|
The purpose of this unit is to understand how create animations for characters and assets using Maya, look into rigging a character and then creating a lip sync video. For task one it is looking into creating different types of animated assets, for task two is creating lip sync and character animations. Pre-production Start date:25/11/17 Completion date:1/12/17 I have given myself a week to look into pre-production such as mind maps and mood boards, looking into animation research and looking into how to rig animate characters. Animated assets Start date:30/11/17 Completion date:4/12/17 I have given myself just under a week to create 8 animated assets. This should be a quick process as all the models are pre-made. Lip sync Start date:5/12/17 Completion date:21/12/17 I have given myself just over 3 weeks to create an lip sync video based of a video from youtube, this will take a large portion of the time frame as it is a big task to copy the actions from the video. Character Rigging Start date:28/12/17 Completion date:3/1/18 I have given myself a day to complete a character rig so that I will be ready to animate. Character Animations Start date:3/12/18 Completion date:12/1/18 I have given myself 10 days to complete 5 character animations. The timeline for this project has taken into account the Christmas holidays and has been fitted around the holidays, making this task schedule tighter. Pre-ProductionIn this blog post I will look into the ideas of the animations I want to create for my character such as movements like walk cycles and then consider animated assets I could use following my unit 75 brief. I will then create a mood board to get visual ideas of how to animate my movements for my characters and assets. After this I will produce digital sketches to highlight bones, NURBS handles and the movement paths. I started of by creating my mind map consider character movement animations and general animations I could use for my character, I then look into different types of animated assets I could use in my game and I quickly looked into the animations I could create for my boss NPC. Below is the mind map I created: 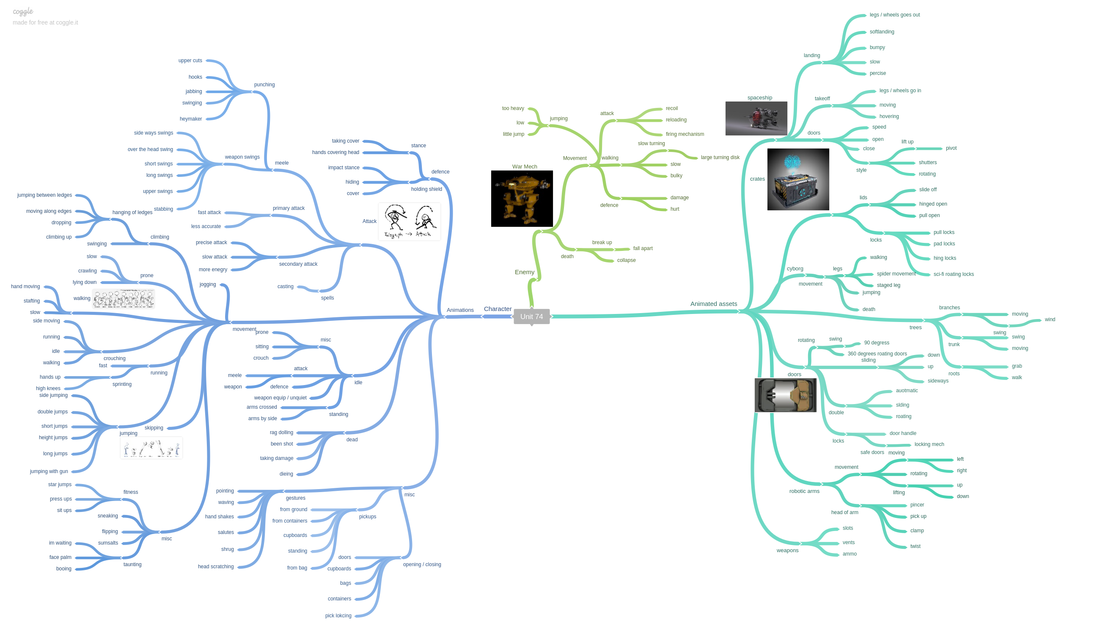
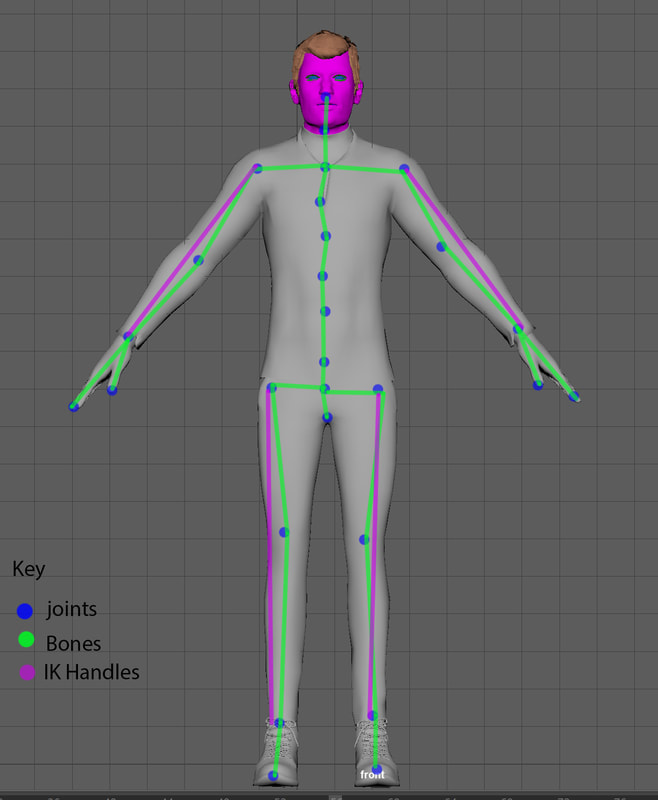
After getting my ideas down onto paper in the mind map I then wanted to get some visual referencing to help me with my animation, I looked into walk cycles, facial expressions, idle and movements, fighting and also looked into some ideas for my animated assets. 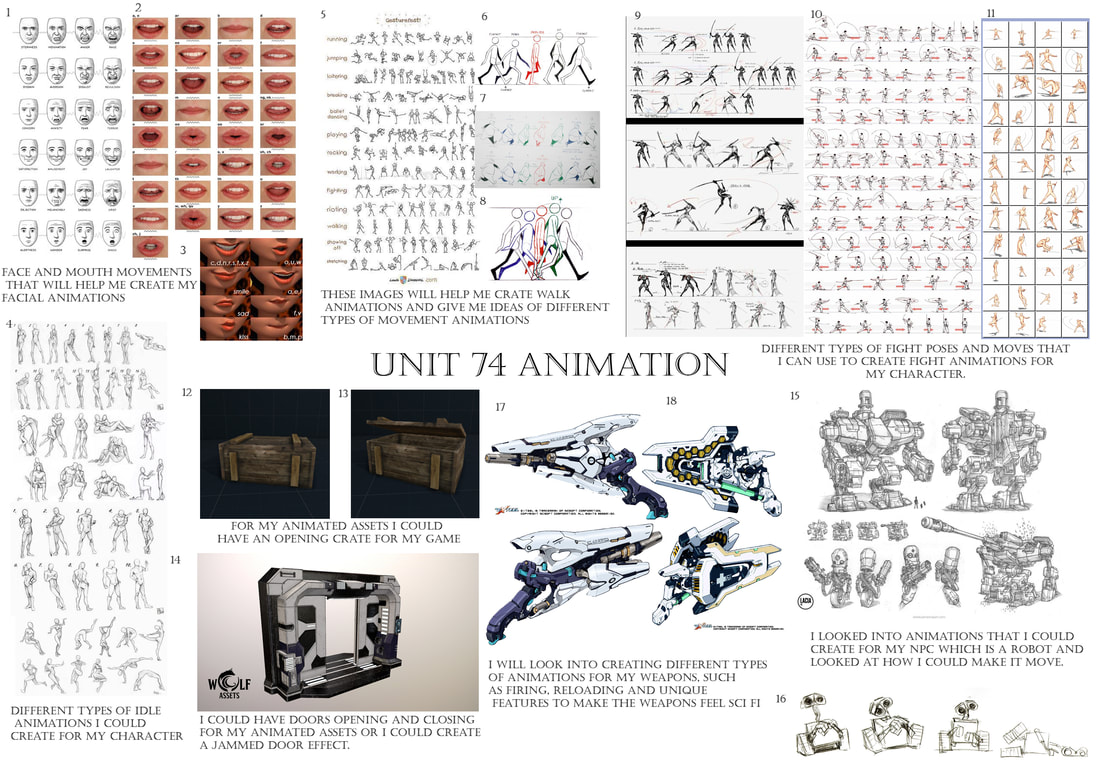 I then drew sketches of the assets that I plan on turning into animated assets, once I got the basic outline of the assets, I then looked into where I would place; joints, bones and how it would move so I could get a visual reprehensive. 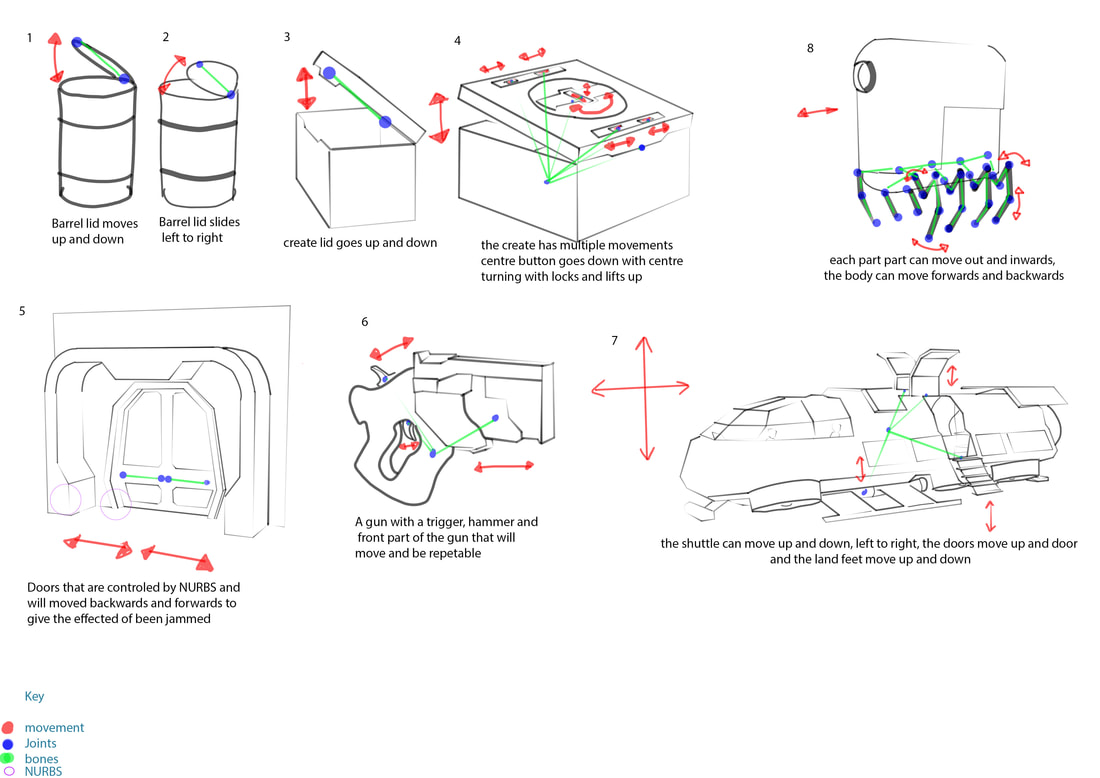 I then repeated the process for my character bone structure.
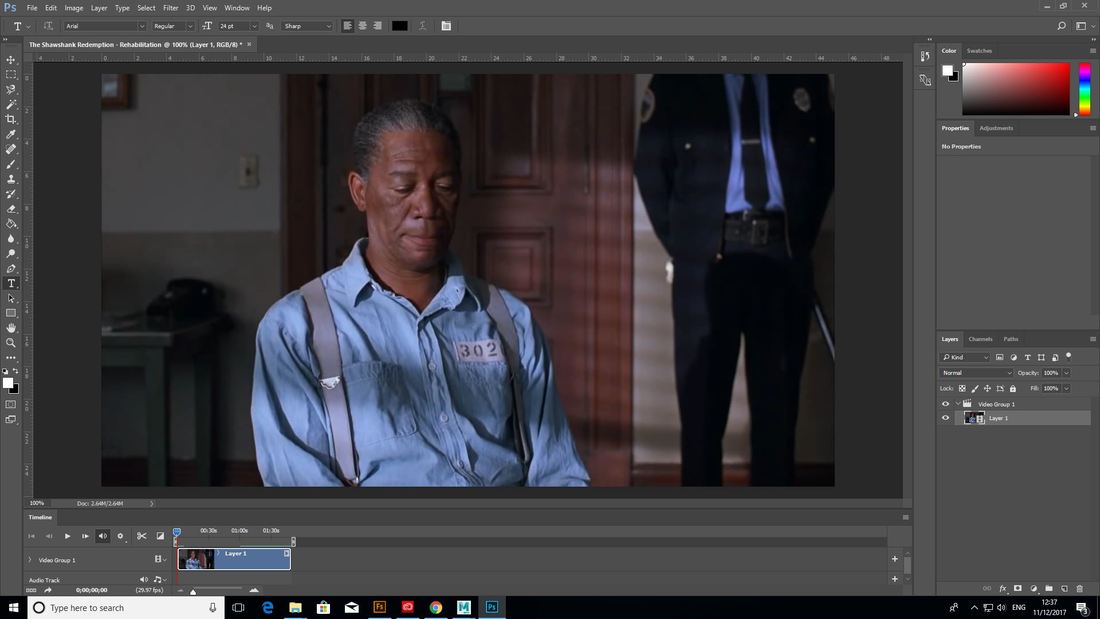
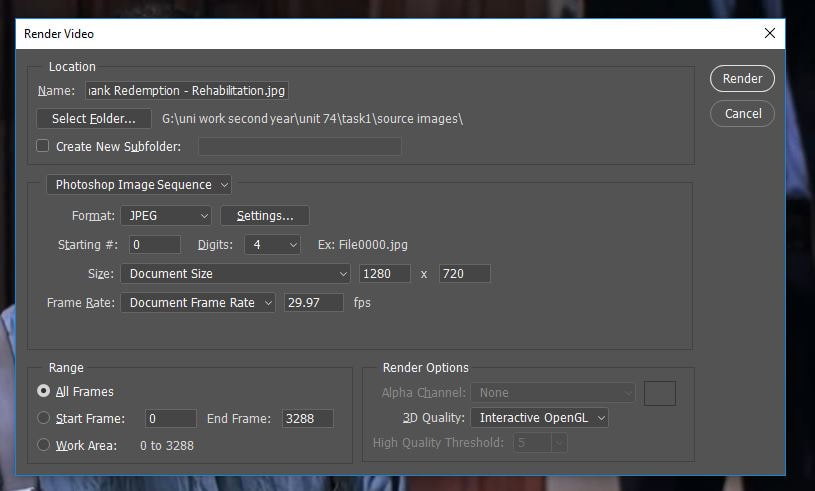
Task 1 - animated assets Another part of task one I had to create animate assests, for this I wanted to start of by learning how to add joints and over each asset I want to make it more complex. For my first asset I wanted to learn how to use the key frames, so I started off by crating a simple box with a lid. I started of by moving the axis point to the edge of the lid. I then press the S key to set the key at frame one I then moved the box lid to the side and downwards and then set the key when I got the lid in the place I wanted. I created a short video of how this animation looks: For the second asset, I decided to use a joint for this asset. I wanted to create a barrel opening and using the same process from asset one to key the movement but by the joint. Below is a video of the asset rotating Then I did the same barrel but with the lid sliding off For the next asset I wanted to add controls to the next asset, for this I wanted to make it easier to select the joints. Below is a video of the asset rotating For my next asset I wanted to have a more complex joint system using a root bone and have multiple joints moving and rotating Below is a video of the asset For the next asset I wanted to create jammed doors, I edit the graph to create a more stagged effect. For the next asset I wanted to combined the graph and multiple joints to create a weapon firing. Below is a video of the asset I then created another smaller weapon so that I had two different types of weapons for For the next asset I wanted to create a long animation that combines moving, multiple joints and graph For the next asset I wanted a more complex joint system, as it a complex skeleton I had to learn to paint the weights of the mesh to stop deformations. Task 1 - lip sync For my lip sync I wanted to create one using a character that I create by keying each of the facial movements by hand inside of Maya and then I want to look into using a camera to capture facial movements that is then transferred onto a 3D character. I started off by creating a character that I can use inside of Maya, I created my character using adobe fuse and then uploaded it to mixamo to get a skeleton and facial blend spaces. I then opened this inside of Maya and used the mixamo facial rig plugin on the character to add NURBS controllers to the face and body so that I can control the animation and set keys. I then went and found a video on YouTube that I wanted to recreate, one of my favourite films is the Shawshank redemption and I decided to do a famous speech of Morgan Freeman at his parole talking about rehabilitation. The clip is around 2 minutes 30 but when broken down the actual time Morgan freeman is talking is just over 60 seconds. I plan on making a scene in Maya and exporting a render of my character talking as Morgan and then edit the two clips inside of an edit software to make a seamless video. I started of by opening my video in photoshop, I only want the main part of Morgan freeman talking now so I cut it down to his bit only this part. I then went to export and selected render video I then chose image sequence in the drop-down box. This breaks the video up into images for each frame. I then exported this, I got over 3000 images from the video which is equal to about 1 minute 30 to 2 minutes depending on playing speed.
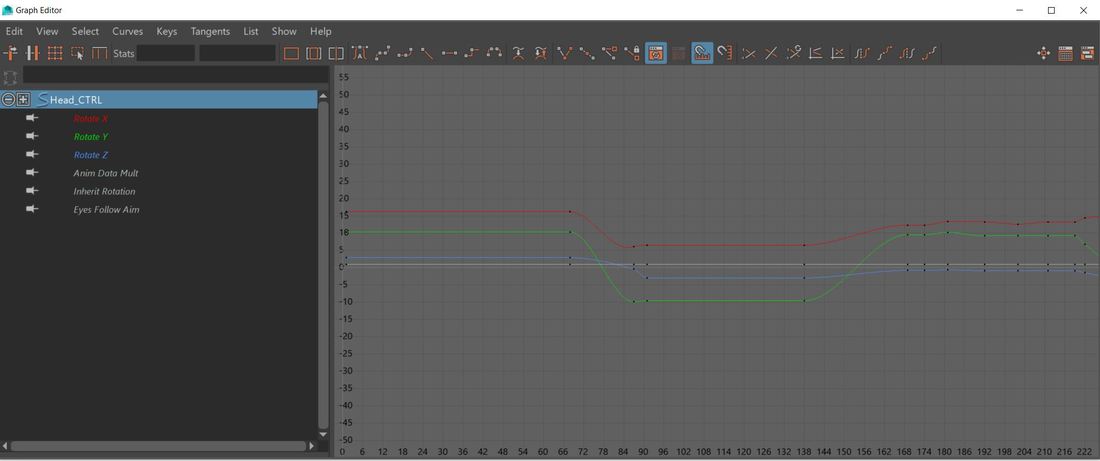
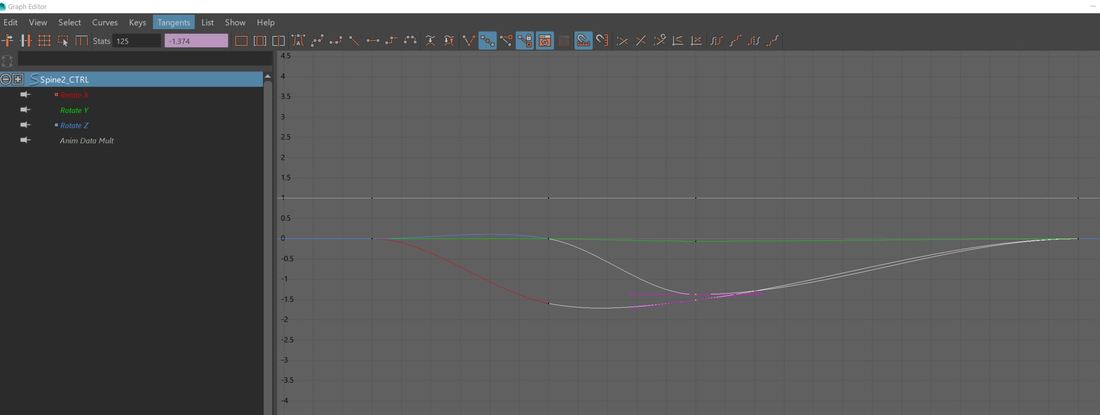
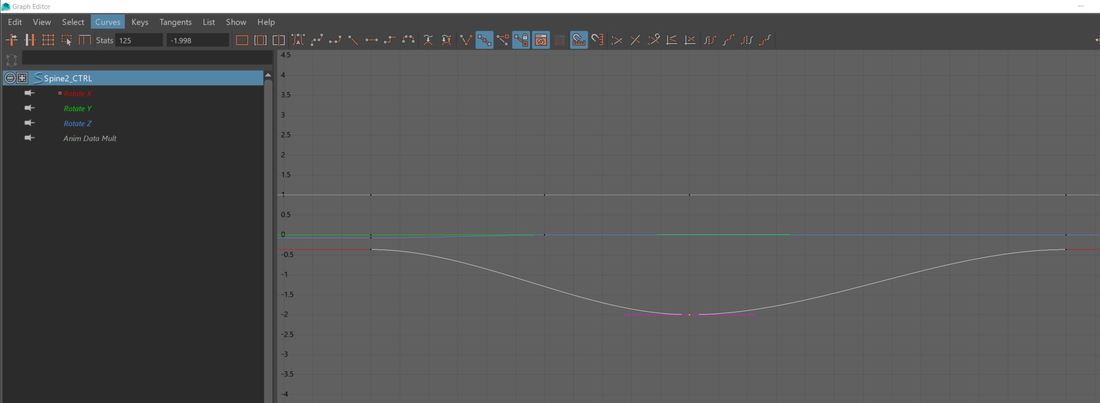
I then went back to my scene in Maya and added a new camera to the scene I then went to the details panel and selected create an image plane for this camera, I then loaded up the first image of the clip. Then I ticked the box that says use as an image sequencer this will player each image at every frame rate. 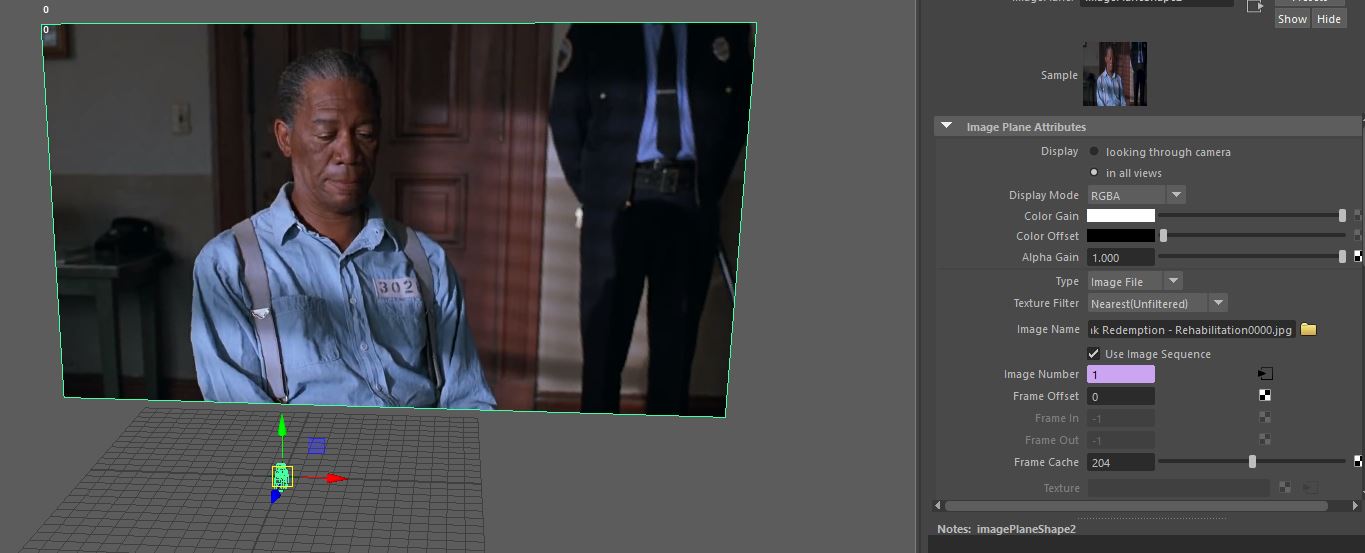 I started to key frames at key moments of movement. I decided to use a stop start type system when I would add a key at the start of the movement and the end of the movement, when it came to complex lip movements this involved a sequence of keys to make this happen. 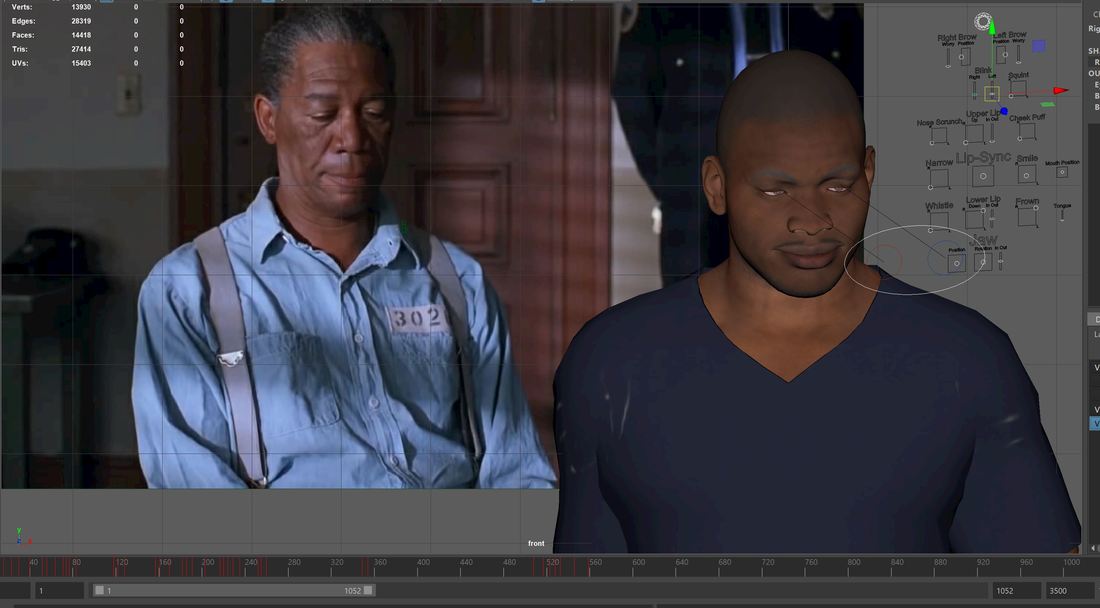 Clean up For the clean-up process I want to go though my recorded keys using the graph editor and change the smoothness of the keys and edit any movement that looks sharp or doesn’t fit the source image as I could of add extra during the keying the frames stage. I started off by going though the animation using the graph I changed the curves of the animation to be smoother and to make them flow better. I also added a tangent of linear to the curves as well.
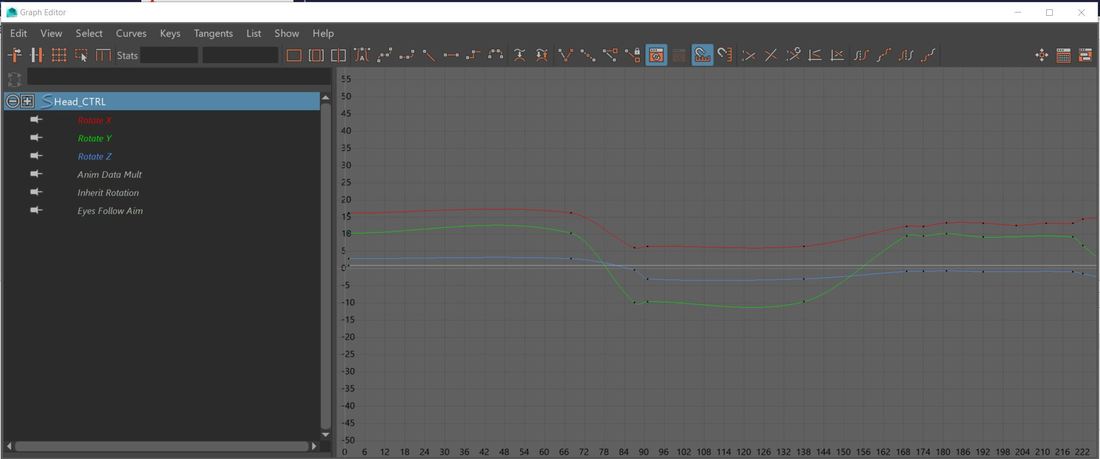
I then went thought the animation deleting and adding keys to parts of the graph editor that I felt need a smoother animation or need some extra keys to add to the animation. To do this I selected on the curve and right clicked to add a key to delete, I selected the key and pressed delete.
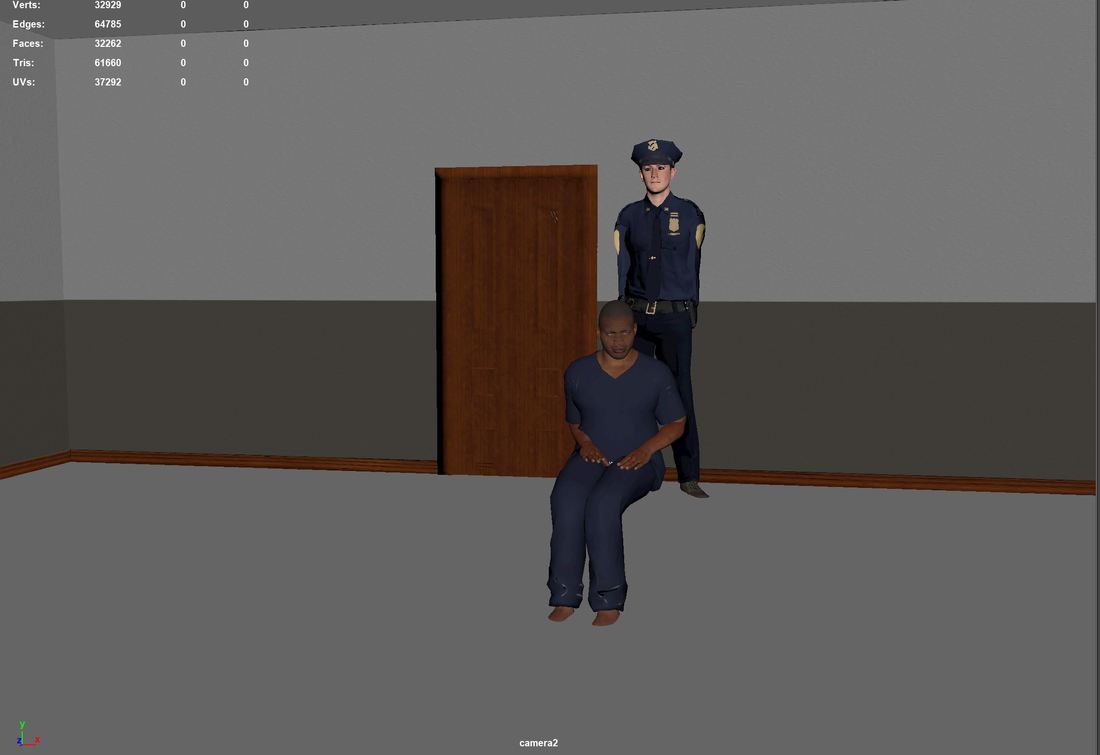
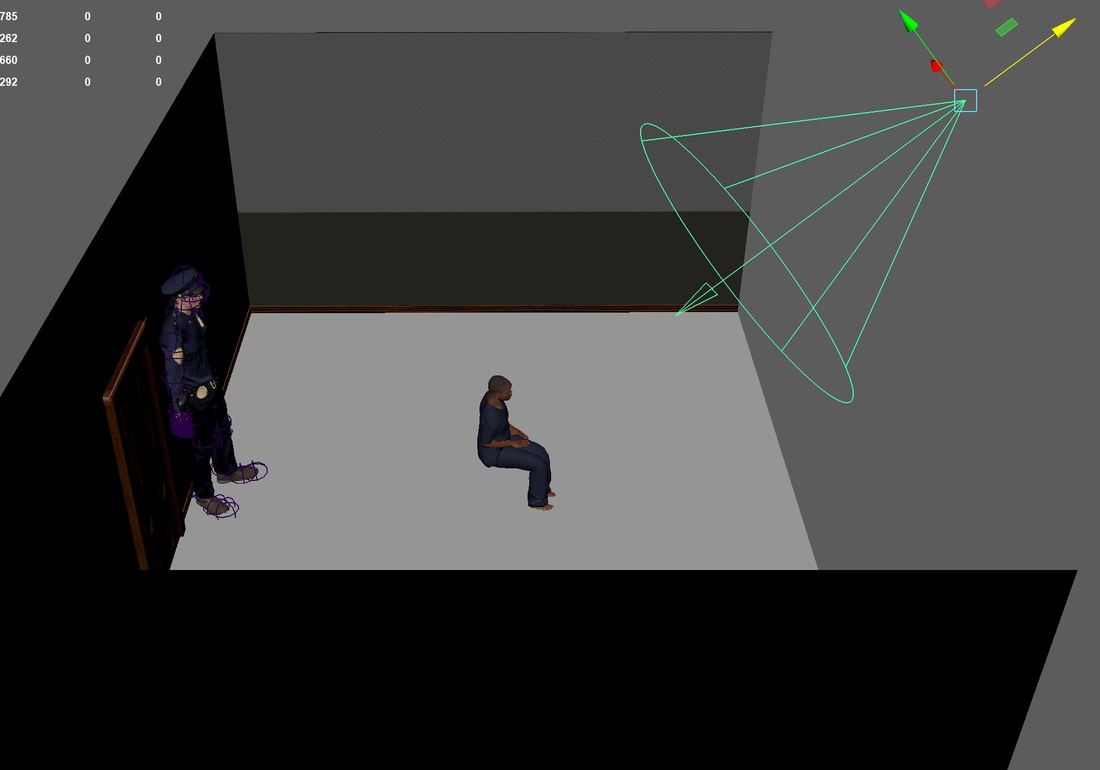
Below is a video of the clean-up Scene and export Before I export my animation, I want to create a basic scene to give the impression of what is seen in the video I created a basic 3 wall room and a door which I then took into substance painter and textured them. I then went into fuse and created a prison guard like in the video. I then added different types of lighting to the scene to get the right balance. I found this extremely hard and did multiple renders before finally finding a lighting system then I was happy with; a directional light to light the scene up and then a point light to light up the character up.
After exporting them I wanted to turn the images into a video, so I went to adobe premier and created a new project. I then went to import to import my images and selected the first one, I then clicked the box that says image sequence. If I don’t do this, it will import each image and add a 5 second duration to it. I then synced the edited video to my lip sync and played it, I adjusted it but there is a slight out of sync towards the end of the clip but only slightly noticeable. I then brought in the original video and edited that, so it displayed the start and endings and placed in parts where Morgan Freeman isn’t talking. I then created a picture in picture to see the original vs my lip sync. task 2 - character rigs In this task I want to create a skeleton for my character and non-playable character so that I can animate my own animations onto the skeleton and use these custom animations in my game. I started off by creating a basic skeleton for my character 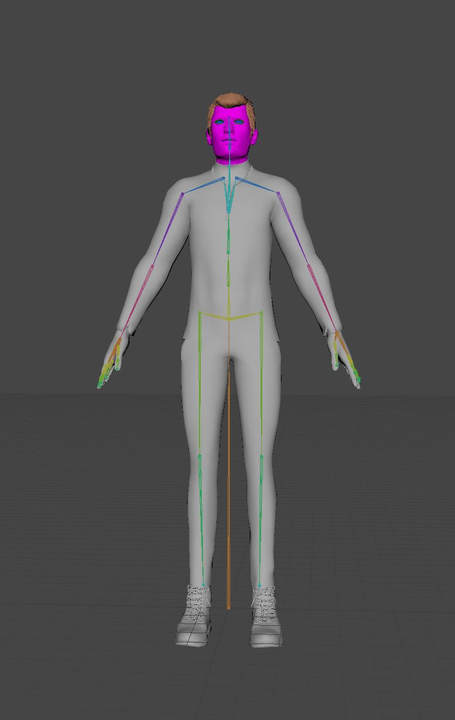 I then painted the weights to stop any deformations 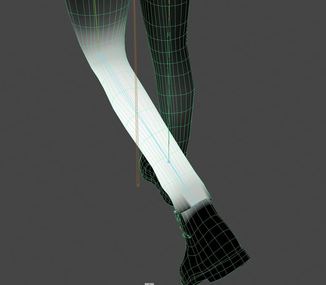
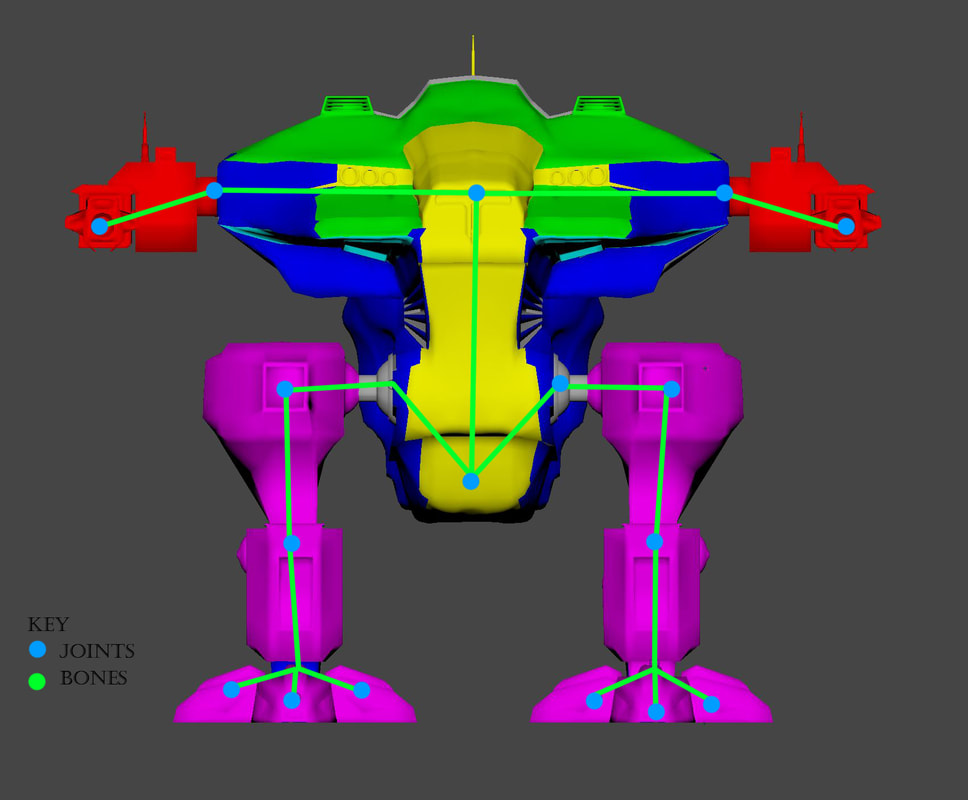
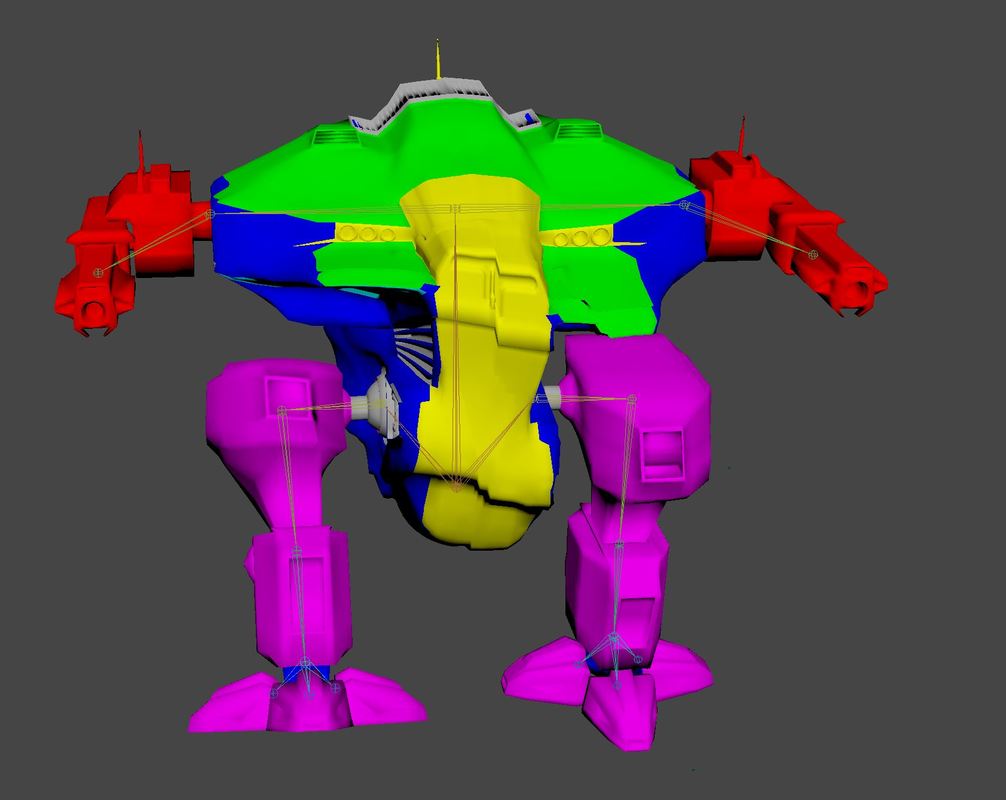
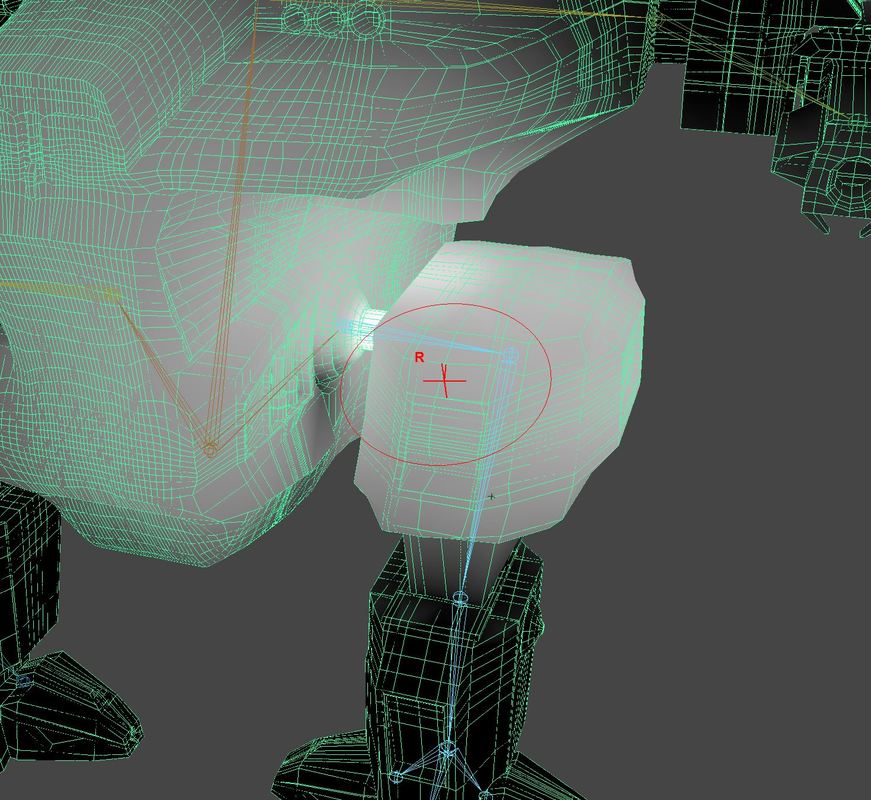
I then used unreals animation tool set to set up an NURBS control system. 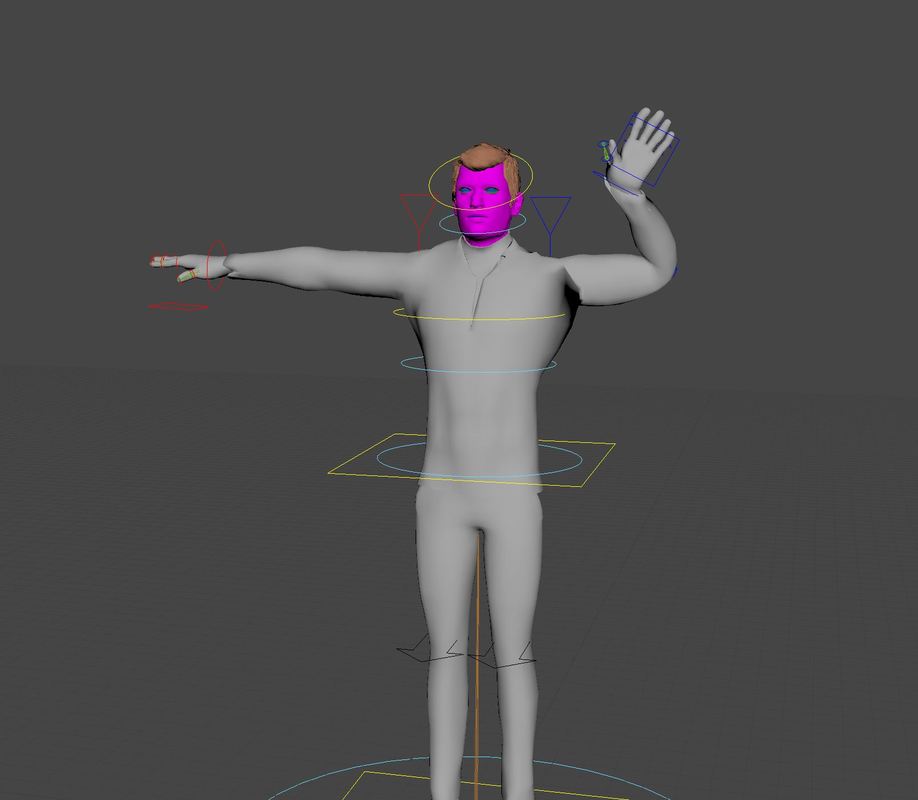 Rigging the NPC For my non-playable character which will be a mini boss in my game I have decided to rig that character myself without using any auto rigging tools, mainly for the reach as it is not like a normal biped and is quite unique. I started off by placing joints at those locations and renamed them according. I then parented those joints to the root bone and make sure the arms and legs followed the correct parent / child chain. 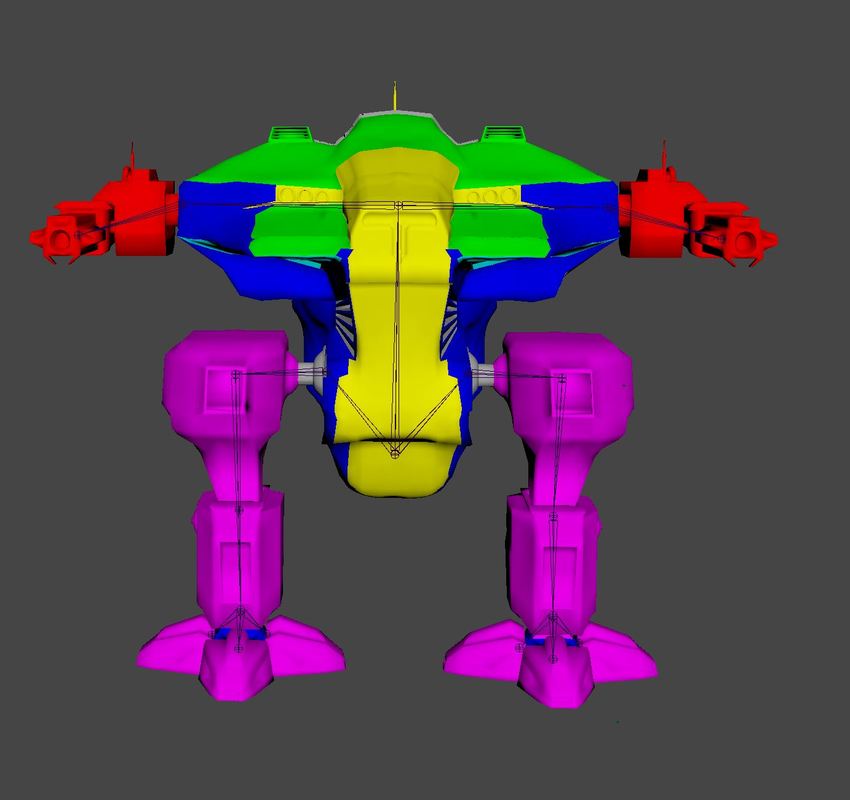 Issue I then tested all my joints and I had a massive problem with the deformation of eacj joint pulling the mesh from all areas. I decided to look at the painted weights and noticed that the joints were pulling the mesh from all over. I fixed this by tidying up the painted weights by removing the white areas that I did not need by painting them black.
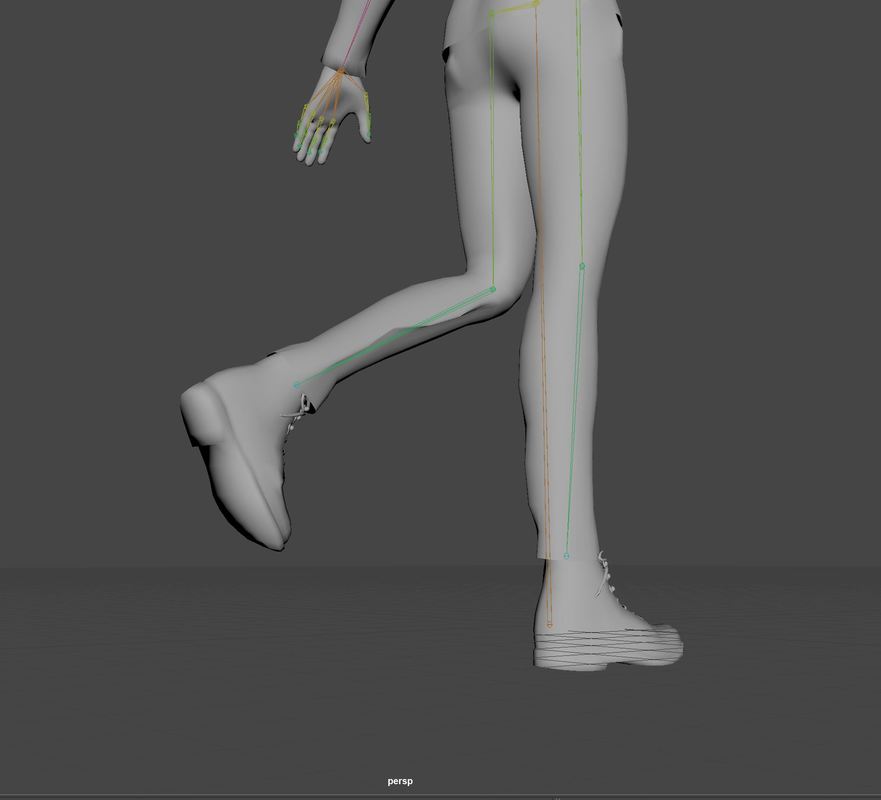
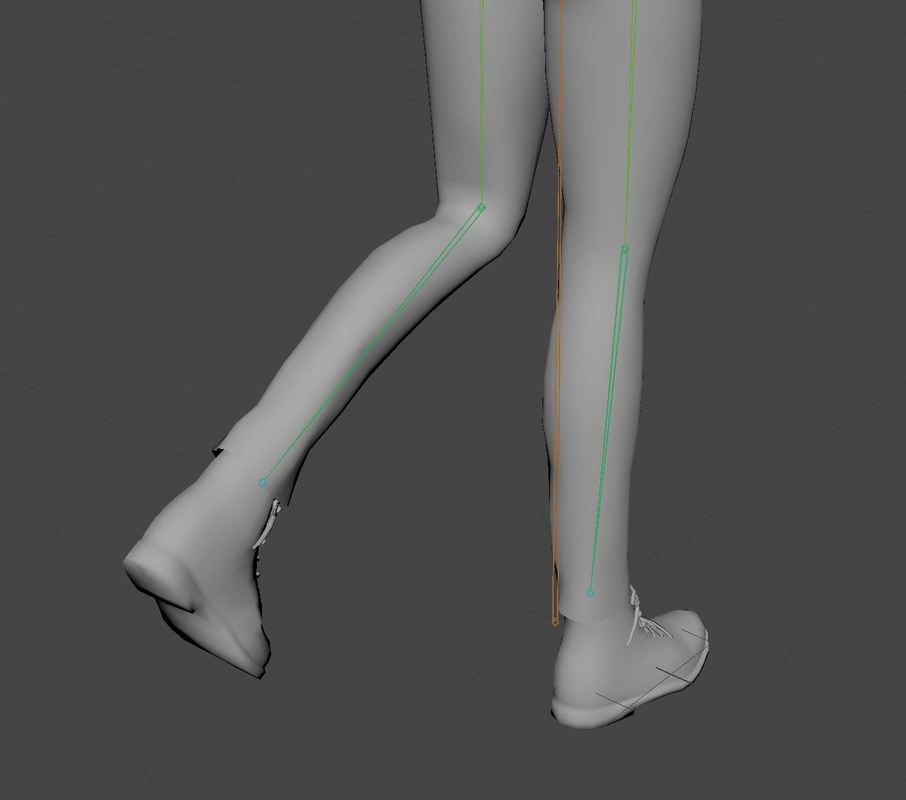
After fixing the painted weights I then need to create some controls for each of the joints, I did this by using the NURBS and placed them at each joint and named the controls for each joint. I then needed to connect these controls to the joints, I started of by selecting the root control and parented it to the root bone. For all the others I selected the controls and then the joints and used a parent constraint for each of these. 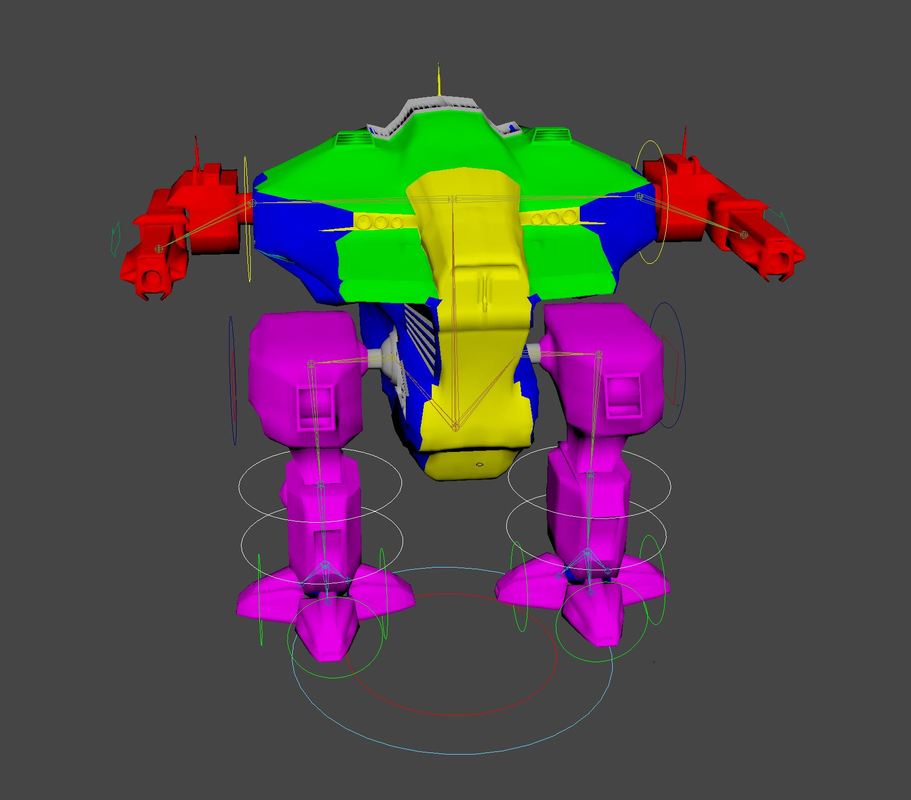 Animating the character After trying to use motion capture and unable to sync the two together I have decided that I am going to key my animations for my character. I am going to create animations that will be for my game only and will be unique to this game. To create this, I will use props I have created for my game to give me the idea of world space to help me create these animations: I am going to create the following animations:
I started off by importing my rigged character into an new project and then I imported the doors and button to the project, I then lined everything up as it would be in game and positioned the player to roughly the same location it needs to active the button 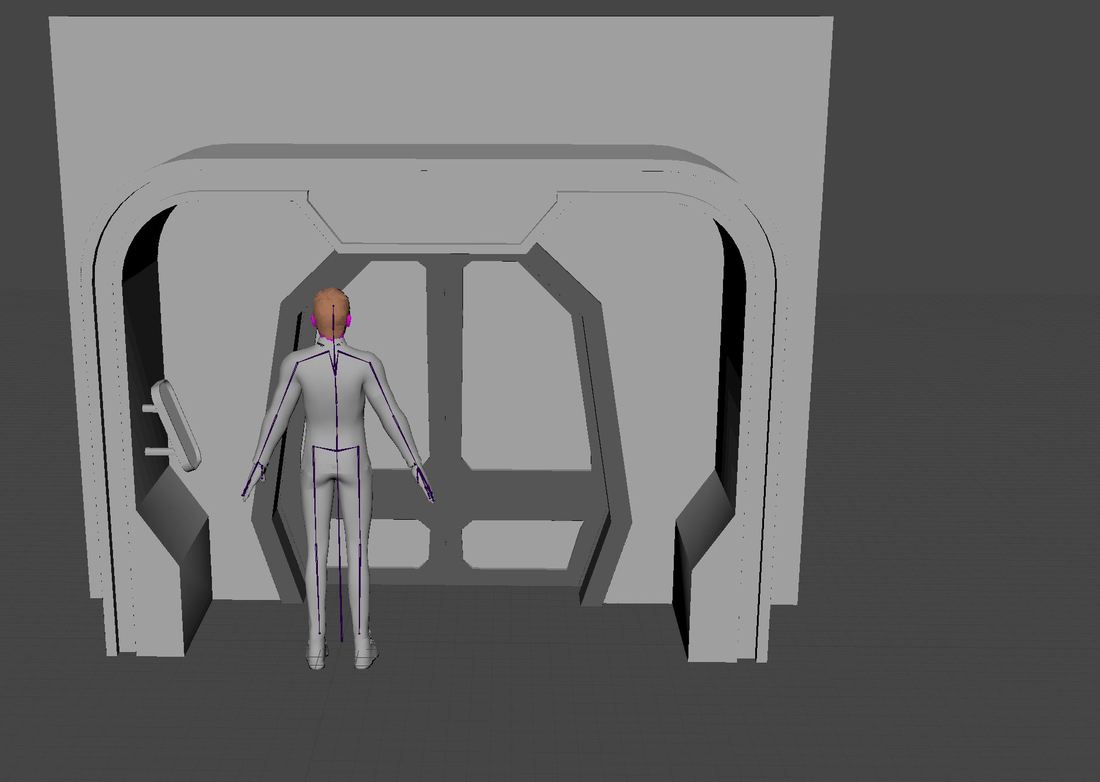 I then keyed the character to move its arm to press the button, adding bend and a twist and lifting the palm up to tap the button I then twisted the spine and other arm to move with the head to give the impression the character is looking at the button and pressing it. 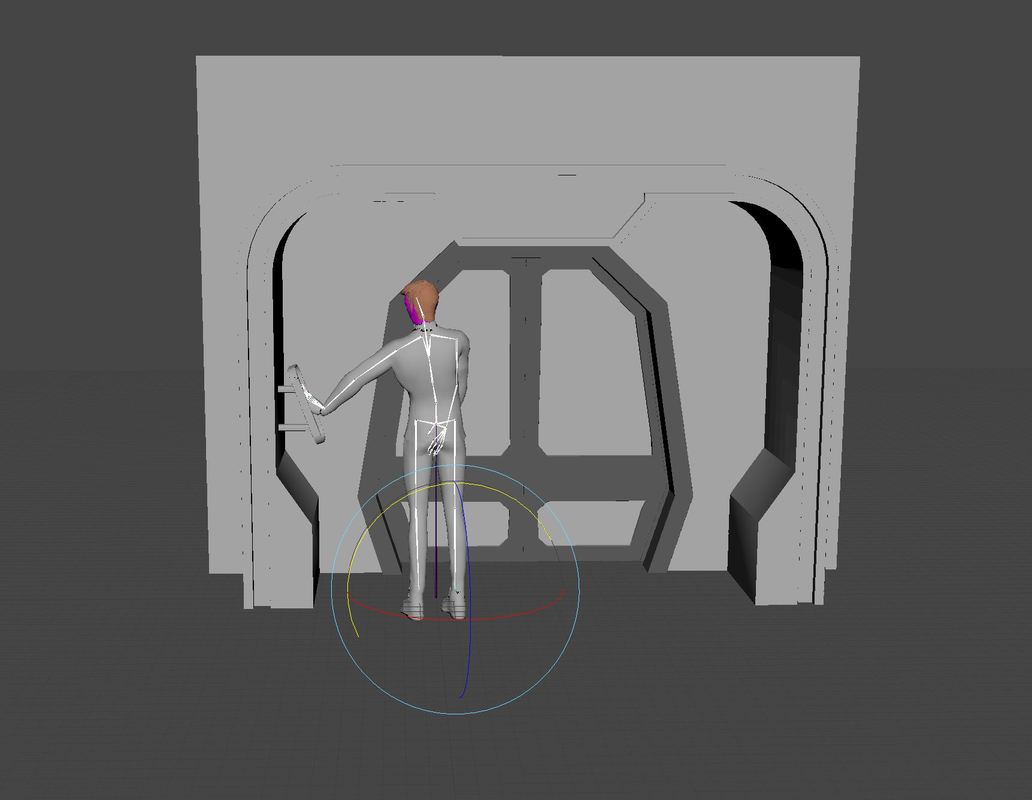 For the single door animation I imported all the files that create the door and positioned the button to the same height in the game and positioned the character when it would be active in game. I then created the animation bring that character arm up and turning the body, arm and head towards the button to look like it is looking towards it. Salute For my next animation I decided to do a salute as the game follows a type of military rank system, I thought it would be good to have a salute for the captain and other high-ranking officers. I broke the animation down into two parts I wanted to create a similar army salute so started off doing the formative stance with the character, I brought the legs closer and the arms straight against the body with the back straight, I then added the salute where I brought up the right arm to the forehead and then back down. Alien salute For my fifth animation I wanted to do some unique but staying to the military salutes but think on the lines of what about alien cultures how would they salute. I decided to create a mash up of 3 salutes, I wanted to incorporate Leonard Nimoy famous Vulcan salute and a royal salute by kneeling onto one knee. I then wanted to add a finishing touch to the salute by adding a type of war beat to the chest but more of a loving one than intimidating salute, I did this by gently patting the palm of the hand on the check back and forward. Evaluation
This is the first time I have ever tried to animate any of models and I have learned an incredible amount from it for this part of the character pipeline. It has shown me how to use bones, create animations using Maya, create a lip sync following a video and how to import my animations into my game. Learning animation has shown me how complex and it is and how difficult it can be at times but is extremely rewarding with the final product. the animated assests was enjoyable as it showed me how to create animations for my assets using bones and without, how to use the graph editor and outliner, it was a good learning curve and I felt I progressed and improved on each animation I did trying something new. I am quite proud with how some of the assets have turn out such as the jamming doors and the create that has multiple animations. What didn’t go to well for this task was trying to get some of the assets to skin correctly to the assets and I had deforming on some assets this was down to the lack of knowledge of painting weights and how I can stop this using this tool. I also had a few problems trying to export the models to unreal and found that using controls cause all sorts of errors and set my project timeline back a day or so trying to figure out this problem. The final version of the lip sync was worth all the hard work that came with creating the lip sync, I am extremely pleased with how the lip sync turned out and I feel I got most of the facial expression matching to the video as well as getting the mouth moving in time with the audio even thou in some places it does look out of sync. I felt some parts of the lip sync could have been improved like before starting adding ribs to the character to add breathing as the video had big inhale/exhales and feel this ruins the effect of the lip sync a little, also issues with the lighting could be improved as I found it hard to get the correct lighting when rendering out. for my character using software and technology, with this task I also decided to create my own rig for my characters as I had a unique biped in the form of a war machine which would need unique bone structure. Creating the rig went was a huge learning curve as it wasn’t expected but I wanted to learn this, I followed online videos of how to do this as well as using industry standard pipeline tools to help me rig and add controls to on my characters. When it came to animating these character I found it straight forward after my practice with the assets I found animating a lot easier as I had already practiced on this before. I am pleased with how these animations turned out especially the war machine animations, I feel this make the machine look more real. What didn’t go to tell was the technology I wanted to use when I tried to use motion capture I could not get the technology to work, I had a lot of huddlers setting up and running the software and once I got my animations recorded I came across more problems trying to get the animation onto the character and encountered a number of more problems. This left me with an option to create my own character animation which I felt look a bit robotic and need more work in making them more smooth and fluid. Conclusion Overall, I feel like I have a love, hate relationship with animation, I found certain parts extremely difficult but the end results are amazing when they turn out correct. I feel like my knowledge has increased over the unit and I feel like I understand more about the animation pipeline. It was a challenging unit but extremely rewarding, I don’t think character animations is something that I want to progress not but understanding how the pipeline works is great. Creating animated assets is something I am going to keep working on as I feel like I can use a lot of this in the future on other projects. This unit has also shown me areas where I need to improve on such as my researching techniques to find more information to understand tools before trying to use them as something I felt that I didn’t look into this enough and struggled to grasp the tool. Future development In this blog post I will look into how I can use animation in the future for my projects and how I look into how I could include this into my development. I plan on creating more animations for my characters for unit 52 this is a unit about character implementation and will be look into blend spaces which uses the combination of animations and blends them together. With this I could look into creating more movements for my characters, such as jumping, side turning and walking sideways I can also look into adding the animation for weapons and how the character could move with these weapons. Also creating assets for this current project and future projects is going to help massively and it is something I am going to counting to develop as I feel it adds so much more dynamics to any game and will help with any development.
0 Comments
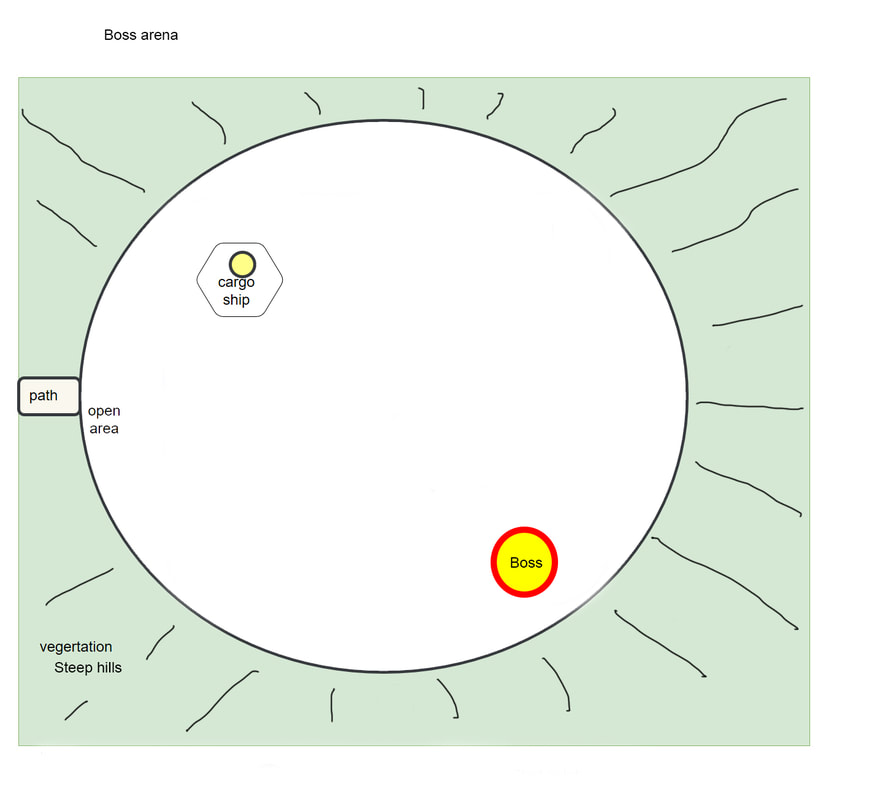
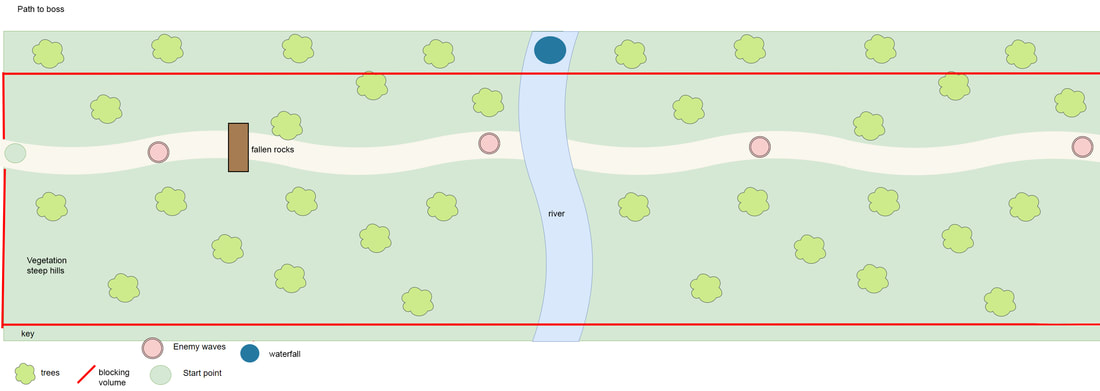
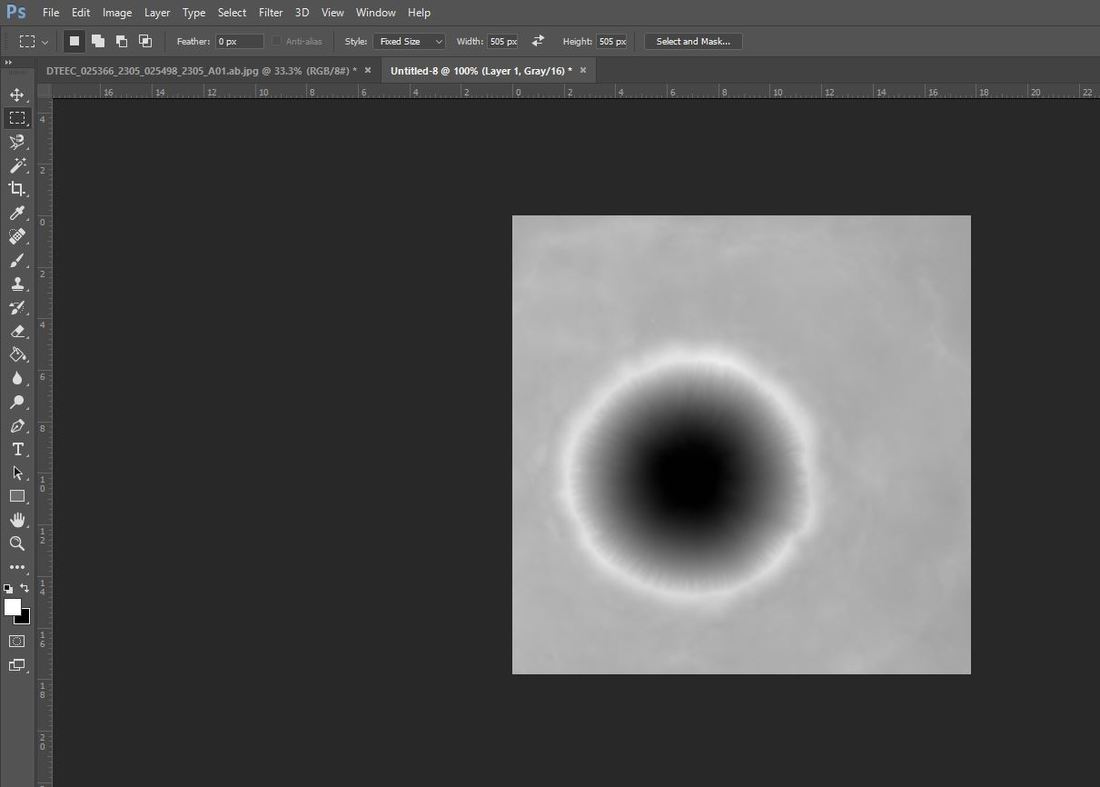
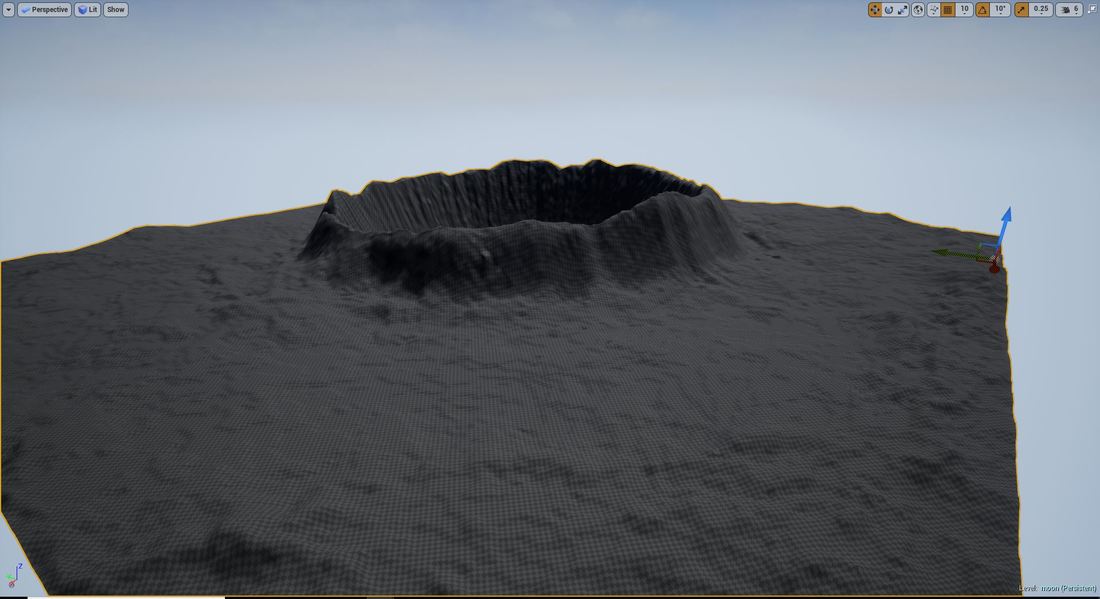
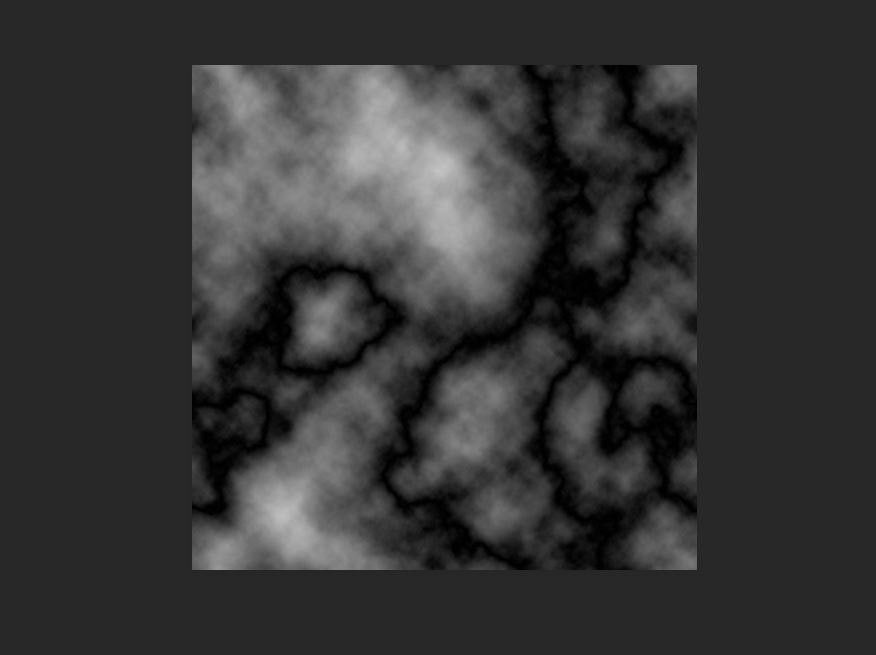
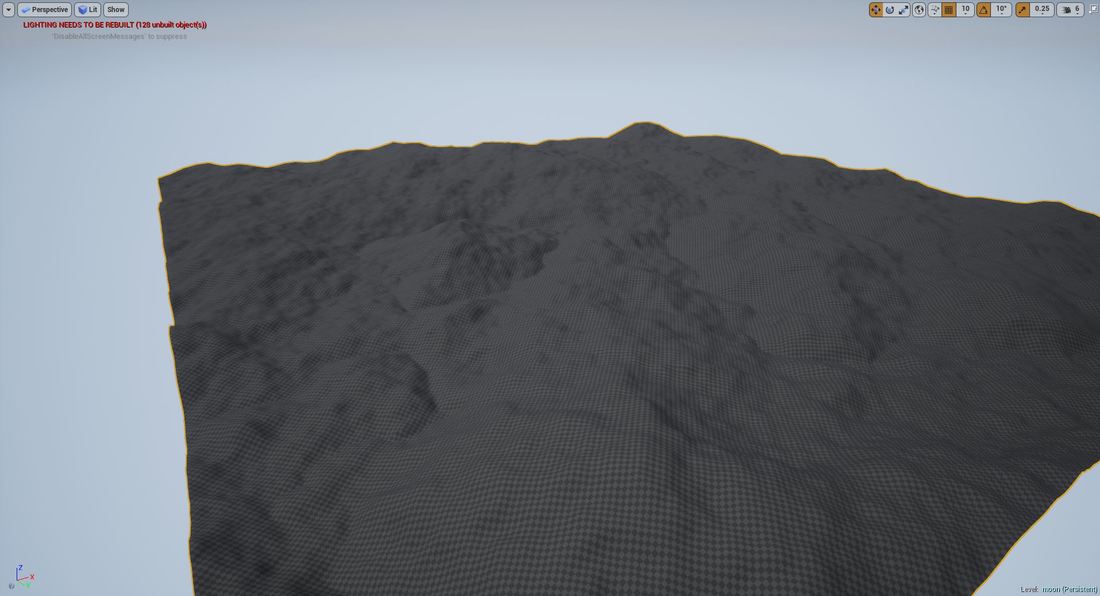
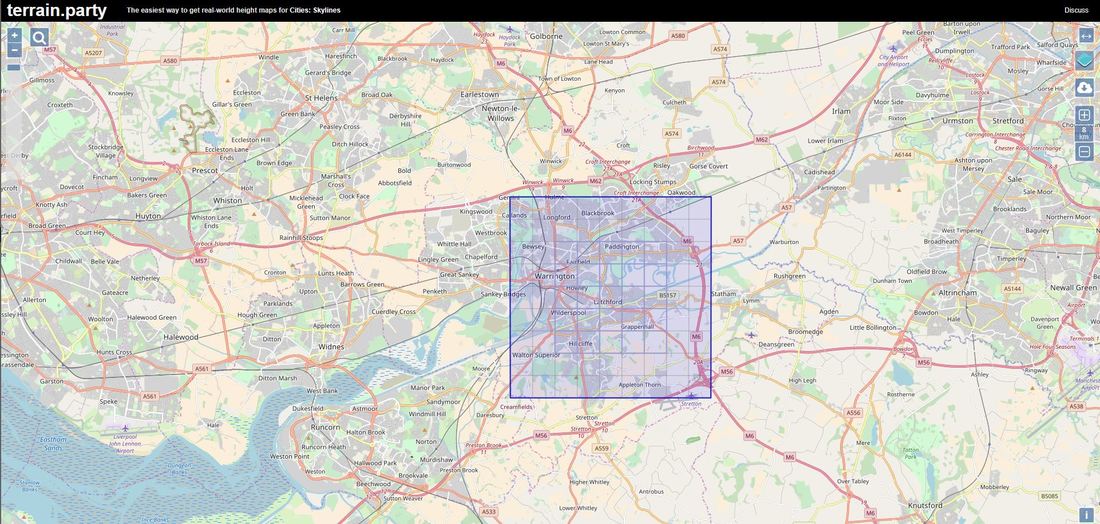
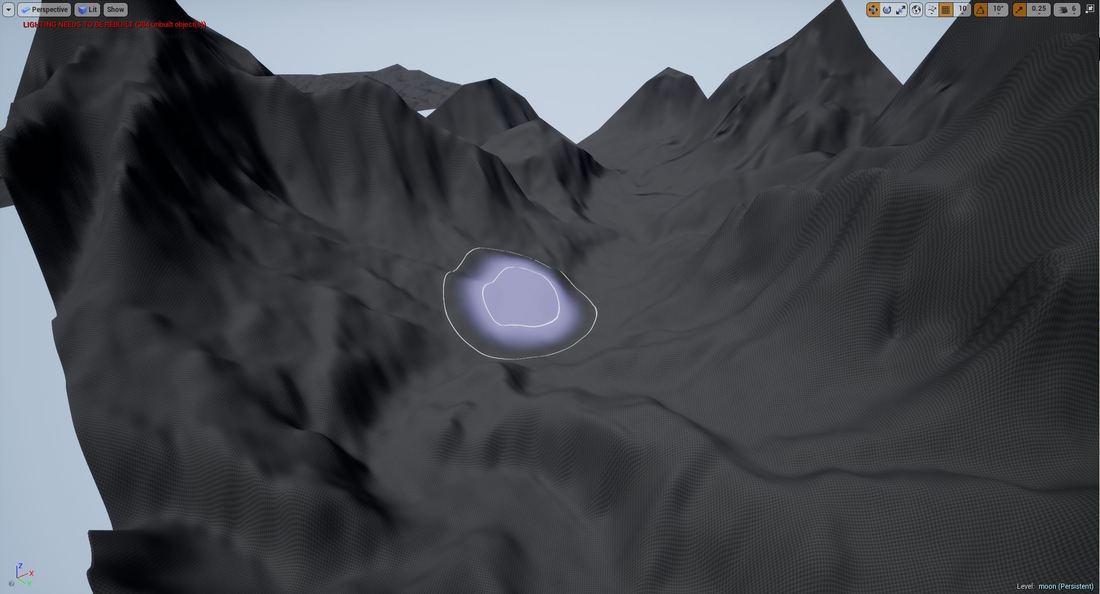
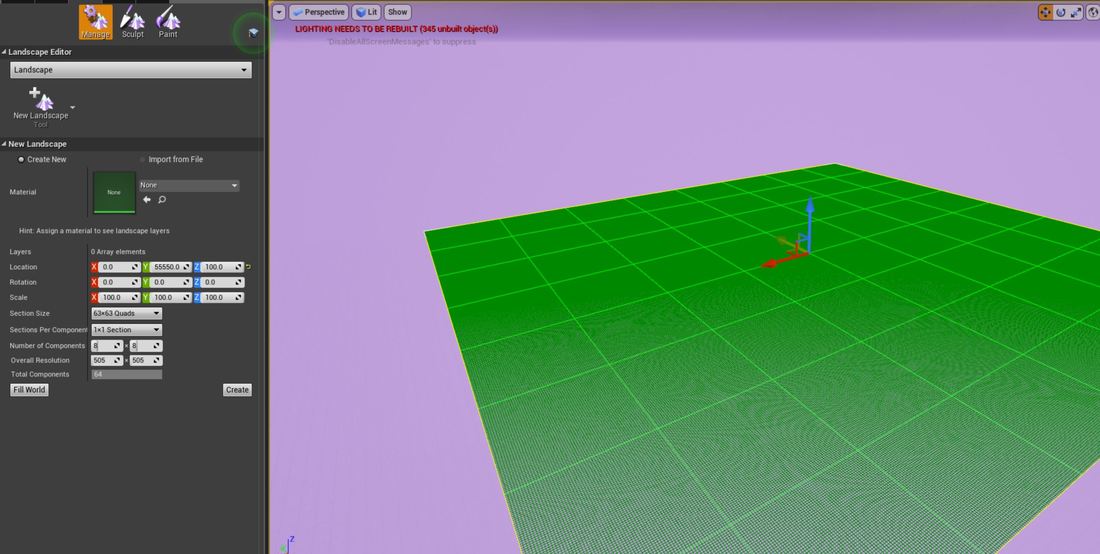
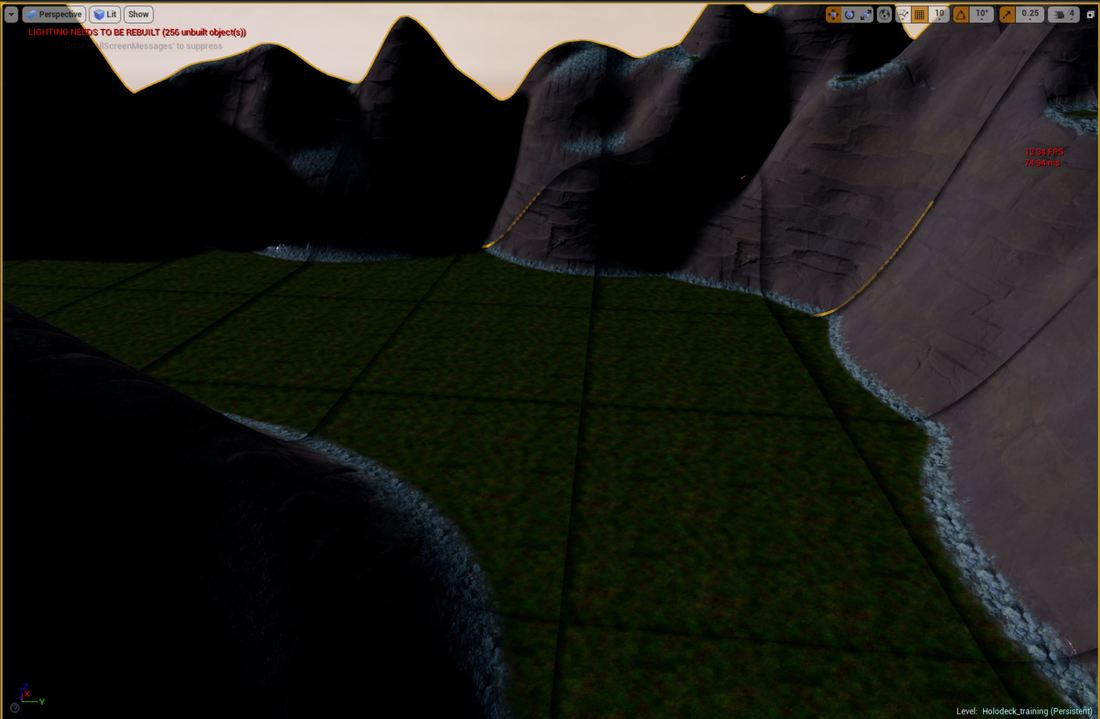
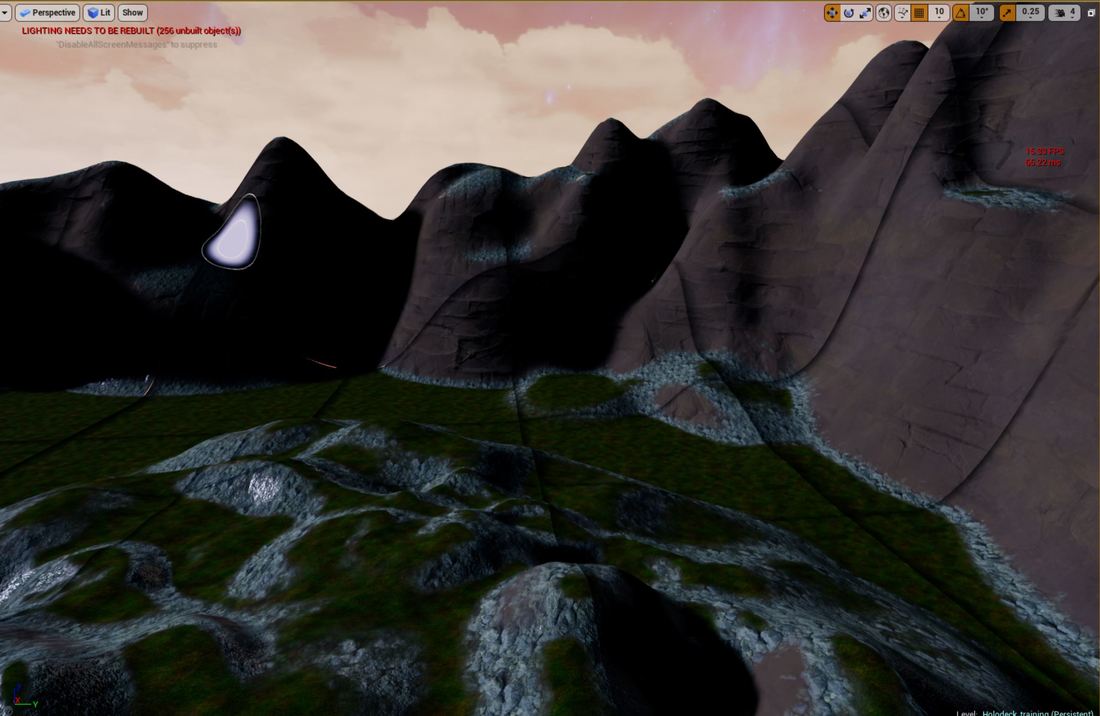
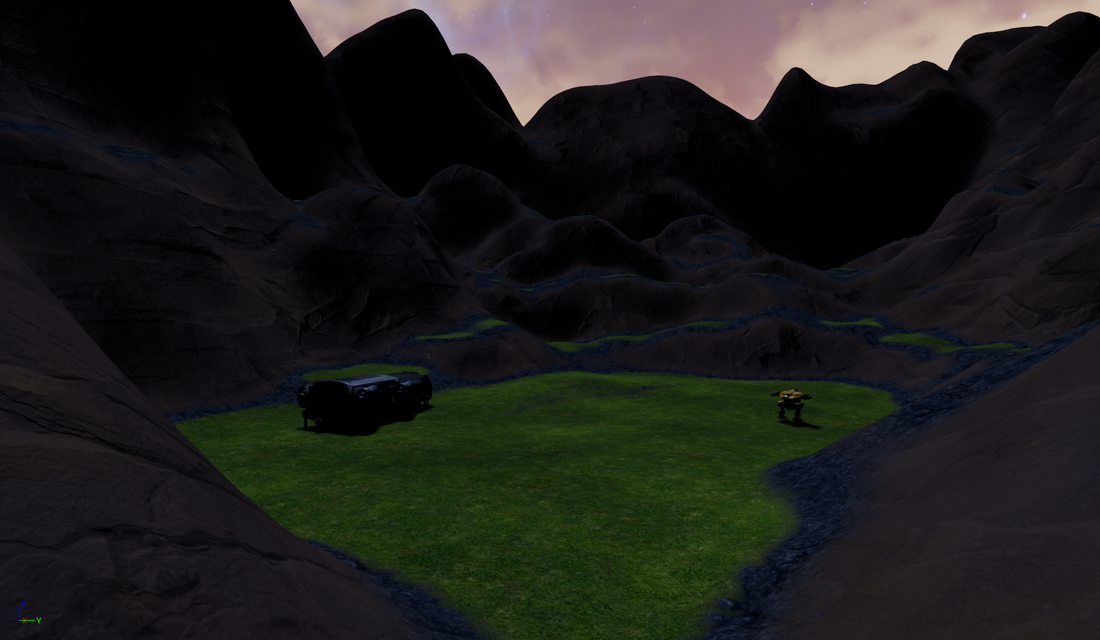
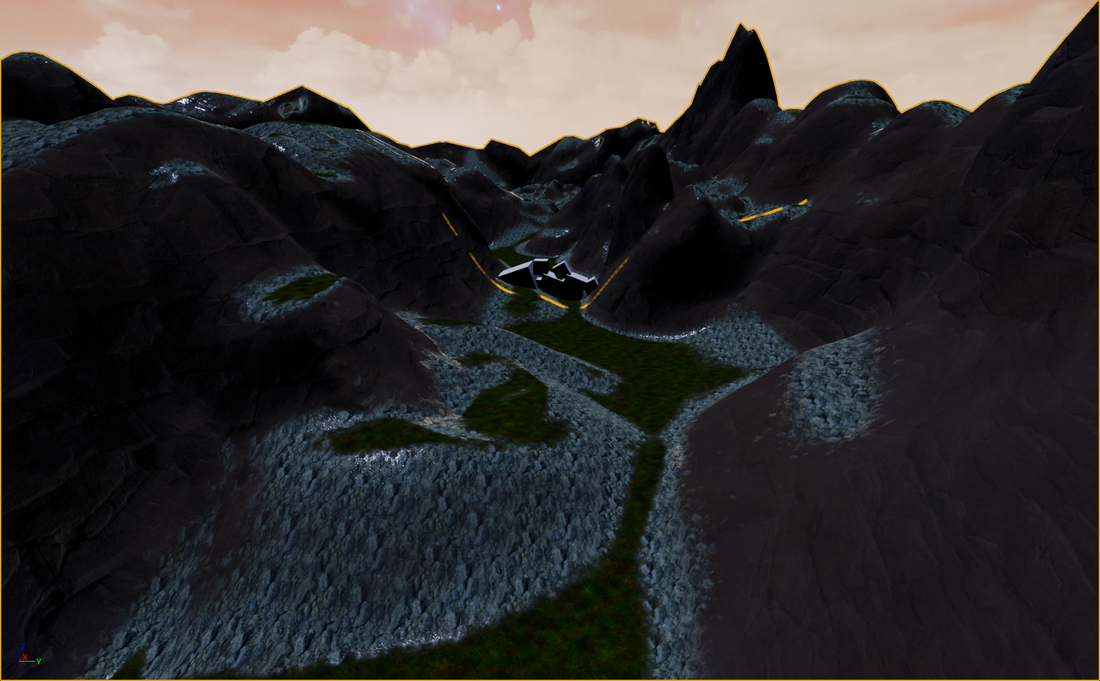
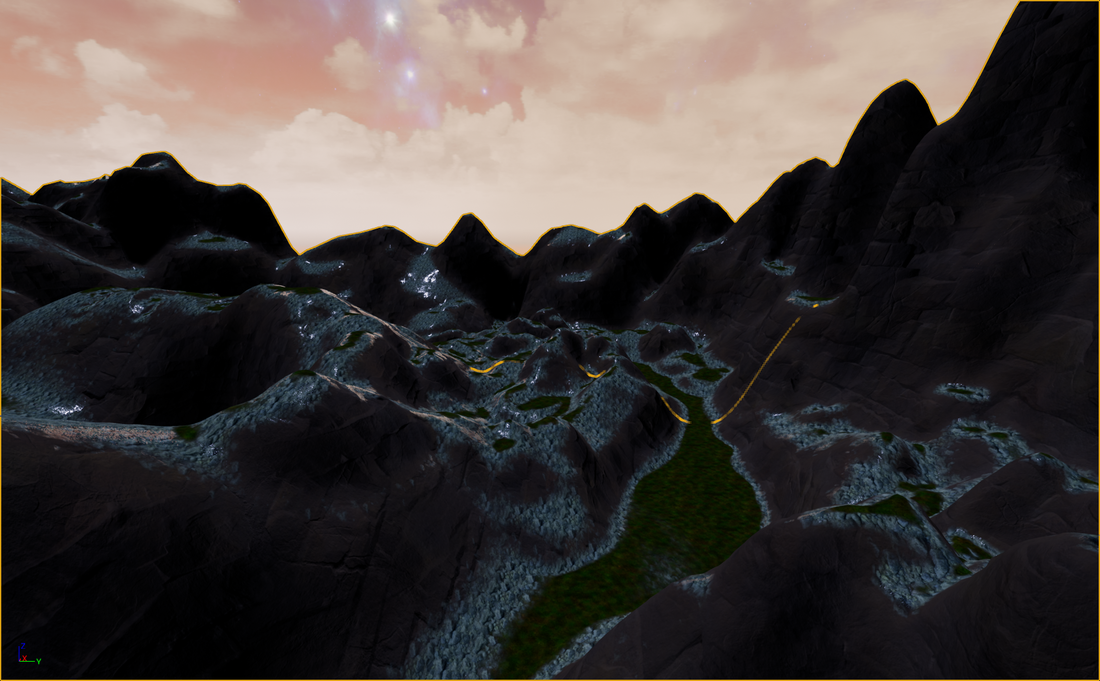
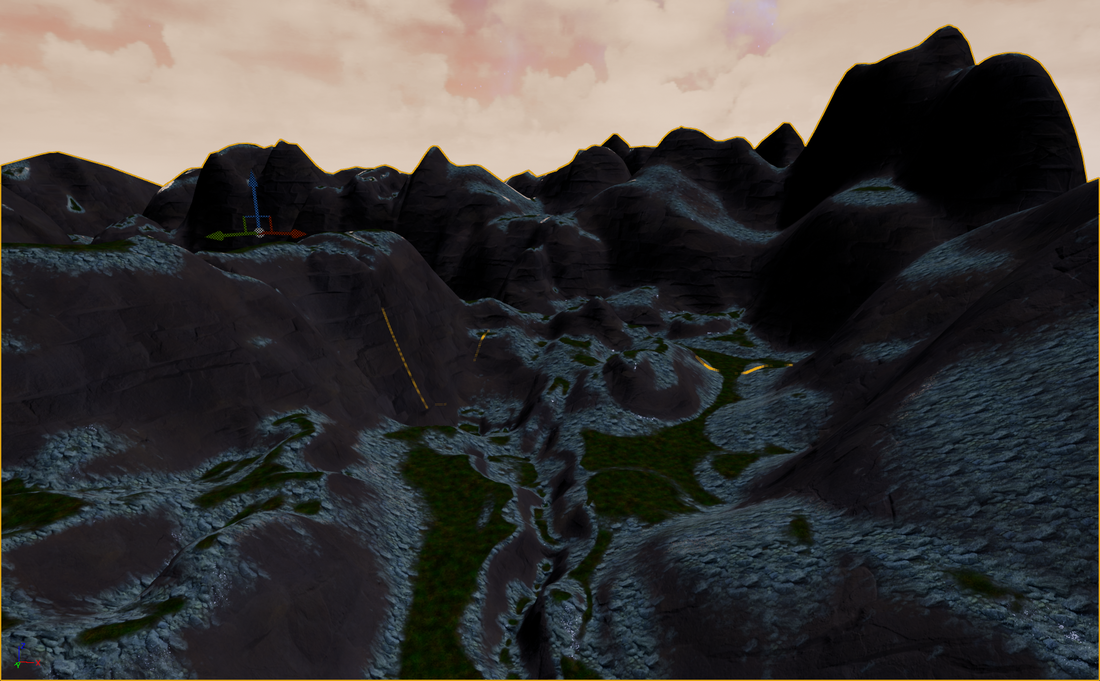
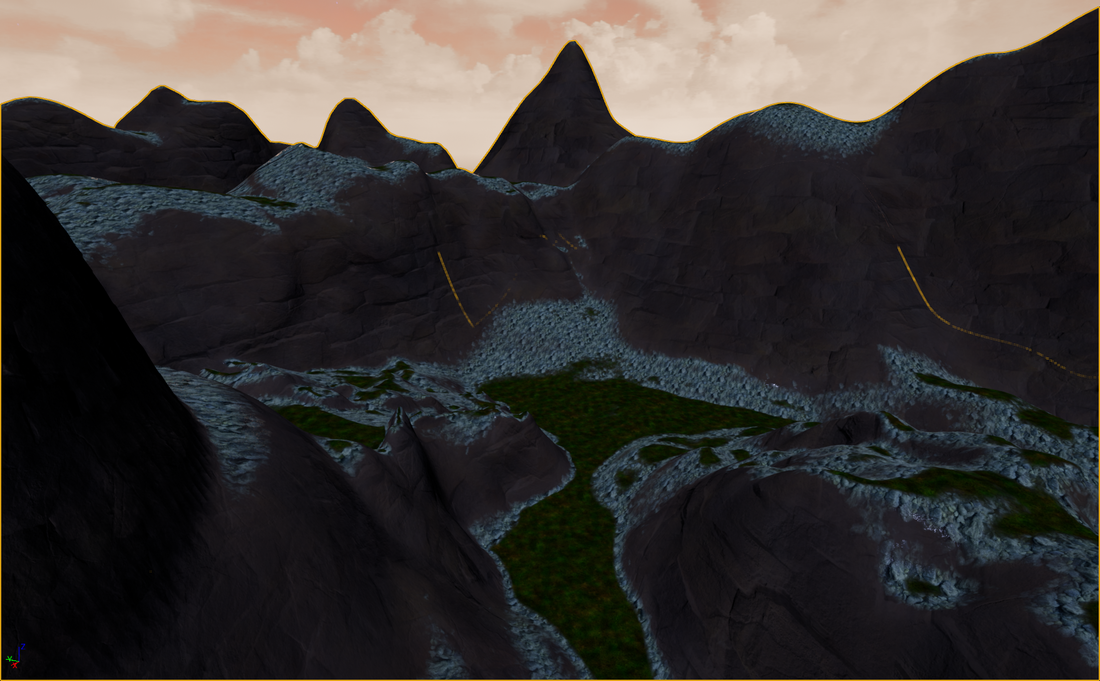
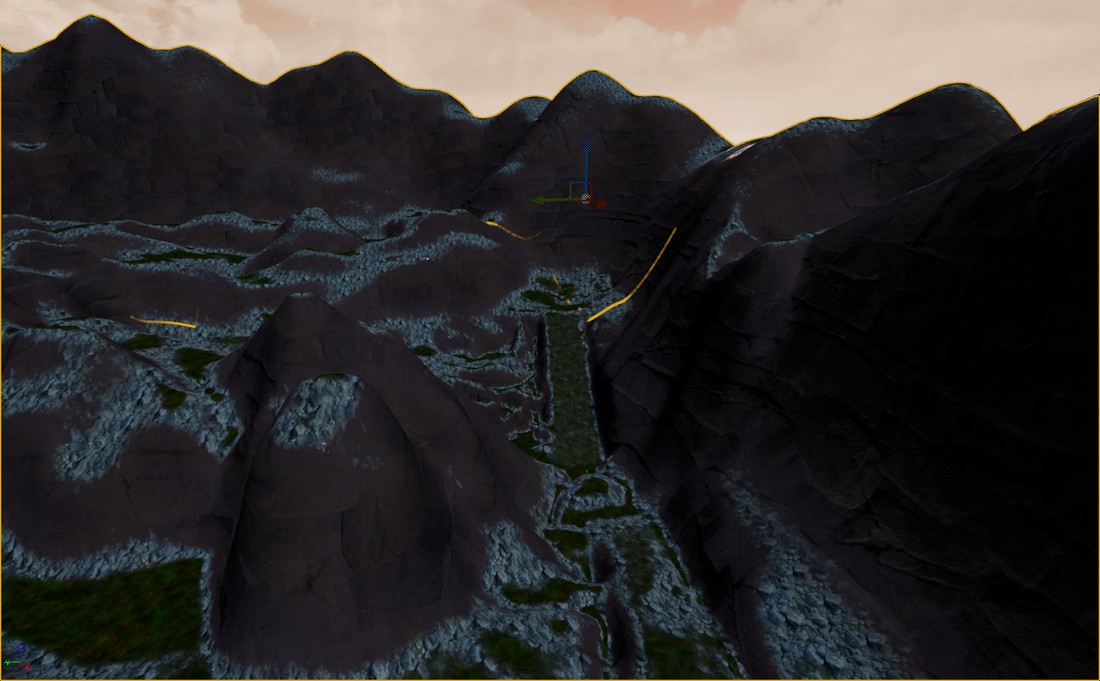
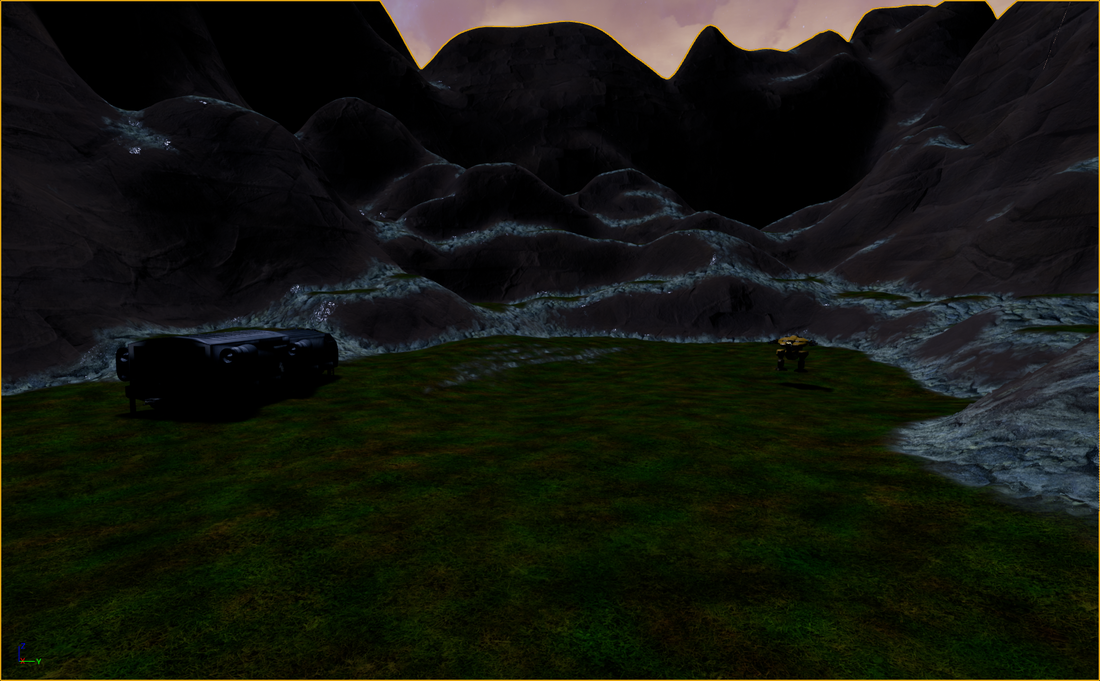
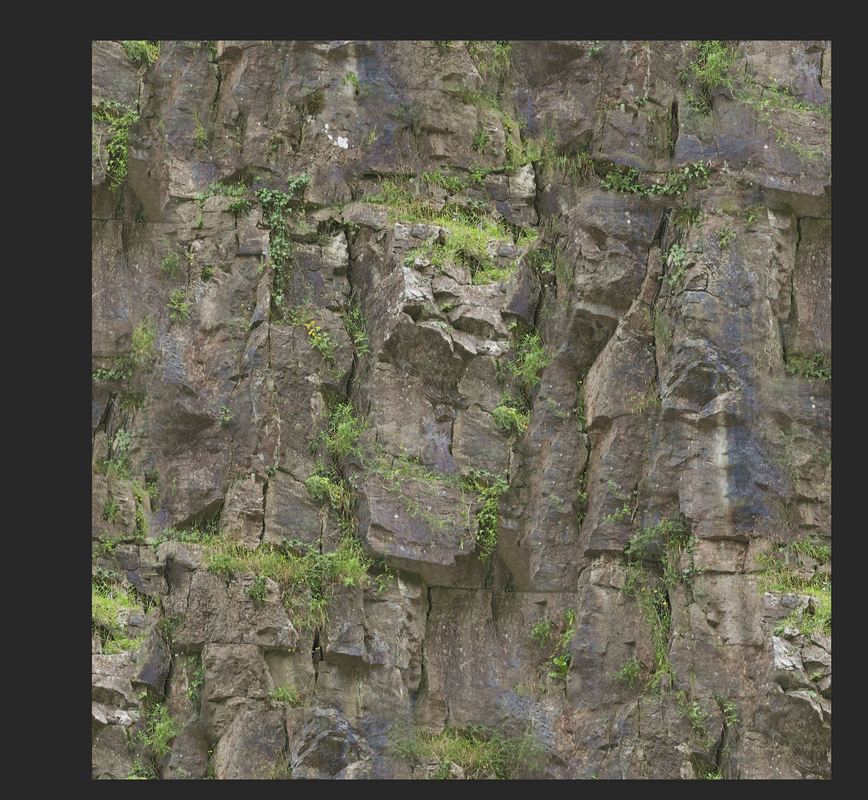
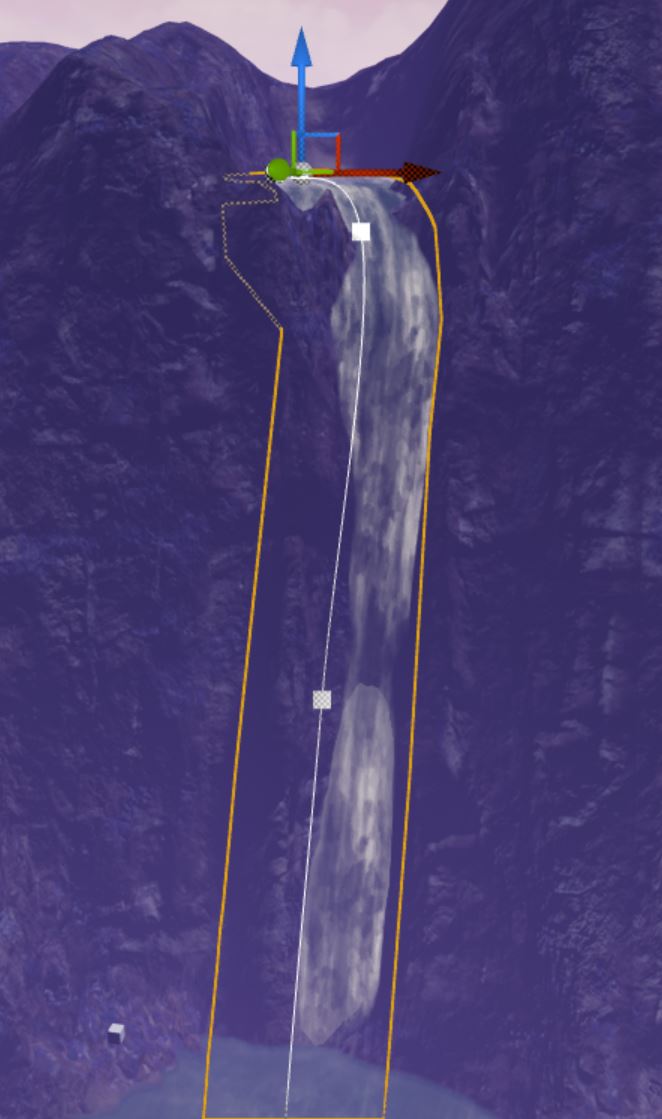
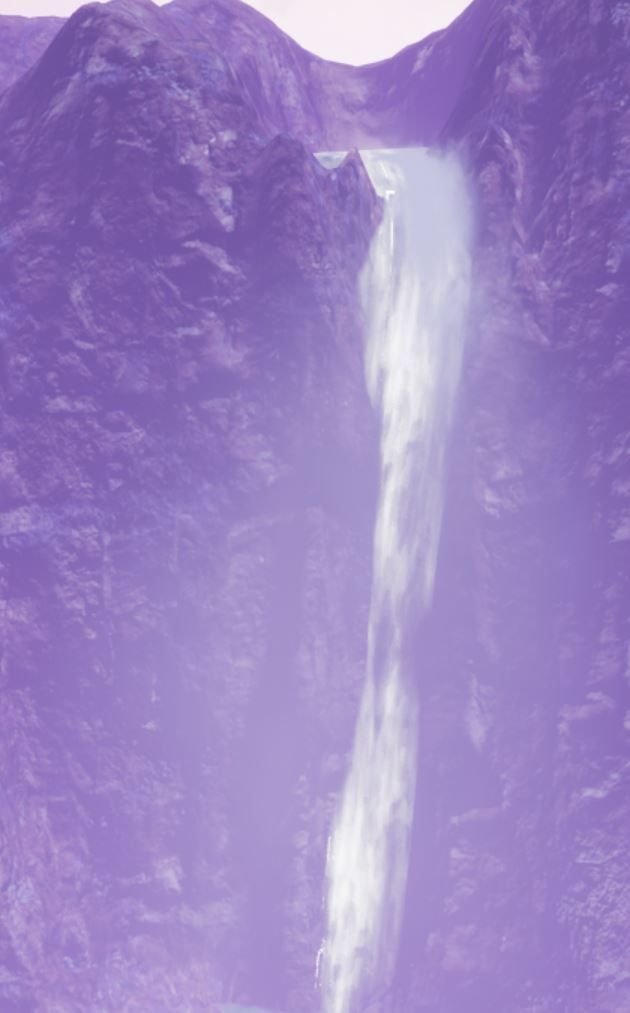
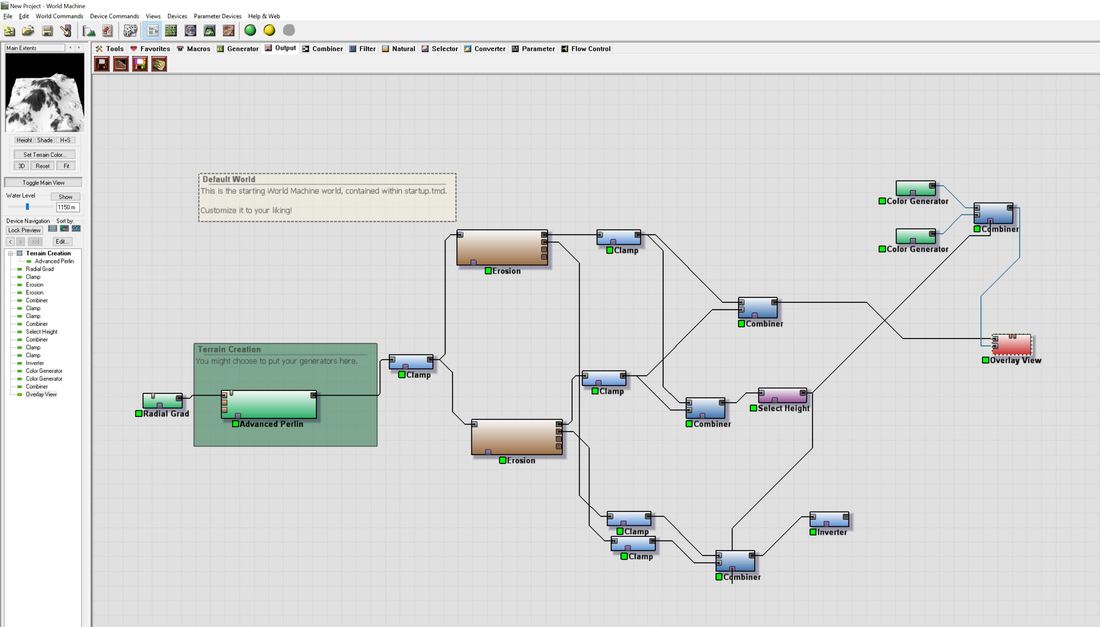
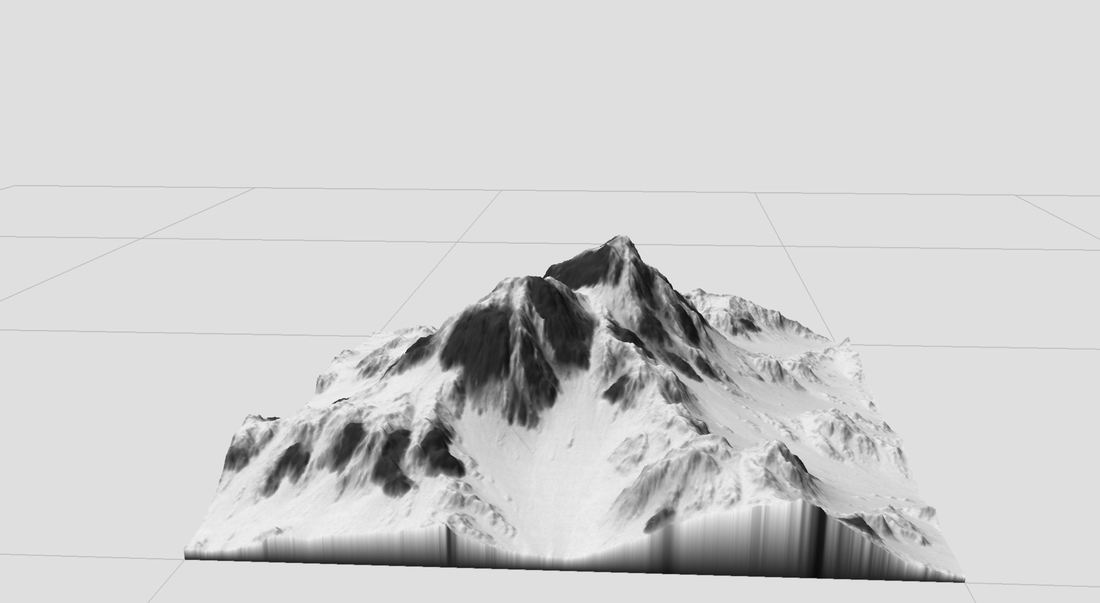
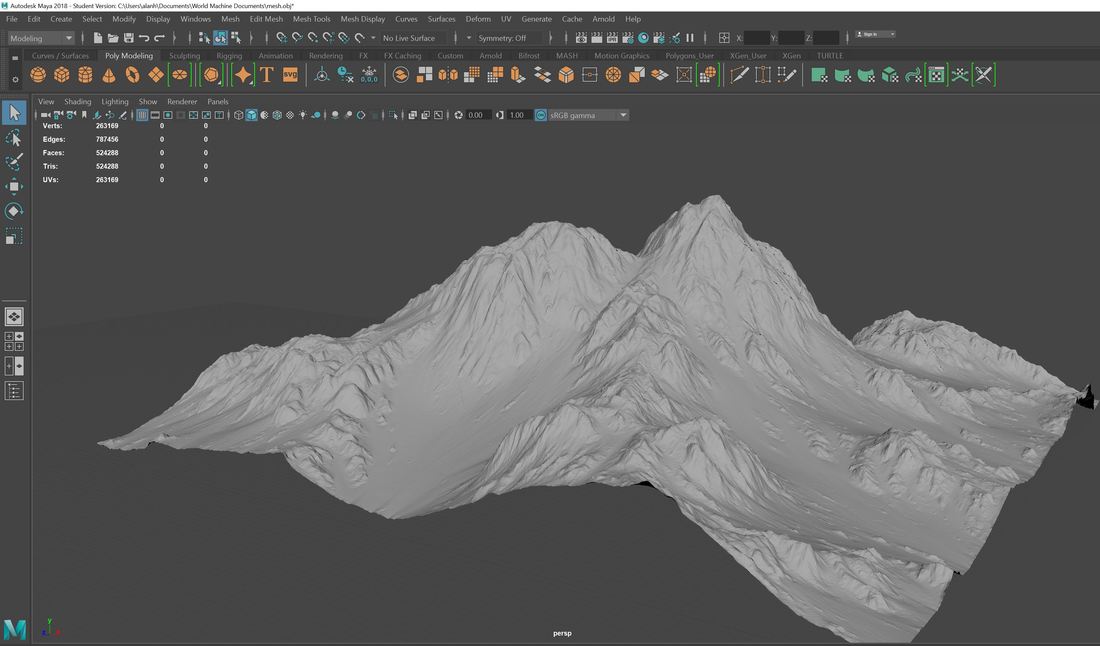
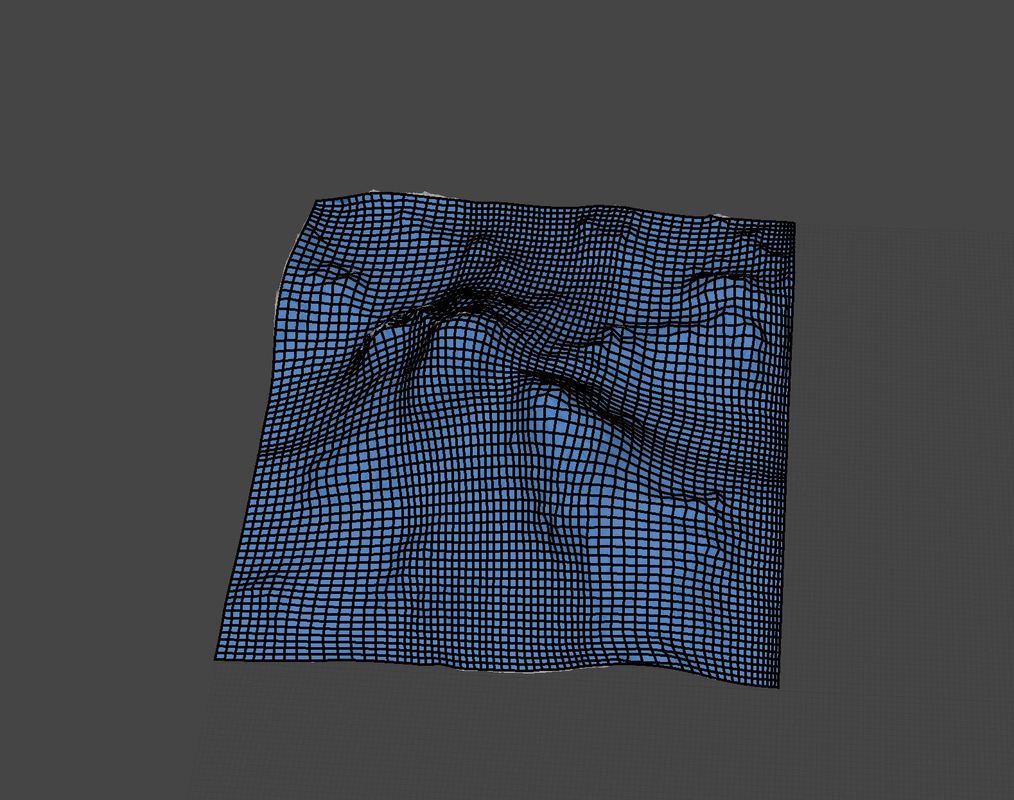
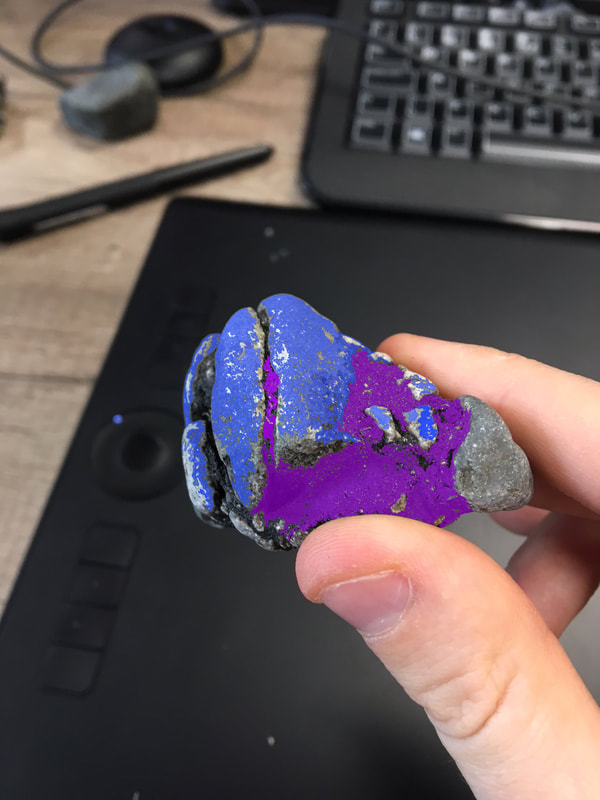
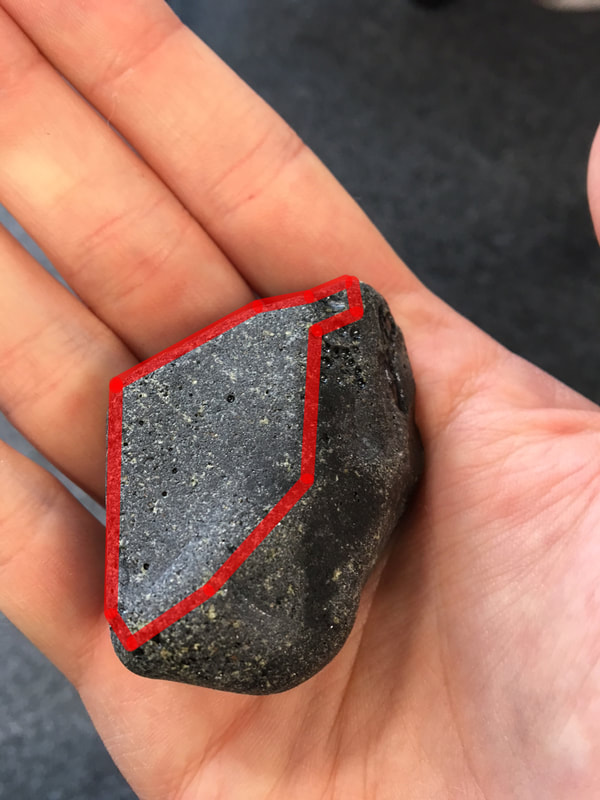
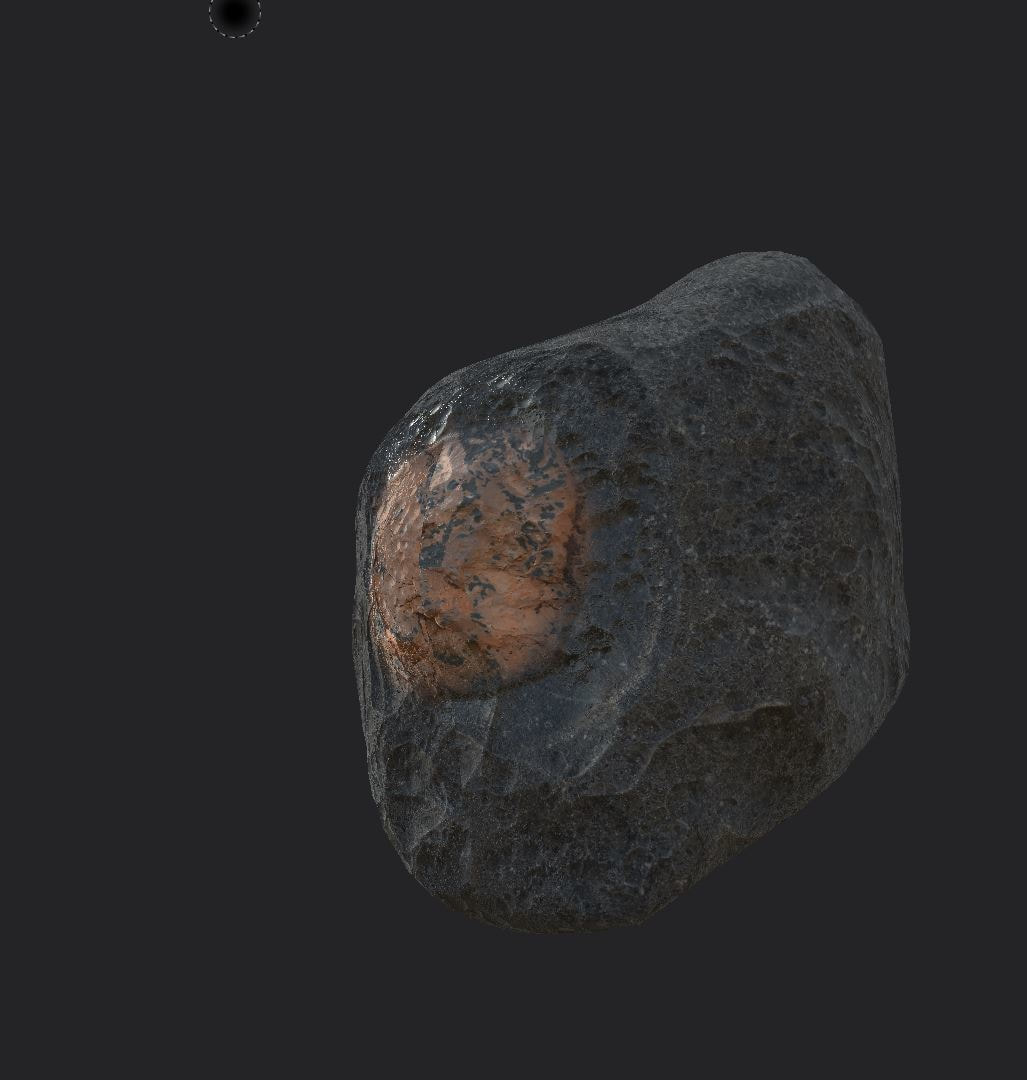
Overview The purpose of this unit is to understand how to create environments using heightmaps and the landscape tools inside of unreal engine, create models to populate the environment and also create background models to add depth to the environment. For my first task I have to look into different software’s to create heightmaps and how to create environments then create mood boards and mind maps to get an idea of what type of environment I am looking to create. For my second task I will consider creating my environment using software’s and tools that I researched. Then for my 3rd and 4th task I will consider creating models and materials to use on my landscape. Time scale Task 1 – pre-production Start date: 22/11/17 Completion date: 6/12/17 I have given myself two weeks to create pre-production for my environment and research techniques that I could use to create my environment. Task 2 – Environment creation Start date: 7/12/17 Completion date: 20/12/17 For creating the landscape, I have given myself two weeks to apply the methods from my research and create a landscape matching my pre-production. Task 3 / 4 – model and materials Start date: 21/12/17 Finish date: 21/1/18 I have given myself a month to create models and materials for the environment, including the background models and landscape / foliage as well. This time also counters for Christmas and new year holidays. Task 1 For this task was about consider research about how to create environments that I could use for my environment and then from this create a mind map and mood board. For my researched I considered different processes of creating environments and terrains that would be used in the game industry, I looked at the unreal engine tools that are mainly used to create and sculpt environments. I then looked into alternative ways to create landscapes, I looked into using software such as world machine, photoshop and Terragen, these are used in the industry but not as common as using the tools that comes with unreal engine. From my research I found that I can make background models that I can use with my environment as well. From this I considered creating heightmaps using these software’s and how to use satellite images to create landscapes based off real world locations as well as creating my own unique heightmaps using with this software. After this I then researched how to create landscape materials but looking at the unreal documentation and how to use blend materials to create height based materials which is a customary practice in games, I then also looked into using 3rd party plugins that has a high-end material that saves time creating materials for the landscape and gives you an AAA quality material to use in the game. From this research I got an idea how to create an environment for my game, I then created a mind map of different ideas I wanted to incorporate in the environment, how I want it to look like and ideas for props I can use for the environment. 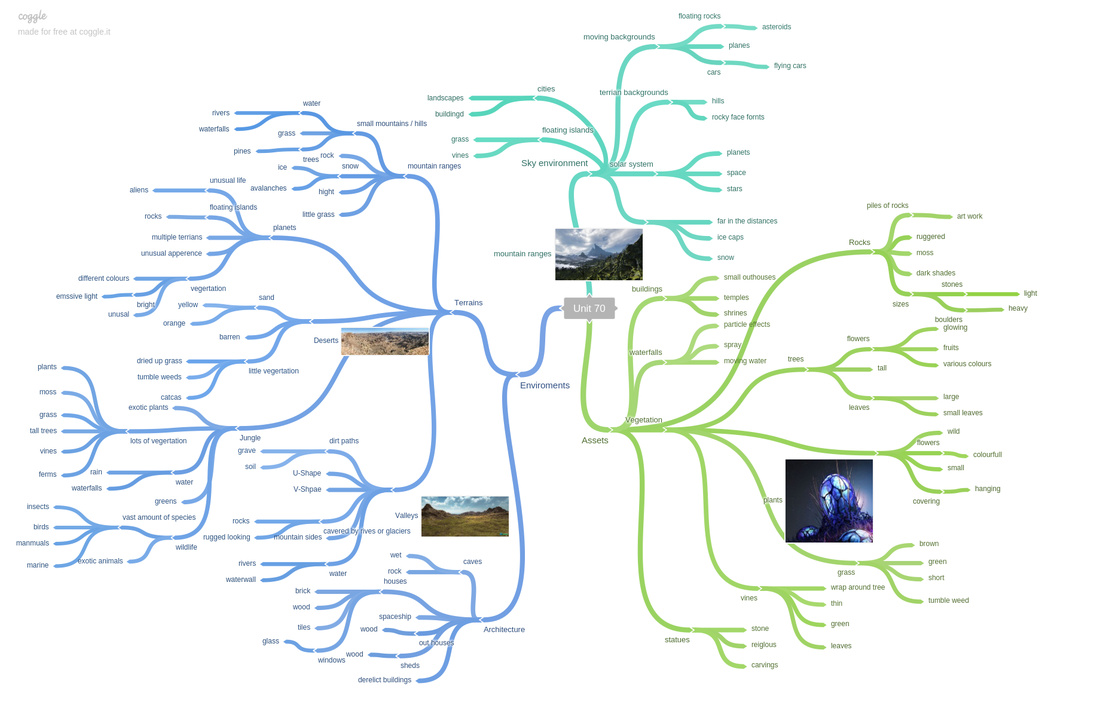 Once I had ideas for my environment I then created a mood bored to get visual ideas of what I want to create for my game, I used my concept art as inspiration to give me ideas of the colours and style I was look for. 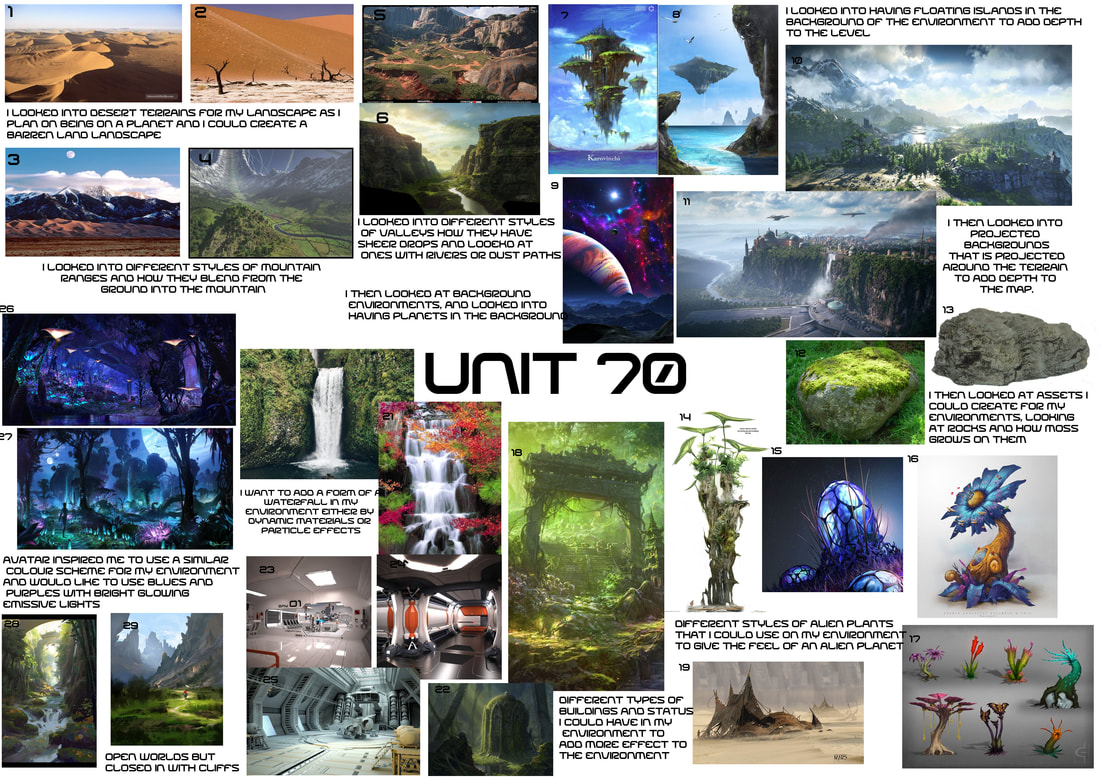 I then created basic sketches of the level design so I could get the main features down on to paper before creating the environment so I could get an idea of what I am creating for my landscape. Task 2 For task two I wanted to experiment with height maps before I started creating my terrain I looked into different methods that I could use for my project, I looked into using satellite height maps of other planets I used a height map from mars, then I also looked into creating my own custom height map for my level using Photoshop and using clouds trying to create the valleys and after testing this out I wanted to try a final method of using real world locations and turning them into a height map so I could find someone in the world that has the bending valleys that I am looking for. Below is screenshots of the height map and how they looked in unreal engine. For my project I decided not to use a height map I felt that when I was testing them out I could not find a valley that suited the style I had intended to have in my game. I decided that to have a landscape that I intended to have in my game I will have to sculpted my own terrain. I started off by creating a landscape and then I sculpted the mountains ranges around the landscape creating a basic path to the boss arena then I built up smaller hills around the path to create a unique environment for my game. I then placed a basic landscape material on the landscape so that I could see how the mountains fall and where the grass and slopes are visually. Below are screenshots of the first stage of the sculpt After I got the basic sculpt on my landscape I decided I needed to work on a better material for my landscape I decided to use an AAA quality landscape material to make my landscape pop more, the other reasons I wanted to use this is because of time it was quickly to use a plugin and play material then spending a big chunk learning how to create a high end material. Once I had the material added onto my environment I needed to import textures into my game and apply them onto the landscape. I started off by finding material I wanted and then opening g them into Photoshop and then I changed the colour of these textures to fit into my environment and colour scheme that I picked in my concept art. After this I then used painting weights and blend spaces to paint on different textures on to the environment to create the paths and grass areas and add sand to the rivers and waterfall areas. Below is screenshots after the material has been added to the landscape. I then wanted to add water features to my game to add more detail to the environment I used a spline to use the same mesh over and over again and this allows me to add bends into the mesh as well, I placed this on the river bed following the curves of the river and then I used the same method to create waterfall. To make the waterfall stand out more and make then look more natural I added a mist particle effect and water dripping on the water below, after this I then add sound to the waterfall to enhance them. Below is the screenshots of the water added into the level After creating the landscape for my game I then decided I need to create some background models for my environment, this will help to make the environment look larger than it actual is and give the impression there is more land past the playable area. I started off by creating a model inside of world machine I used nodes to create a mountain and then I used more nodes to add smaller details like fallen rocks and snow fall. After this I used nodes to export the model and height map of the mountain I created in world machine. I then took the model into Maya since it was high poly I decided to create a low poly version of the model by using the quad tool and then smoothing it to fit into the groves of the mesh I then took the low poly into substance painter and then I baked the high poly onto the low poly to get all the details from the high poly onto the low poly. I then added different material to create the look of the mountain using mask to use multiple materials and then using alpha masks to add unique features onto the mountain like fallen snow. 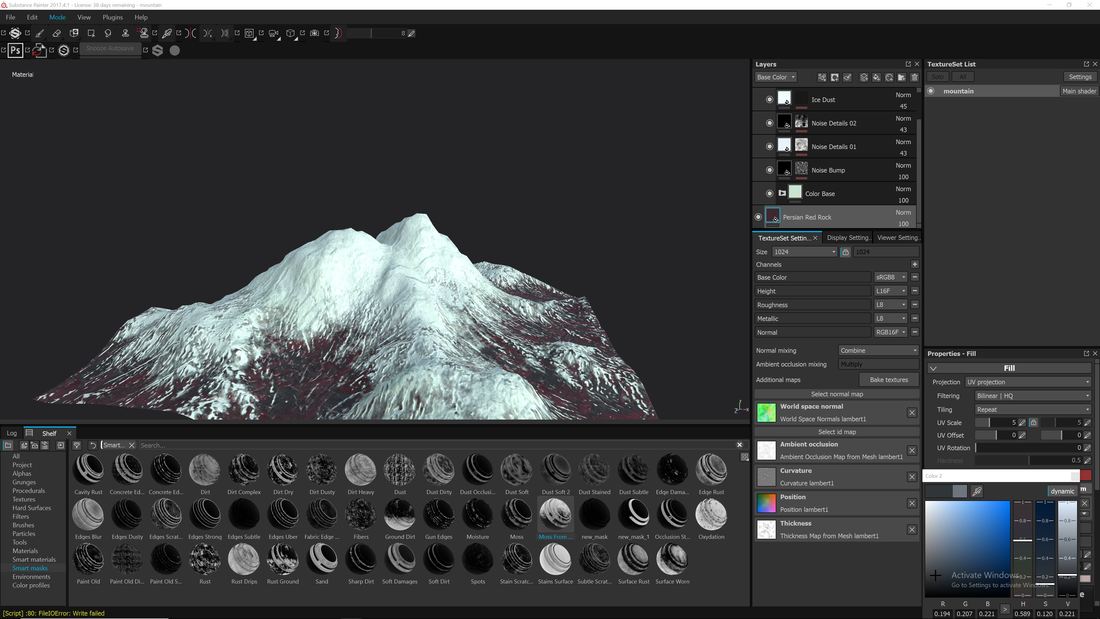 I then imported the model and textures into the landscape and placed them behind the terrain and placed them around the level to give the appearance of mountains in the distance. 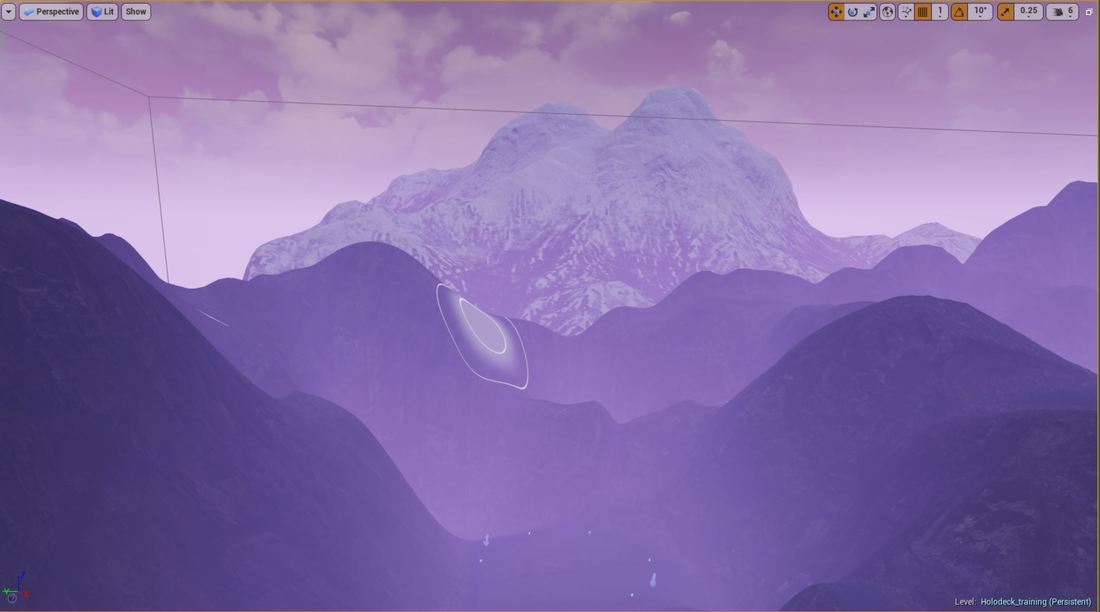 Below is images of the background terrain added to the landscape Task 3 & 4 For these tasks is about populating the level with models and then creating materials for each model, I decided for this task that I would use new software such as Zbrush and other tools in the substance package so I could familiarize myself with software used in the industry. I planned on creating a couple of models that would be widely used in my level; crystals, rocks and foliage. I started off by taking photos of rocks so that I could get an idea how I could break down these rocks and create a model of them.
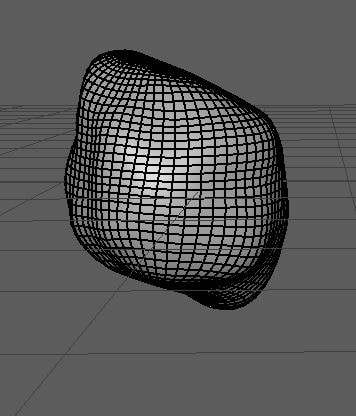
I then used Zbrush to create a high-poly model of the rocks, using tools to morph it into the shape of a rock then add details to build on top of the rock and then used noise to add fine details into the rock such as air holes. Once the rock was created in Zbrush I needed to create a low poly version so I took this into Maya and then used the quad draw tools to create a low poly version then from this I was able to take it into substance painter and I was able to bake a normal map of the high-poly and place it on top of the low poly.
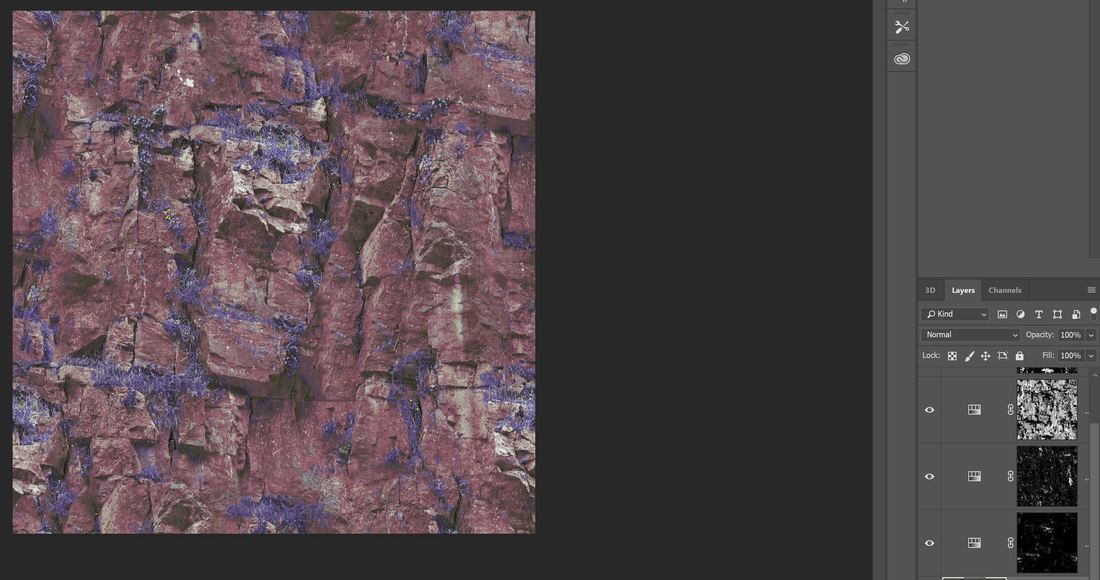
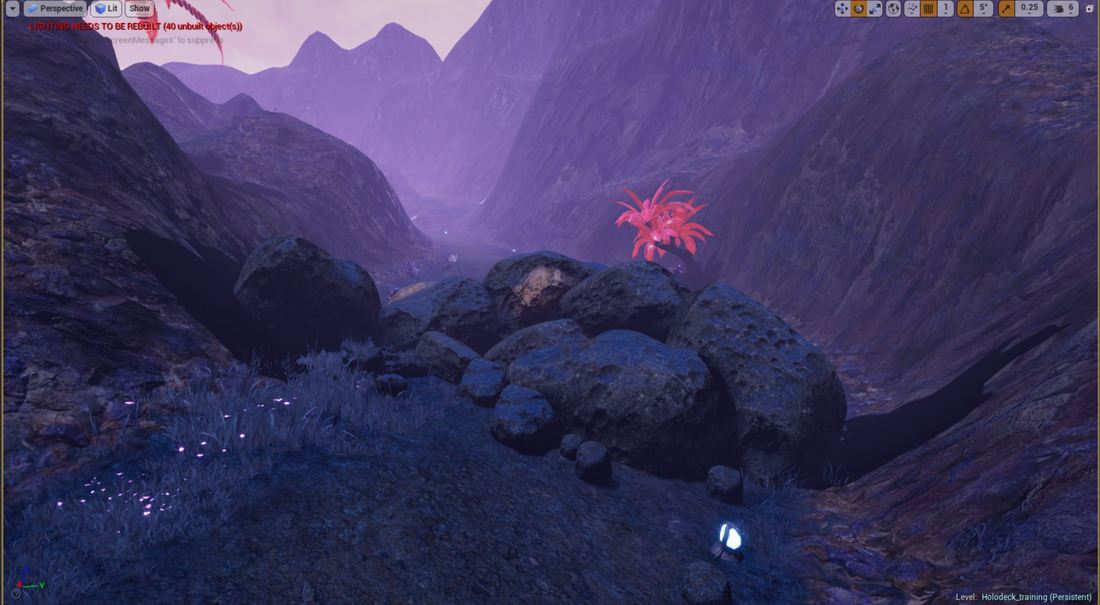
After creating the rock, I then took this into substance painter and then added materials onto the rock to give it a sci-fi look to fit into my concept. From this I then exported the materials and imported then into unreal engine. Improve the cosmetics of the rock After placing them into my level I found that these rocks looked two clean and decided that I needed to add some dirt and grim to these rocks, I decided after looking at photos of natural rocks that they had moss growing on top of them, I could do this in substance but the rock would look repetitive, I decided to create a shader in unreal engine. I used a moss texture which I turned blue in substance bit2material so that I would fit into my theme, I then used a material to create a shader that would place the material onto of the rock and give it parameters so that these could be edited for each rock. I then added a world space so depending on the position the moss would change.
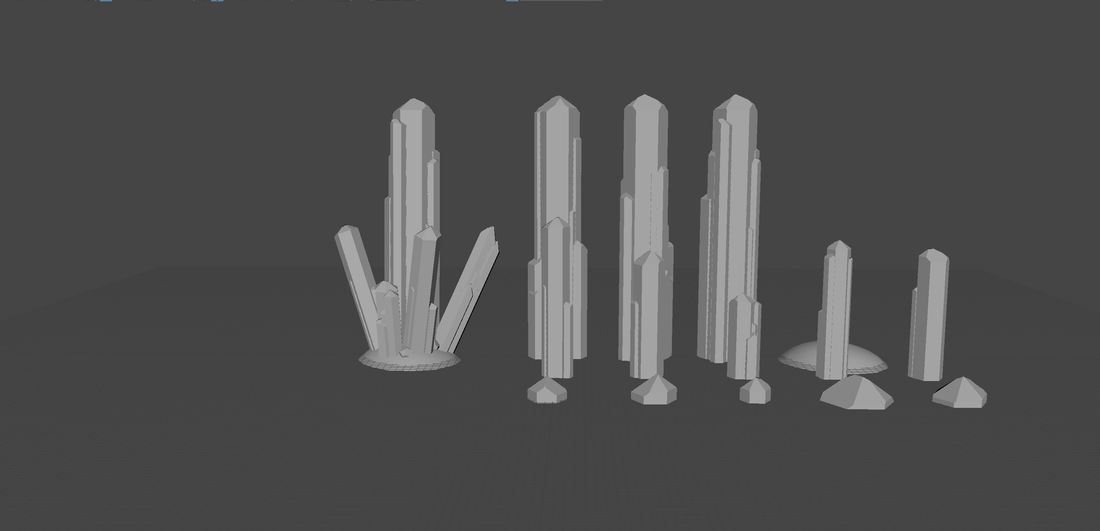
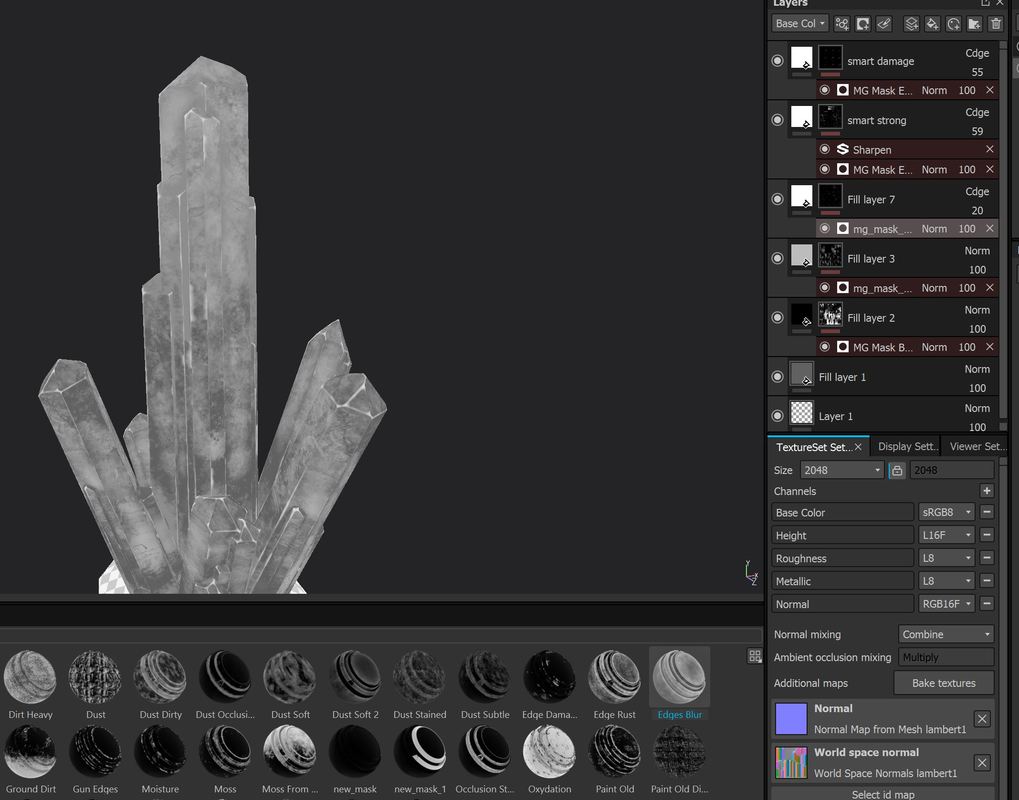
I felt that I need more to my environment to make it more alien esque I decided on creating crystals, I plan for this to also help guide the player like the small orb plants but use these less frequent but at major points. I want to create a crystal that uses an alpha texture that I have created and use basic parameters in a material to change the colour of the crystal and take advantage of the alpha texture to make a unique pattern, I then plan to add a shine effect to the material. I then opened the crystal in substance painter, I wanted to create an alpha base material to get the patches on the crystals like you would find on cloudy quartz crystals. I started of by making a dark grey base layer and then I created another fill layer, I then added a smart mask to this layer to add a patchy mark onto the crystals.
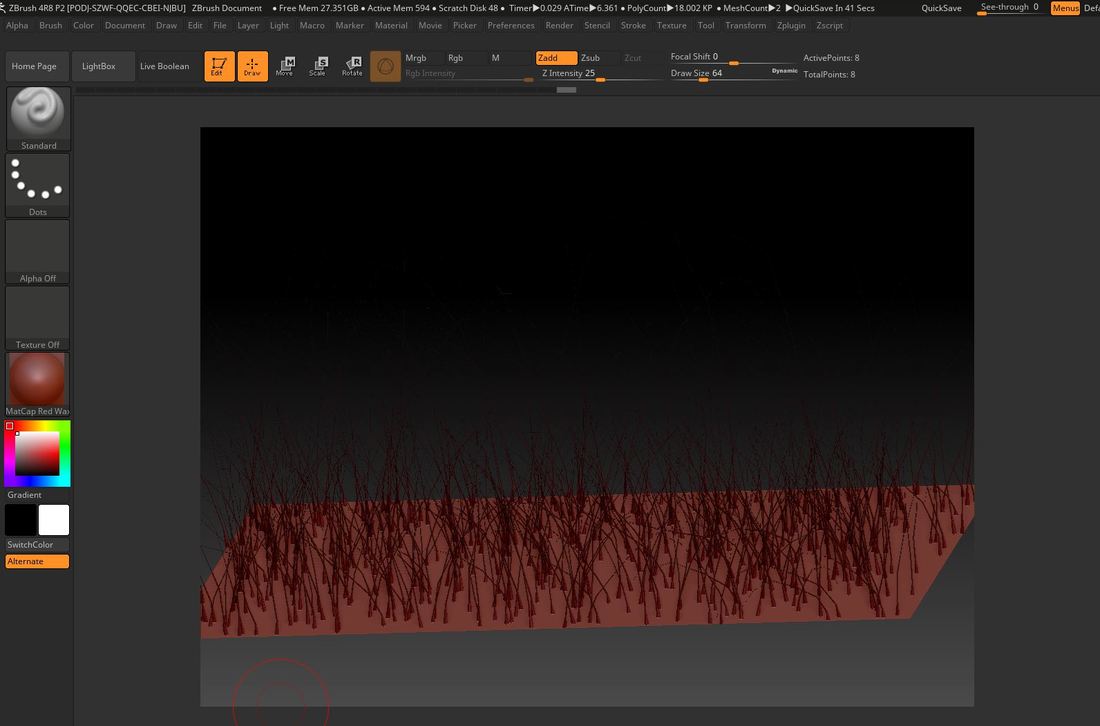
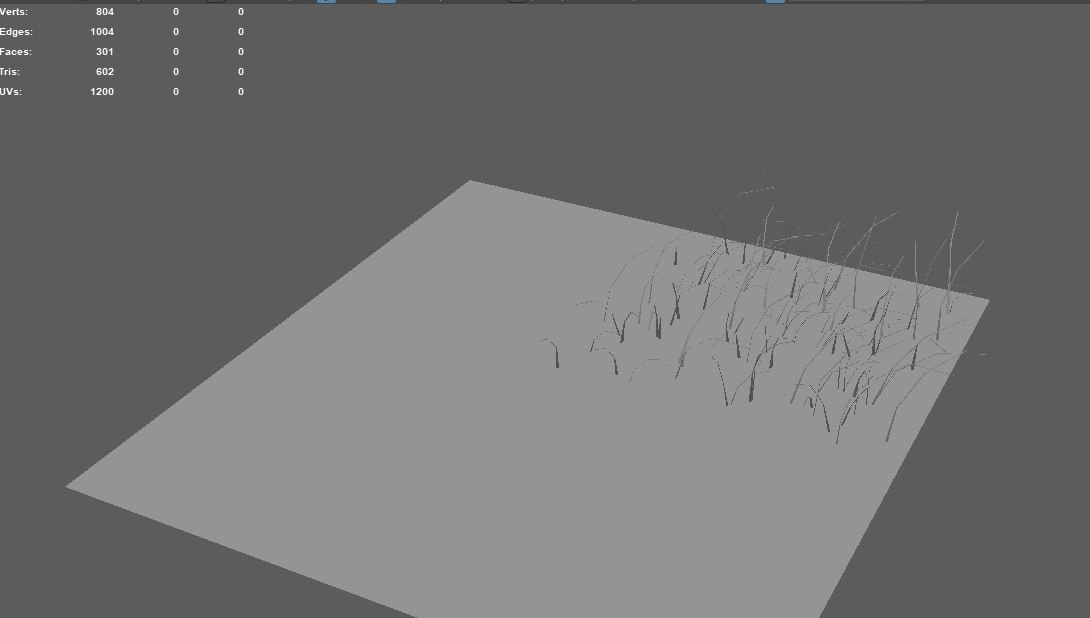
I added my texture to a new material which I plan on been my master, so I can create material instances for this. I then created two scalar parameters to be used as my light and dark colours, I added these to a lerp along with the base material and added it to the base colour. I changed the material blend mode to translucent with a lighting mode of surface translucency. I then added an opacity texture which is a gradient created in Photoshop and also created emissive node to control the amount of light produced, I also created a colour normal map and specular and roughness nodes. 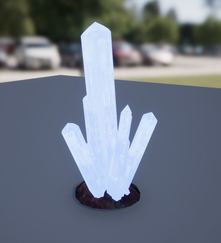 Error I then spent time trying to make the mesh look less opacity as it was causing clipping issues, looking into forward vectoring but was unsuccessful, I also try adding more to the refraction to create a more realistic shimmer but these was not working as well due to the clipping of the mesh. Solution To fix the clipping problem I turned the transparent blend mode off and replaced it with opaque which turns of the refraction which ruined the shimmer effect I was after, to solve this I created a line texture in photoshop and added to an world position and panner to move the texture across the crystals to give an effect of it shimmering in the light. 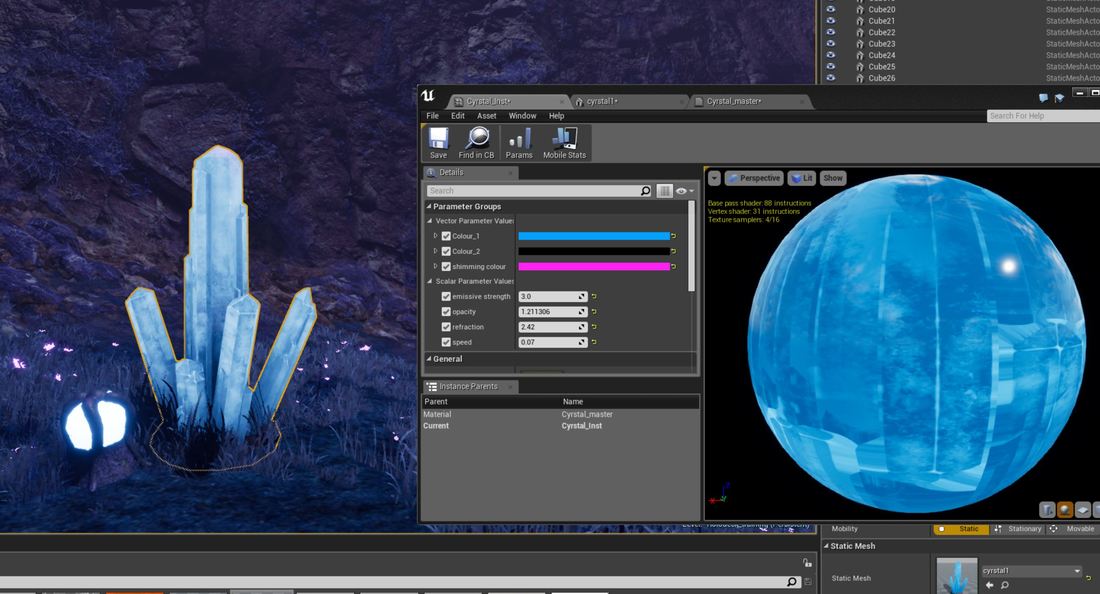 For the foliage I will consider creating my own using 3D software’s and I will also look into using game engine ready grass and migrating / exporting these and look into modifying them to suit my environment. I will then consider adding illusion to my foliage such as wind to give that feel that there is an environment. I started off by creating my grass, I wanted to create an alien looking grass, so I started off by going into ZBrush with a small plane, about 100by100uu. On this plane I used the fibre mesh to produce grass and then I played around with the settings till I found a happy medium of grass blades and then I exported these. Then I exported this to Maya and rearranged the grass blades to fix into a close square.
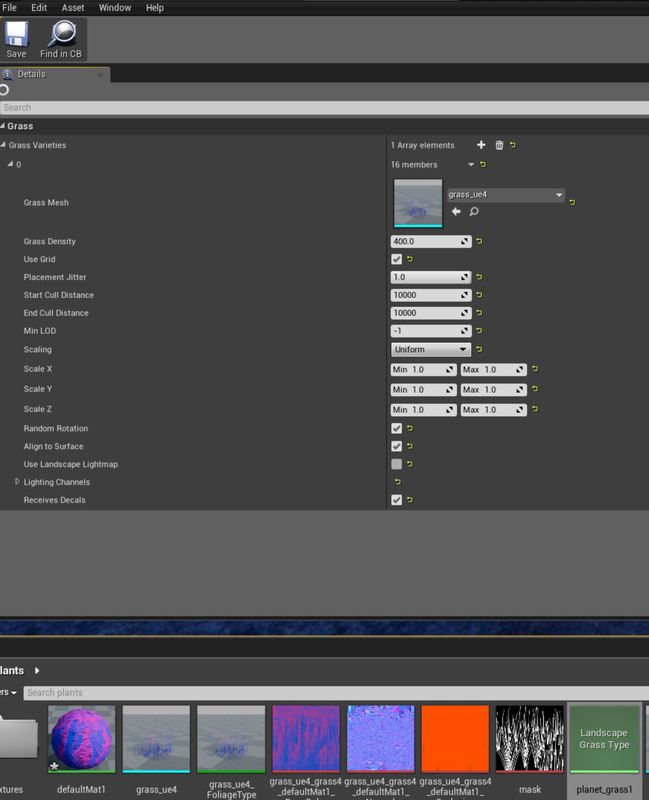
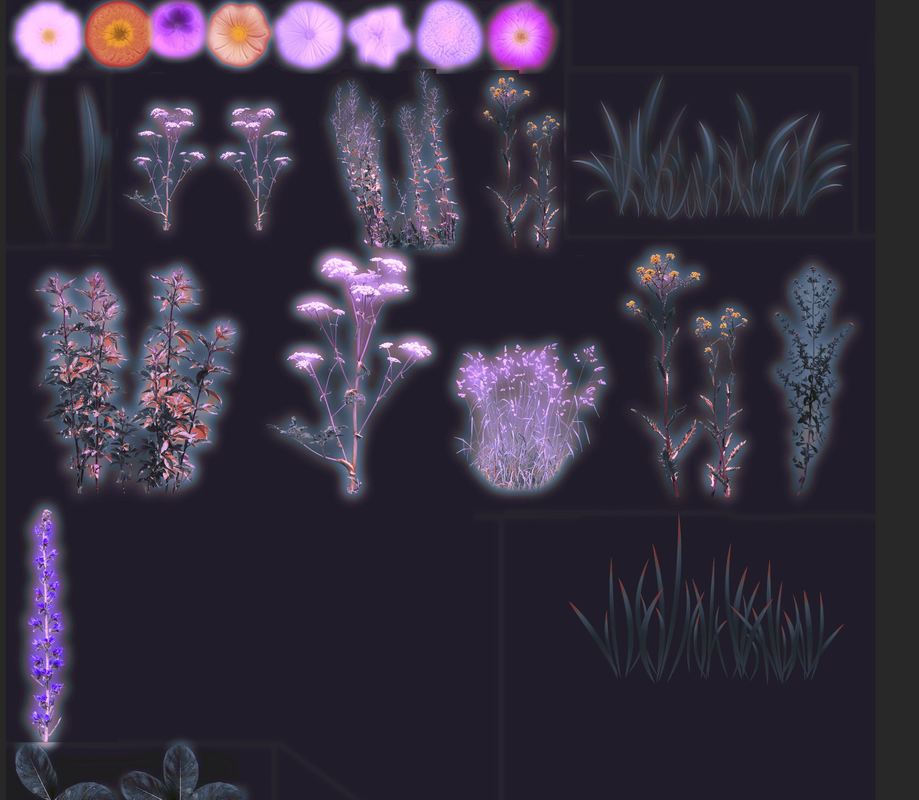
I then wanted to add wind effect to the grass so I found a video to how to create a shader to give the impression of wind I applied this to my grass I look into this a found that in unreal engine I can create a grass landscape type node, in this node I can add my grass mesh and tell the engine how many grass meshes to spawn on the landscape per 10meters squared in unreal units, I can also add unique features like scaling and rotation to the meshes to make it more random and also add a culling distance to help optimization. It is also an array, so I can add as many meshes I want to this node and it will spawn them depending on how many to spawn per squared meter. I found the textures for the meshes and exported the diffuse mesh out and opened it in photoshop and used the hue and saturation to change the colour of the texture. I then wanted the flowers to glow to make them more alien like, so I decided to cut the flowers from the image and place them into a new image and created an alpha channel for these by duplicating one of the RBG and then I imported this back into the game engine.
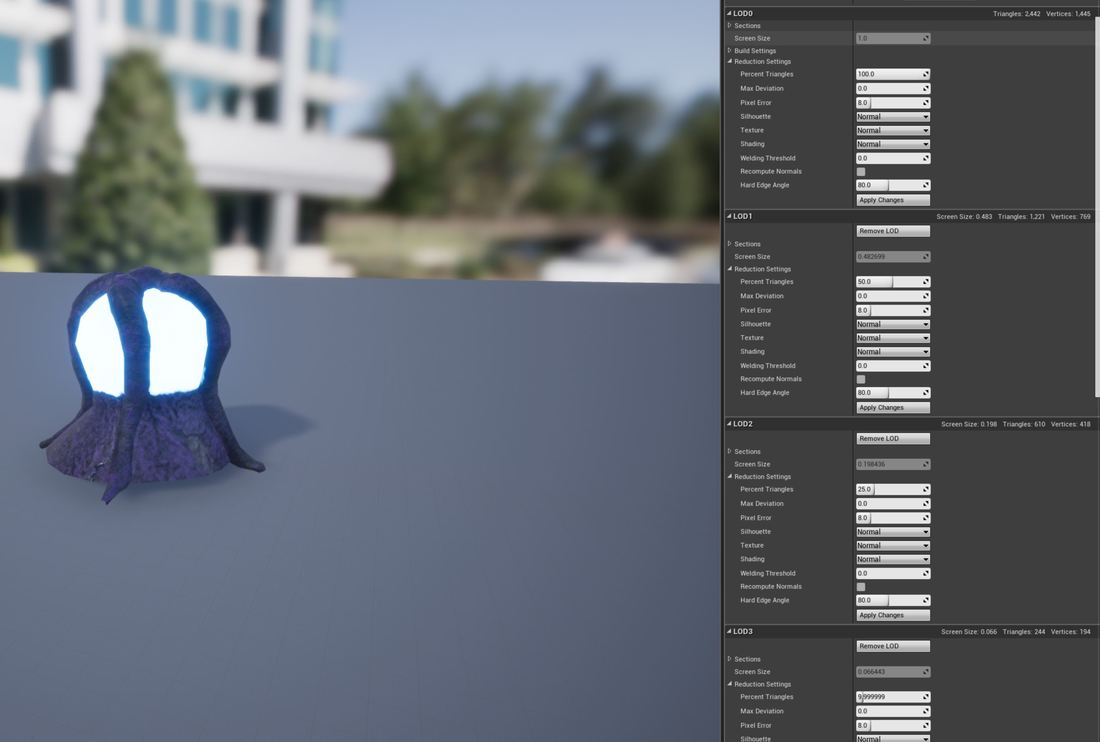
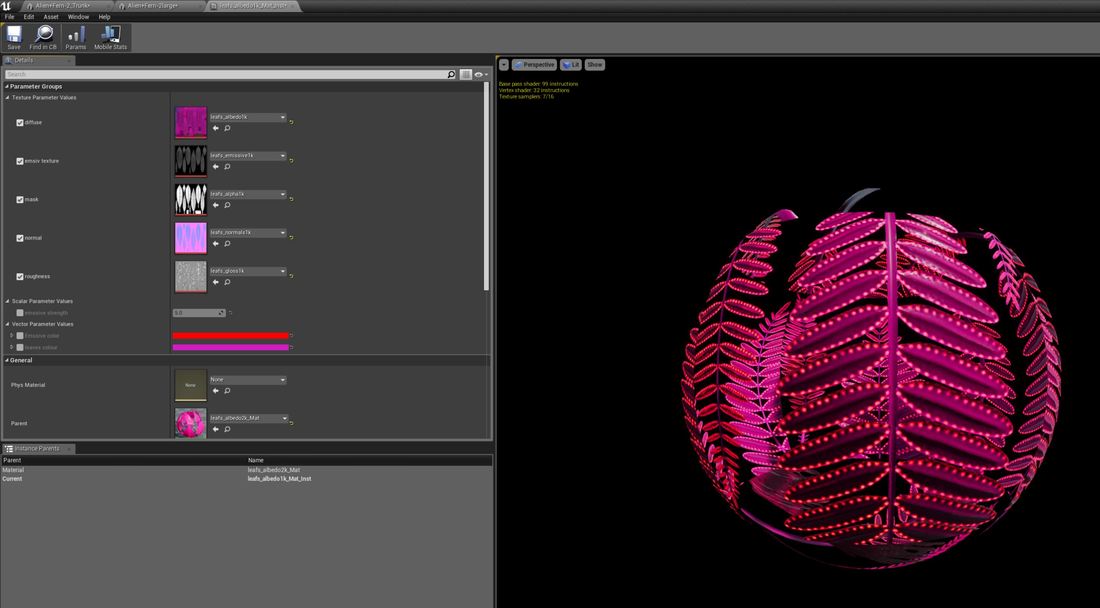
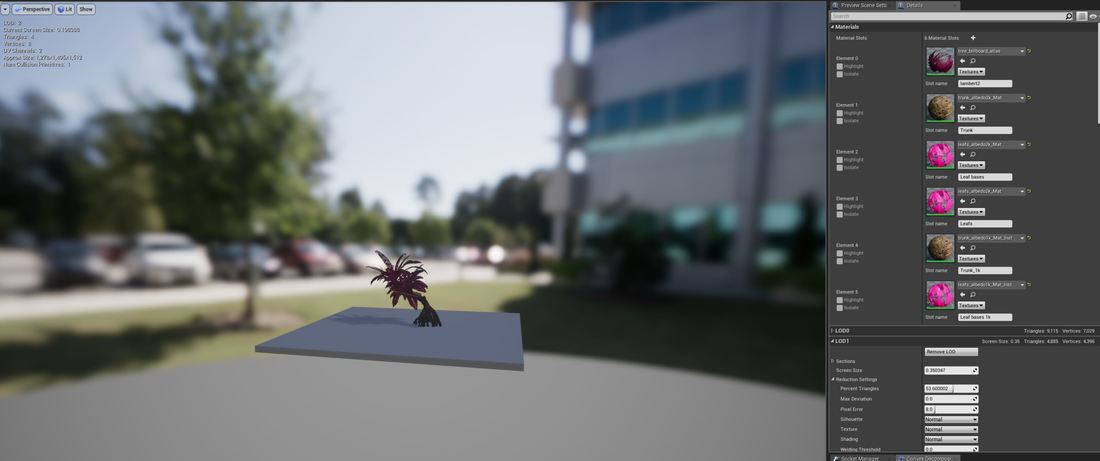
Below is an image of the final grass 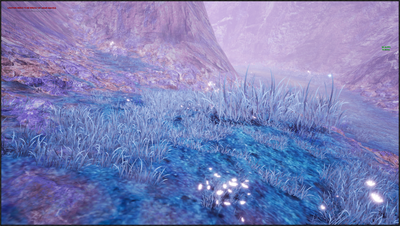 Optimization To improve the optimization of the level to get better performance I will look into different aspects of areas for optimization editing the landscape, level of details of assets and materials including billboards and level streaming for the indoor sections. Optimizing the landscape since I have created a large landscape with mountains around the edge of the landscape there is a lot of sections to the landscape that are been rendered that the player will not see, deleting this will help the performance a little as it will not have to render unseen landscape taking pressure of the CPU and graphics card. 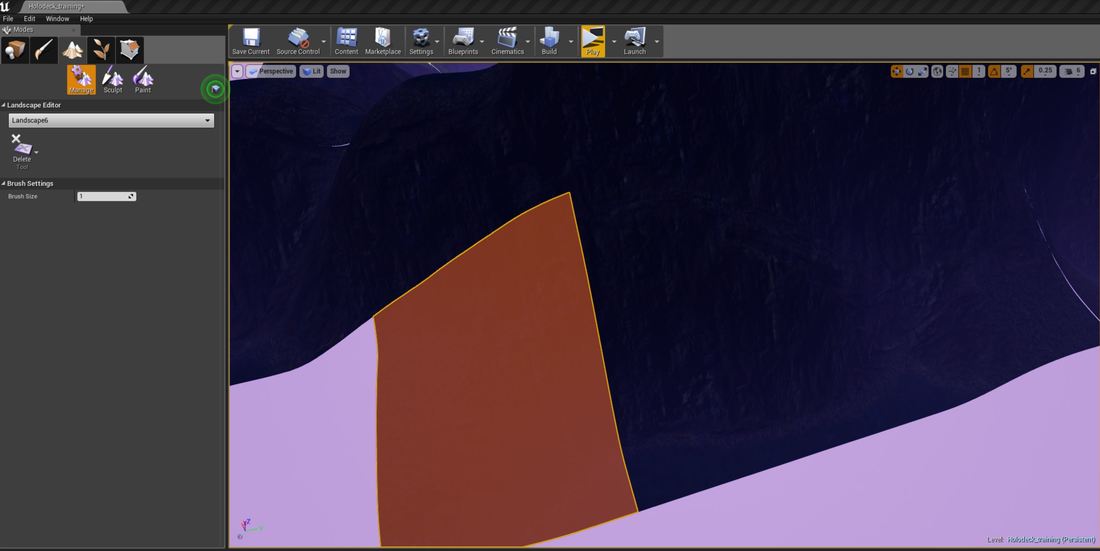 Level of details For each asset I wanted to create level of details of the mesh. this is an automatic process that I can use in unreal engine, it reduces the number of polygon based on distance to be rendered. this use to be done in Maya by deleting edges on the mesh. Now its automatic process in unreal engine where you selected how many LODs you need and select the distance to apply the reduced rate. For each model I created I added 4 levels of detail to the model and changed the reduced percentage to 75 / 50 / 25 depending on how far away and added a distance of the same values. To help the performance during the level of details I can also set the textures to change at each point of distance in the LODS, to display a reduced texture size which will help the graphics card process quicker the materials and geometry around it without bottle netting and causing a performance issue I set up my tree material before so that I could change textures by using a master material and creating material instances from this master. to get reduced textures I opened my full resolution textures into Photoshop and went to the image size and reduced them to 1024 by 1024 and 512 by 512.
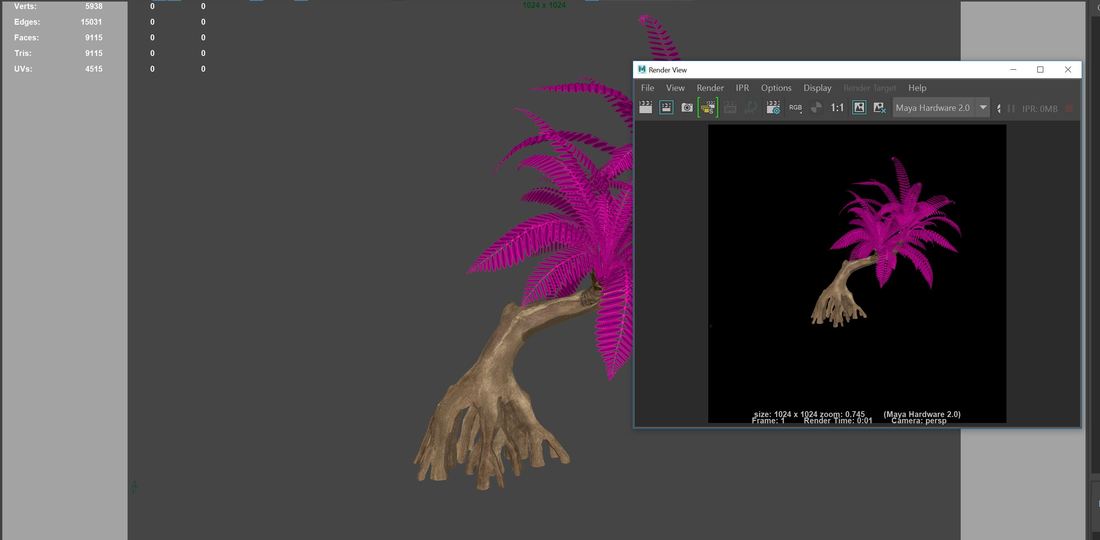
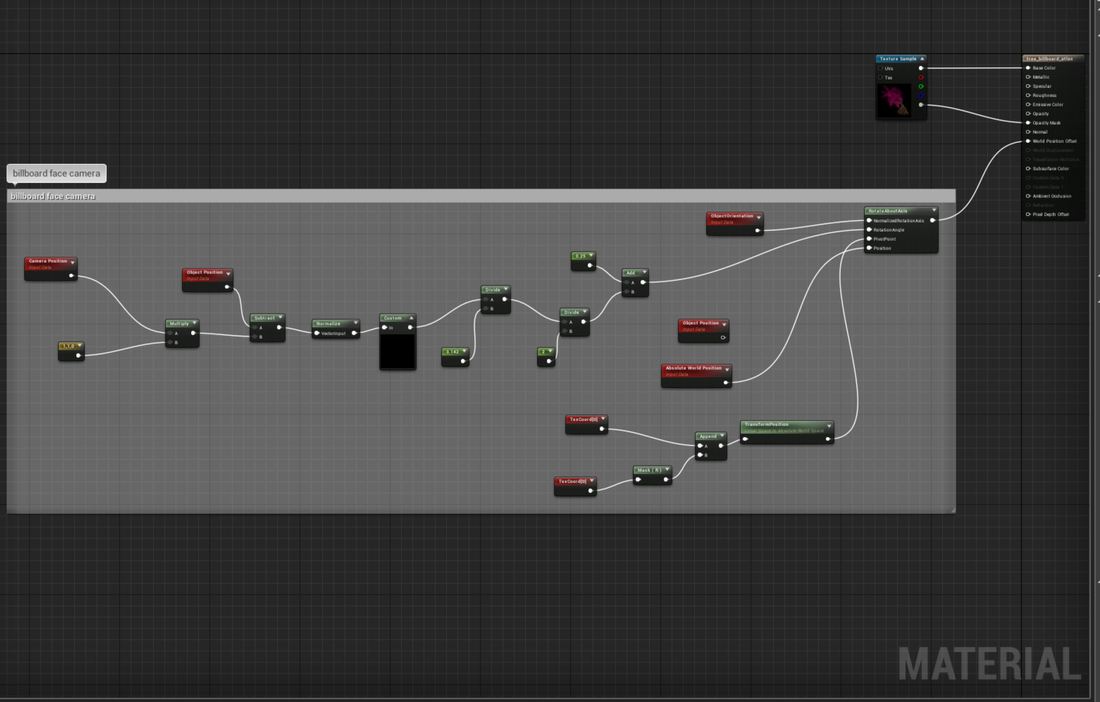
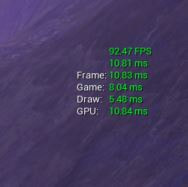
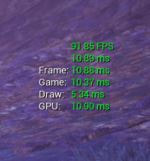
tree billboards To optimize the trees even more I decided to create tree cards for my trees, these are an image of the tree rendered onto a plane so when the user reaches a certain distance it shows a silhouette of the tree and when they get closer it turns into a model. I took a screenshot of the tree I wanted to turn into a billboard and created an alpha channel on this in Photoshop. I then created a plan that matched the tree. I then exported this and added this onto the level of details for the tree. I then created a material that makes the plane and texture of the tree follow the players’ camera so it looks like the tree is always in the correct ordination to the player. Culling the environment Since I have added high quality textures and a lot of models / foliage this takes its toll on the game and its performance. I have been running stat fps though the creation and I get an average of 60 – 120 frames per second. This is a basic performance test and I am going to look into improve the frames so that I can achieve a high frame rate in the areas I am getting 60 fps. I am going to look at 4 other performance stat commands:
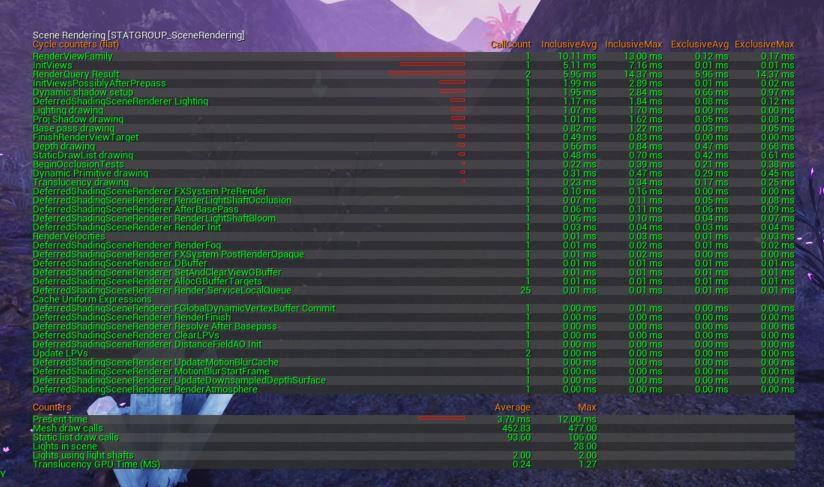
I started off by adding a cull distance volume, this culls the models in the volumes depending on size and distance to the camera. I set up distance of anything under 100uu to be culled at 3500uu away from the camera and anything under 200uu at 4700uu, and anything under 500 to be culled at 6500. The next area to cull is the foliage as this might be low poly having it in large clumps that move in the wind is costly on the GPU and this could be where the performance drops are coming from, I opened the grass landscape node and changed the start and end cull distance to a low and high number as these were set to 0. I set it to be 250 is the start of the cull and the maximum is 2500uu from the camera. I then ran the performance stat tests again in the same area that is get low performance. The fps has shot up and now in these bad areas I get between 75fps to 90 which is a huge increase from 60fps. The unit stats have stayed around the same area but seemed to produce the same figure with out dipping.
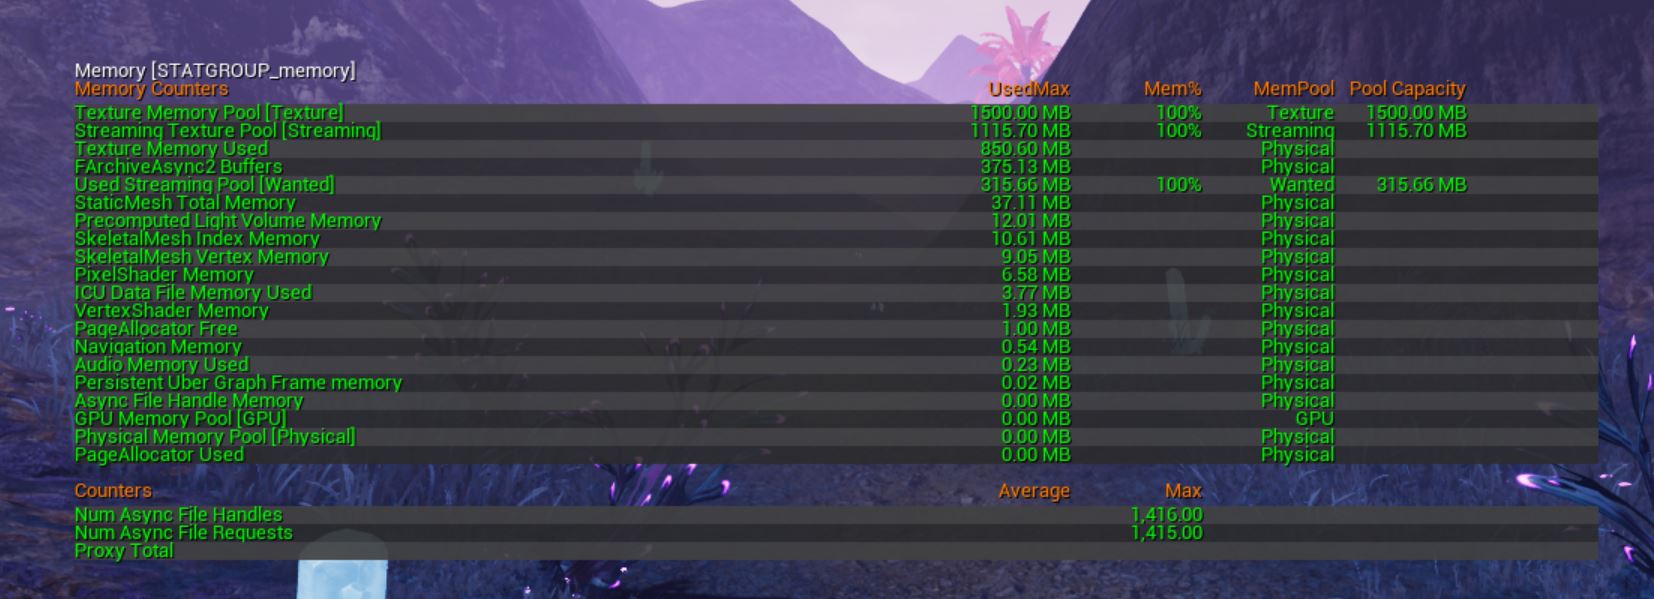
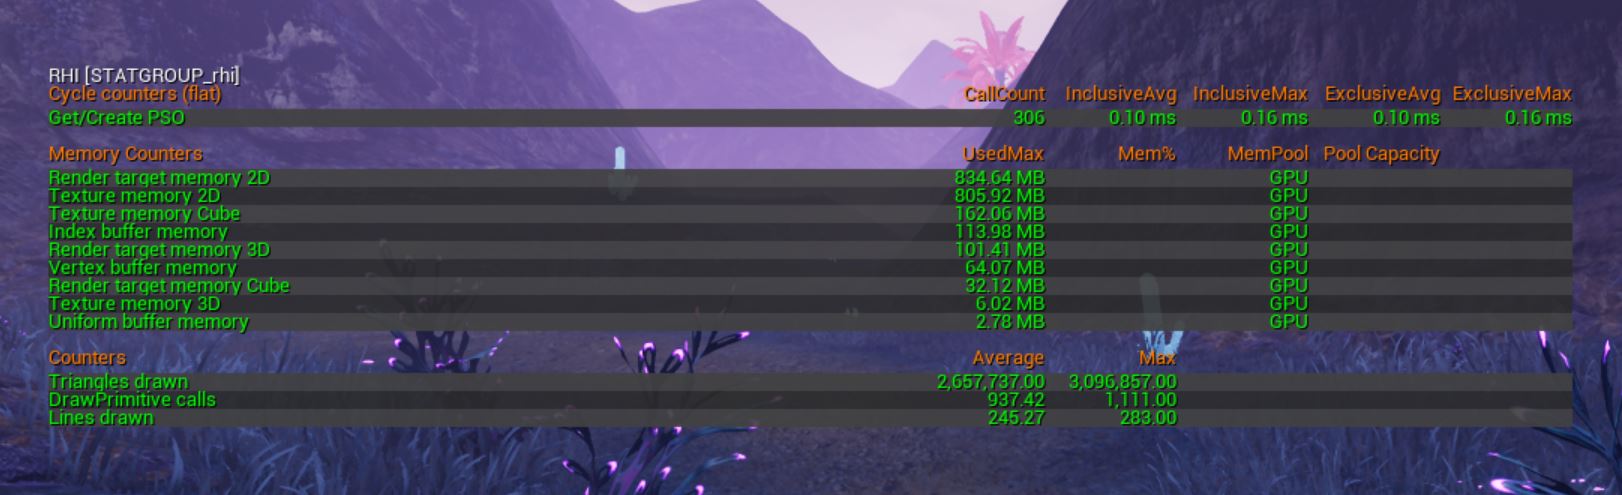
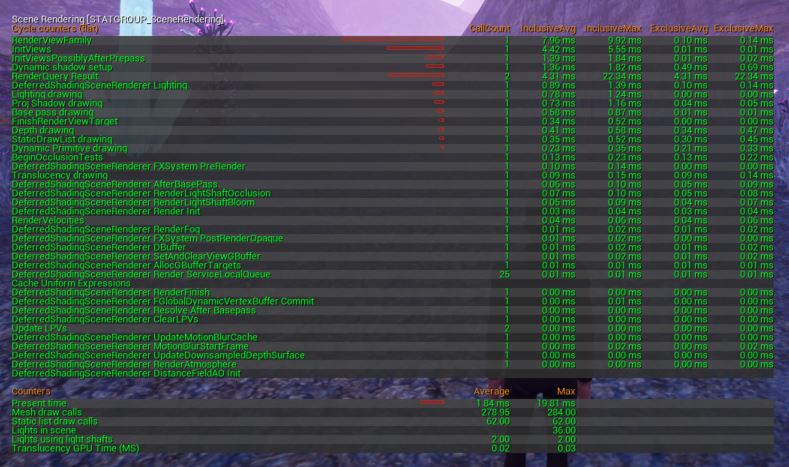
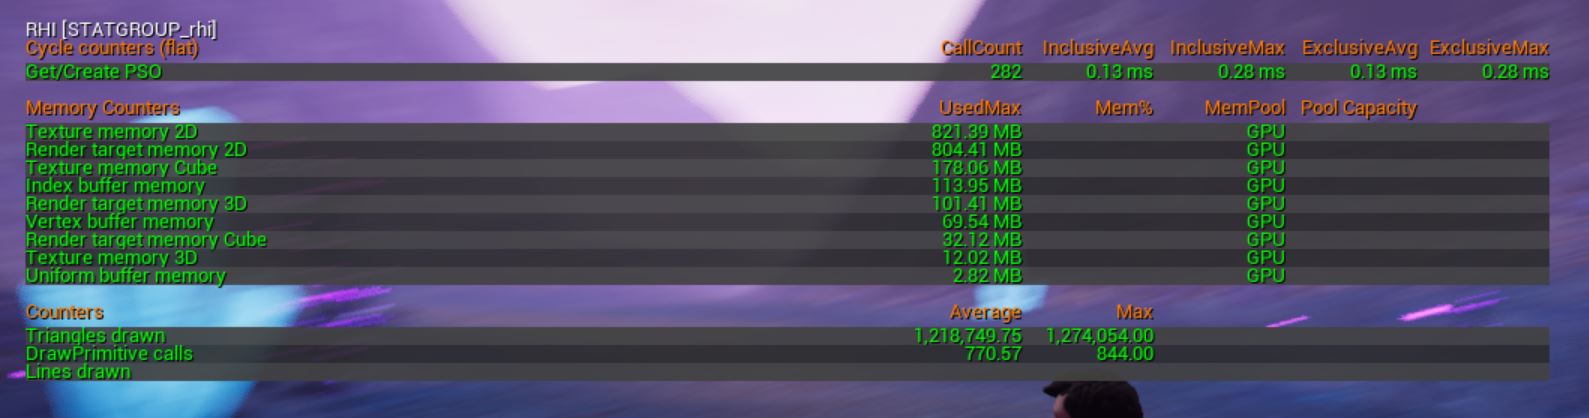
The RHI shows that the tris count is now around 1.5million which is over half cut of the original test and shows this is helping the performance. The scene rendering shows that the times have dropped as well dropping form 11/12ms to around 6.5 to 7.5ms which has helped the performance massively as it not trying to render as much and the lag has reduced. Conclusion Overall I really enjoyed this development, I have learned a lot about creating environments and how to optimize large scale environments. I enjoyed creating and scuttling a custom environment and creating my own foliage and models to populate this environment to add feedbacks matching my concept art. I didn’t encounter any problems but I feel it has helped me learn more about unreal engine and how to use the tools inside to my power and create powerful landscapes. It has also shown me areas where I could improve on such as improving on my researching techniques to find more reliable information. I could also improve on my pre-production creating more and covering more areas as I felt missing out the character customization was something to overlook. The development went well, I was able to produced everything I had planned, either on schedule or before the schedule date. There was one task that was over the date completed but this was down due to the scale of the models that needed to be created and learning new software. |
Archives
June 2018
Categories |
||||||||||||||||||||||||||||||


 RSS Feed
