|
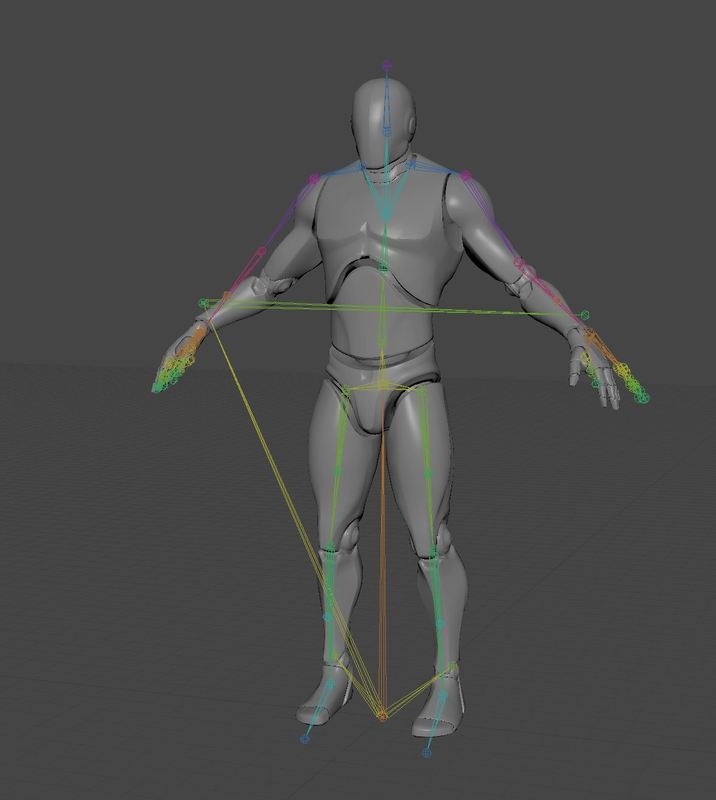
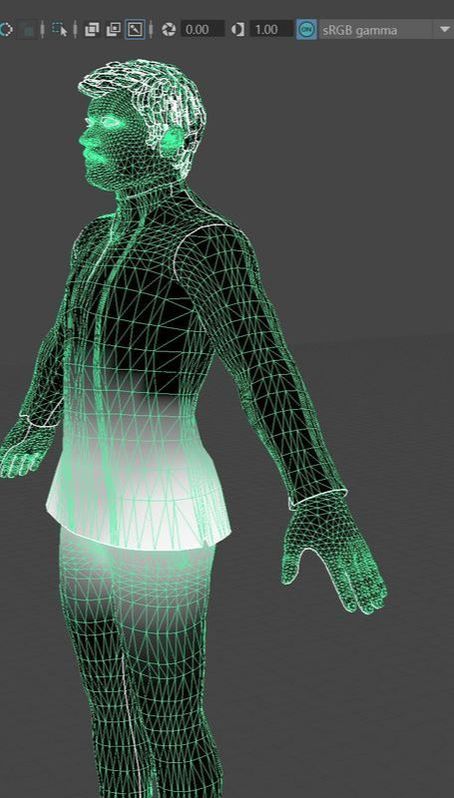
Task timeline Pre-production Start date: 1/2/18 End date: 7/2/18 I have given myself a week to complete the pre-production looking into creating a mind map, basic research into how states and game animation works, mood boards and flow charts. Basic character implementation Start date: 7/2/18 End date: 14/2/18 For this I have given myself a week to set up basic character implantation such as setting up the character to use the unreal skeleton, setting up basic walk blend spaces and basic state machines. Attacking and defending implementation Start date: 12/2/18 End date: 21/2/18 I have given myself just under two weeks to add a combo state using two different attack styles and a defending state as well. Boss and damage set up Start date: 21/2/18 End Date: 1/3/18 I have given myself just under two weeks to set up an NPC boss that can attack and dodge the player and also add damage so that the NPC and player character can damage each other. Pre-production For this part of the project I am going to look into the pre-production of character implementation, I am going to research about how to implement characters into unreal engine and then I will create a mind map and mood board and then look into other areas that can help me with later in the project. I created a mind map that looks into different types of animation that I would use for my character look at action type movement, attacking and defending and miscellaneous moving to add a unique look to the characters movement. 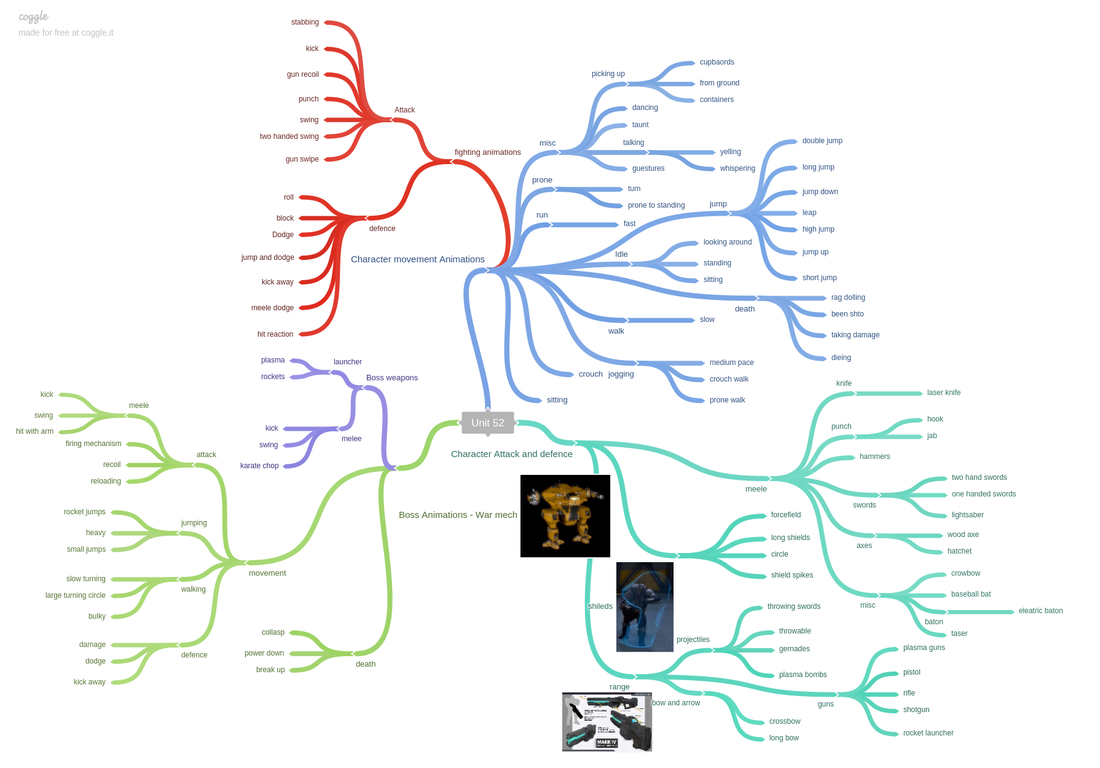 After getting my ideas down on to a mind map I then created a mood board from these ideas so that I could visual represent what I wanted to achieve in this part of my project. 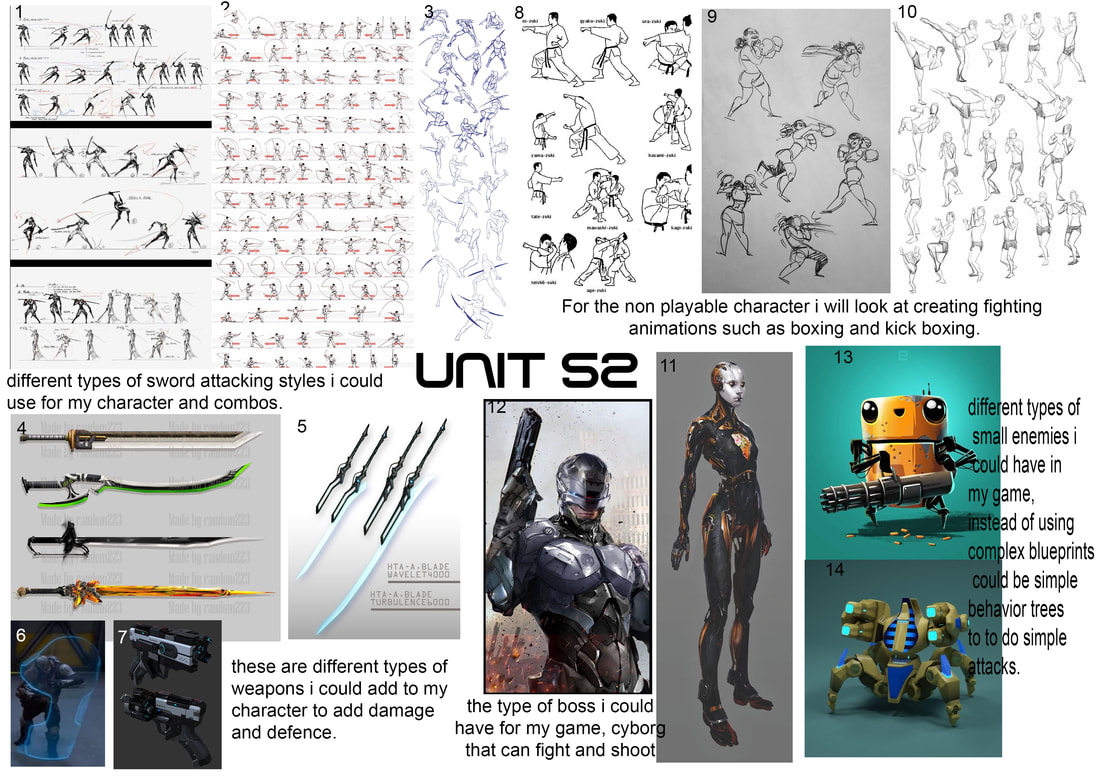 I then did research into how state machines work and from this I ended up creating a flow chart to help me create my state machines for my character. 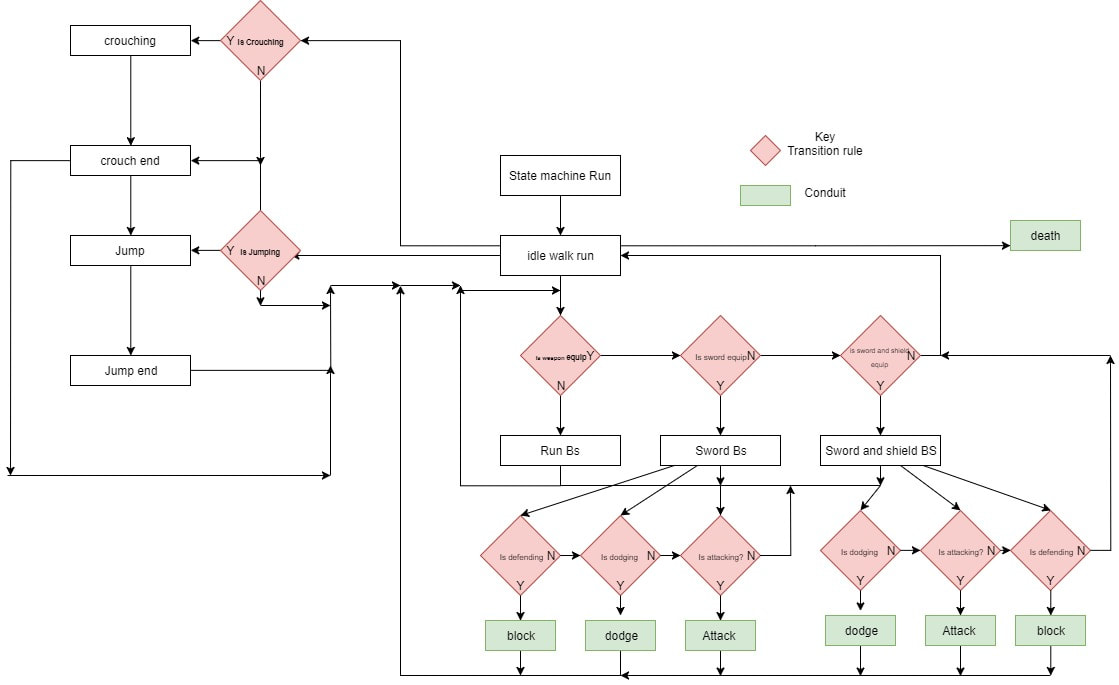 character implementation For this part of the project is all about implementing the character into unreal engine using blueprints, animations, state machines and inputs. Combine these together I will have a player that can fight, move and interact seamlessly. I started of by exporting the third person character an I opened this up inside of Maya, I want to use the third person skeleton as I plan to use animations that are based of this skeleton. I then imported my character I wanted to use and bind the skin like I did in unit 74.
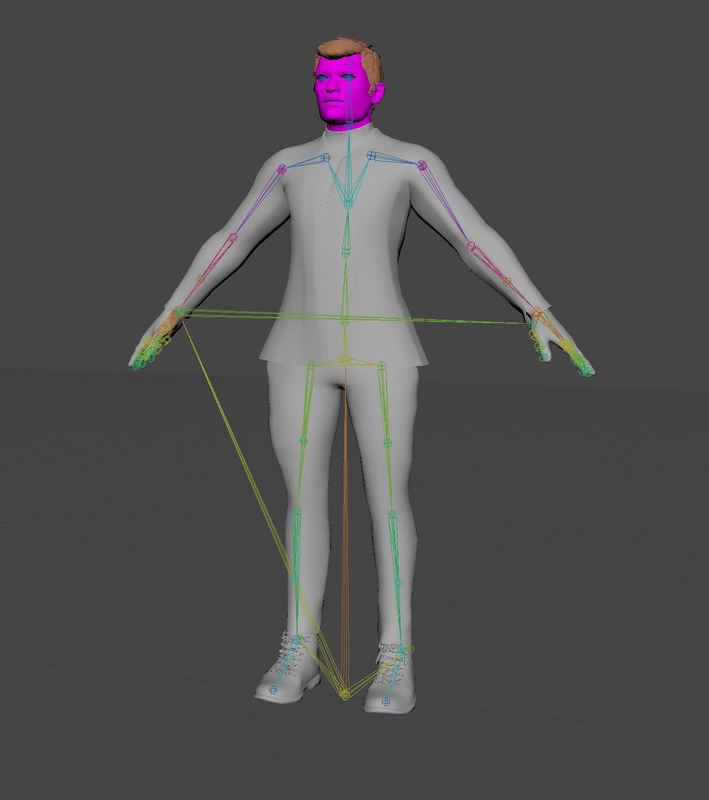
Once everything was in unreal I opened up the third person skeleton and went onto the retarget manager and added a humanoid rig, I then opened up the player rig and did the same with this one. I then selected all my animations have retargeted them from the default skeleton to work with my skeleton, as these were identical skeletons there was not much needed to change the targets or poses. After this I added the sockets to the skeleton and previewed the meshes on them, so I could line them up correctly so that they fitted in the correct positions. After this I added a sheath version of the socket for when it was not equip. I then went to the character and added these models to the character and attached them to the socket. I had one equip and one sheath, I made the equipped ones invisible. After this I made 3 blend spaces for 3 different idle to runs, one for normal walk no weapon, one for the shield and sword walk and then another walk for the sword. I then added states in the player animation blueprint that starts off with the default idle/run and then depending on which Boolean variable is set from the character blueprint the other two walks is selected. 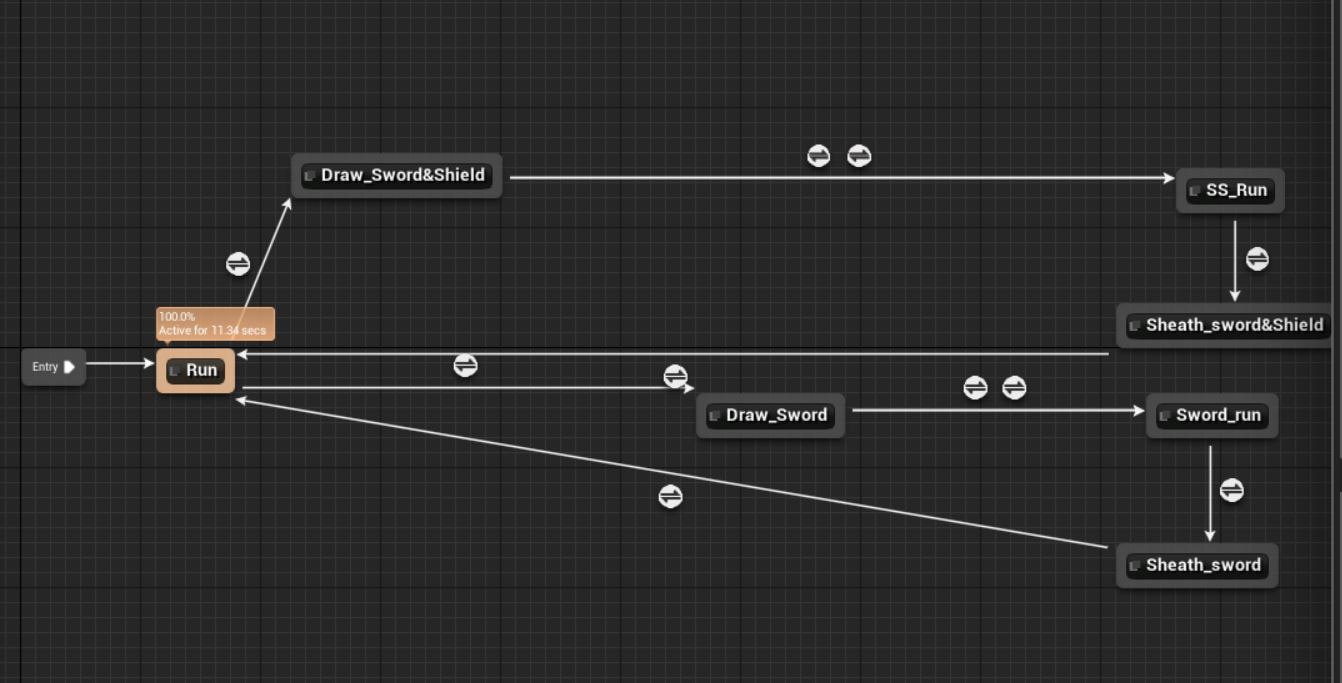 I then went back to the character blueprint and used some Booleans and branches to set up visibility on the meshes so when the character is drawing or sheathing a weapon the in-hand weapon is set to visible or not visible depending on the action and visa versa for the sheath weapons. I then used Booleans to determine which weapon was activated and when the other weapon is selected it would put that weapon away and equip the selected weapon.
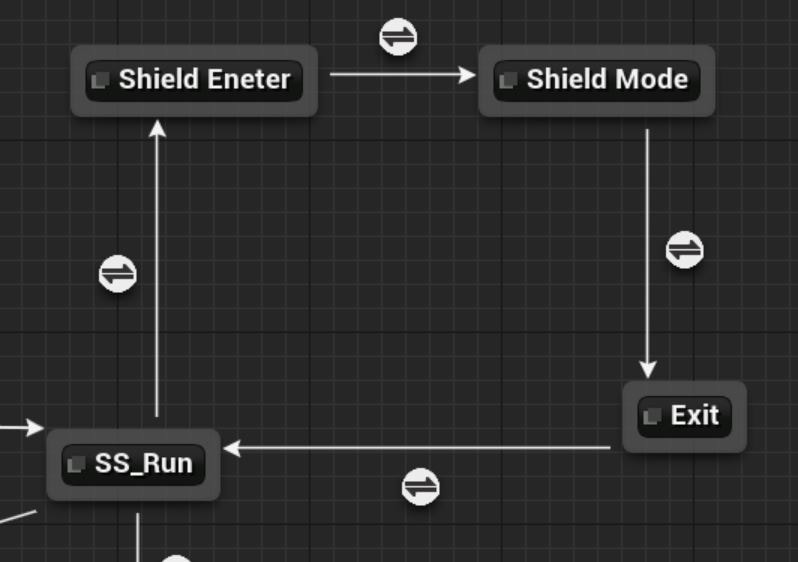
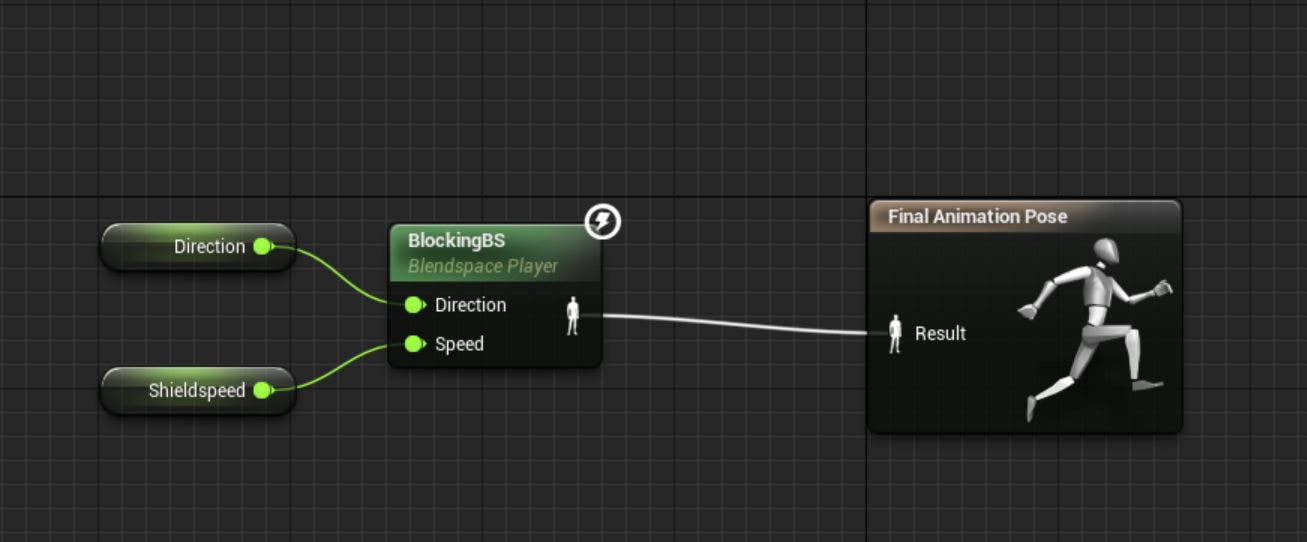
Attacking and defending implementation I started off by selecting the animations that I wanted to use for my attacks for both weapons, I then right clicked on these and turned them into an animation montage, I wanted to use animation montages because this allows me to take control of the animation and control when I want the animation to play and stop using blueprint scripting. It also good for when I wanted to loop an animation to blend into multiple ones.  I then needed to set up the attack, I used the left mouse button and ran a condition checks to see which weapon was equipped and that the player is not switching weapons, then I sent another condition to see if the player can attack. After these checks I placed a switch on integer and created an integer variable and set it to one. I then added to custom events for attacking and resetting the attack. For the defense I wanted to get a blocking I started off by creating a multi-directional blend space and in this I added a forward walk, backwards walk and a left and right strafe and an idle position to blend these animations from. Depending on the direction and speed the character is moving they will blend into the direction and speed.  After this I went to the animation graph and went into my motion state and where I have the sword and shield run I added three more nodes to enter the shield mode, the shield mode itself and exiting. For the conditions I then added a Boolean that is blocking and is not blocking. In the shield mode I then added the new blend space and added the speed variable and created a new variable for the direction. I then set these in the event graph using a calculate direction and get the velocity from the vector length and then for the based rotation the actors rotation.
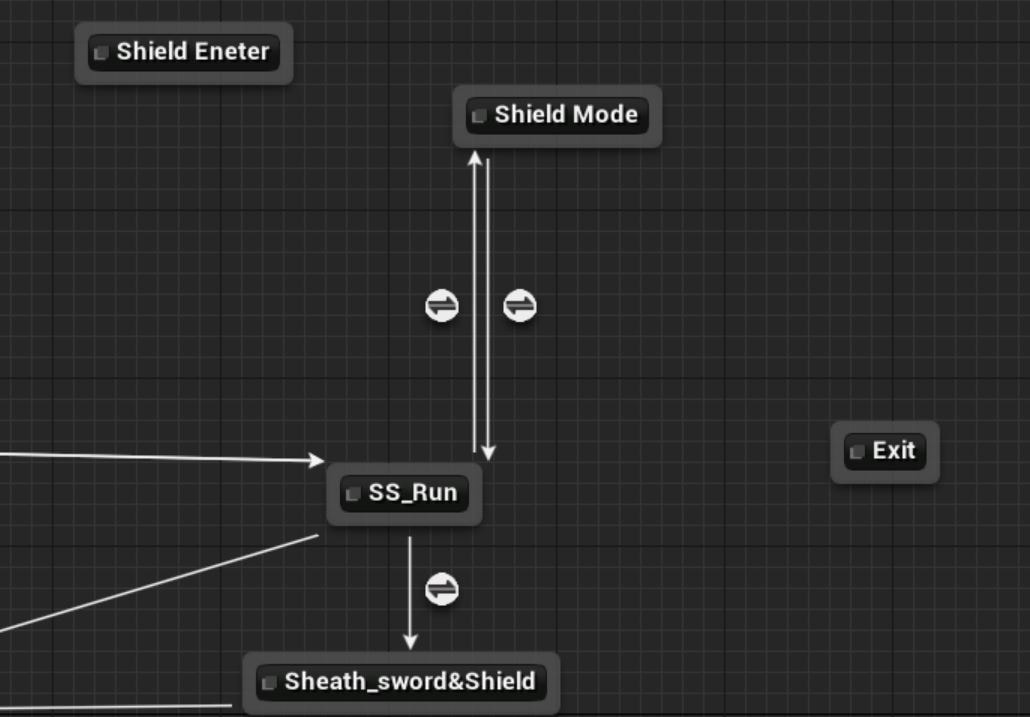
In the character blueprint I then added a new condition for blocking and created an on and off with the on been reversed to the off side. After this I either set blocking Boolean to enable the blocking state in the animation blueprint, I then set the max walk speeds to make it slower in blocking mode and then I add an orient rotation to movement from the character movement, this disables the rotation movement so that the character can strafe. I then added a use controller rotation on Yaw axis, this rotates the camera when the player is turning. Error I then tested the blocking function out, and I noticed when I blocked and walked that my player would walk and glide. Below is a video of the error After looking into this error again I realised why the player was gliding, I was calling an idle animation before and after going to the blend space, the blend space already has this inside of it so it did not need to be called, the glide was because the idle animation is a still player for 3 seconds and will glide till the animation is over. To fix this I just removed the entry and exit from the motion graph.
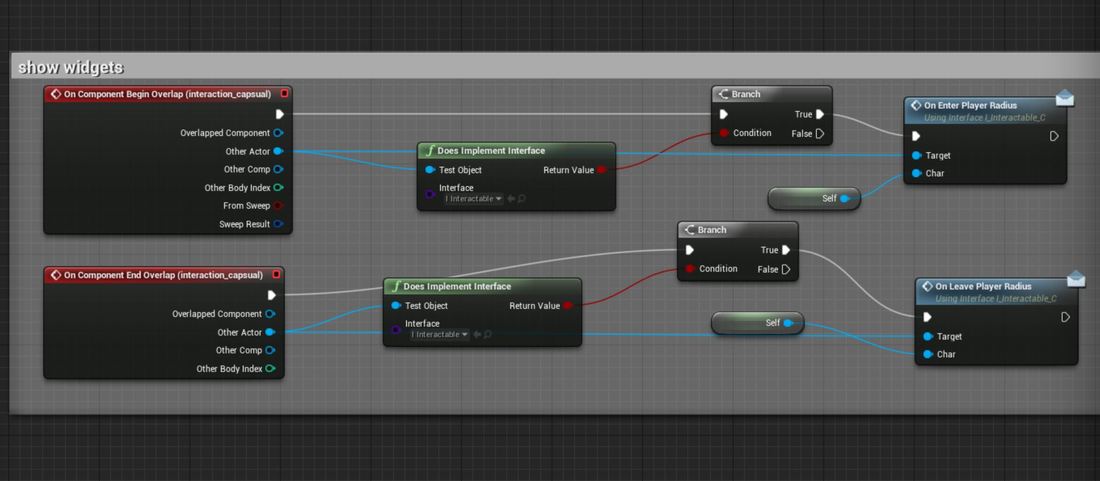
Adding unquie features After creating my attacking and defending I looked into how I could improve my attack system I implemented the secondary attack system that I wrote about how I could improve my combo. When the player is now attacking and the player presses the secondary attack it will find which combo has been played and play an animation equalled to that attack combo and play an unique animation. After creating my primary and second attacks I wanted to add unique features to them to add more feedback for the player, one of the things I noticed is when I walk and attack the player slides on the floor, one of the ways I can fix this is by adding a type of force that pushes the player along the floor but gives the impression that the player is moving while attacking giving great form of feedback. I did this but creating a custom event and setting the character movement ground friction to 0 then I set a node to launch the character, I pulled a pin from the velocity and got the actor forward record and times it with a float which would be the amount for launch the player at. I set these amount after each animation montage in the graph. I then added a new notify to the player attack animations called launch and set it before attacks when the first foot of the character touched the floor. I then set it up in the animation blueprint like I did for the combo attacks. I then tested out I could see if the player moves with out direction input, by just clicking the mouse I could see the player launch into the attacks. After got this working I duplicated it and did the same for jumping but using a actor up vector node and set it on certain attacks where it looked like the player was jumping into the attacks. I then investigated unique ways of adding different features to the character, I added a dodge roll so when the character is not attacking they press the f key and the character goes into a roll and can potential miss an attack form the enemy. I then added a camera shake, when the player attacks with the special attack it shakes the camera to give the impression of a big hit. After this I then added a zoom function which uses a timeline to make the camera change from 90 field of view to 70. I have not found a use for this but I feel it will I will find a use when I get to defence and make the camera zoom in on a block. For this part of the project I want to create an NPC that will sense me and then find and attack me using different ranges (close and far) depending on the range it will decided which attack to at random. I started off by duplicating the third person template so that I had a clean character to work on but had all the basics set up like animation blueprints, blend spaces etc which later I can change into what I want as these are just place holders. Once I had the template I opened it up and added a sensing pawn, this is so the pawn can sense the player when he is near, I can also add hearing to this and set it up in the future so when the player walks or fires a weapon it will know its last location. 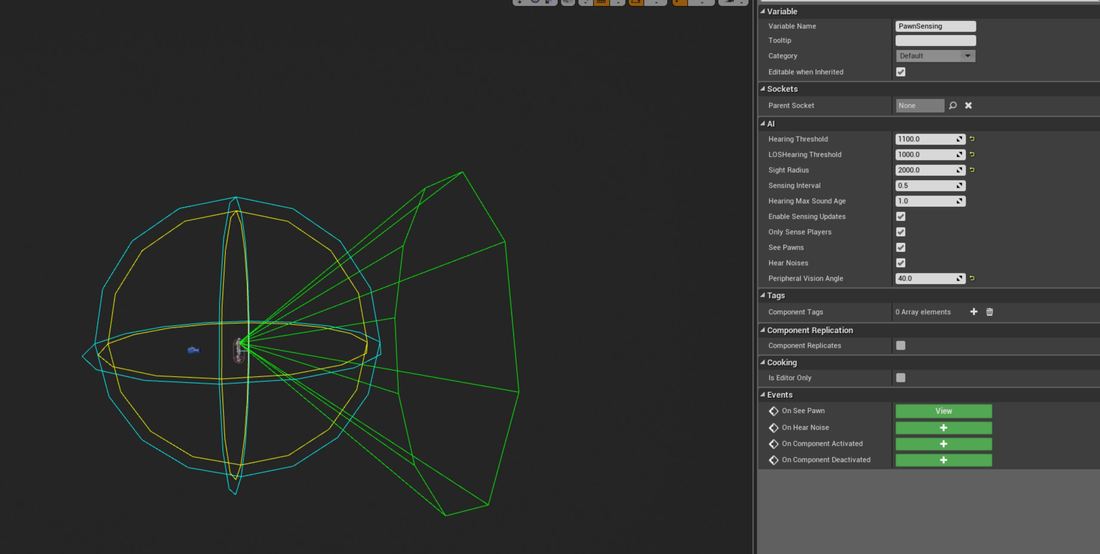 I then added a function where it will check the distance of how far away the player is away from the NPC and till I gets to certain distance it will perform long range attacks and once it enters that radius it will switch to close range attacks. I then added a float on random and set it between 0 and 4 this make the NPC select a number between 0 and 4 and I set it if that number equals 0 it will perform the long-distance task. This will make the NPC run more and attack less and then to add randomness on the attacks I added another integer in random which is connected to a switch on int and the random number selects the attack. Setting up the health For the enemy I wanted to create health bars and make the visible to the player, instead of having a default one at the top of the HUD I thought it would be different to have an enemy health bar above the character that displays when the character is in a certain distance. I started off by creating a widget and setting it desire on screen and added a text of the enemy which can be change via having it as an editable variable and a progress bar that shows the enemy health. After I created the widget I placed into the enemy blueprint and placed it above the head. 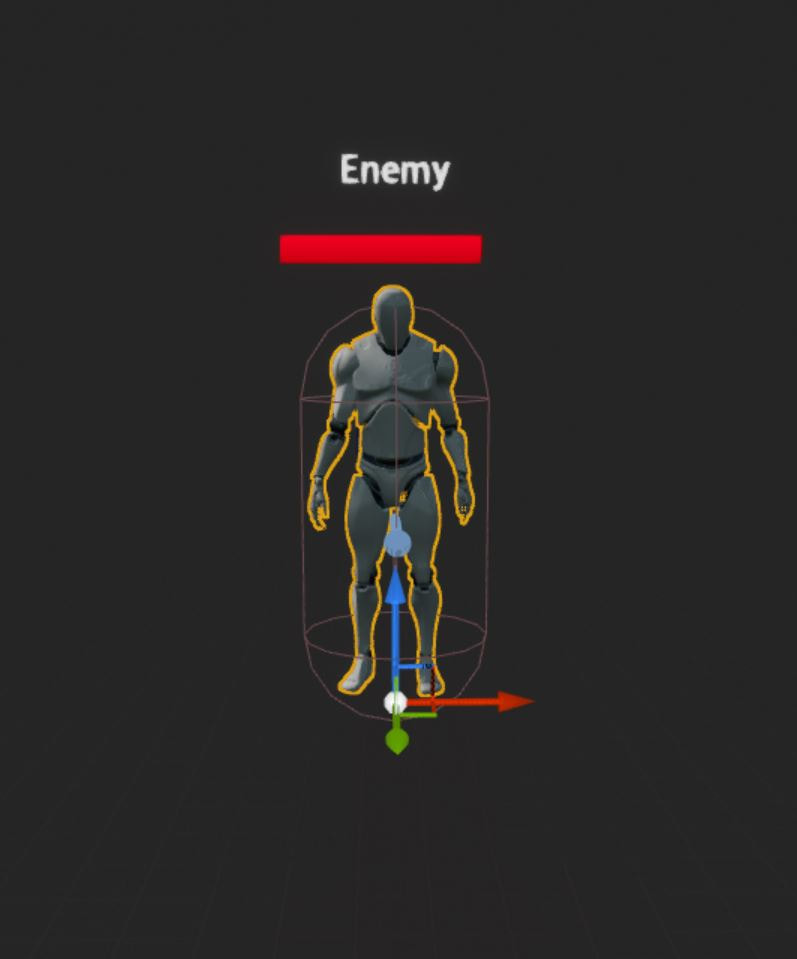 To get the widget to display when the player enters a radius of the enemy, I created an interaction blueprint and created 3 functions: On enter player radius, on exit player radius and on interact which will be used later when I’m creating interaction such as QTE etc I then added a large capsule Collison box to the player character, this will work as the Collison to display the health bar. 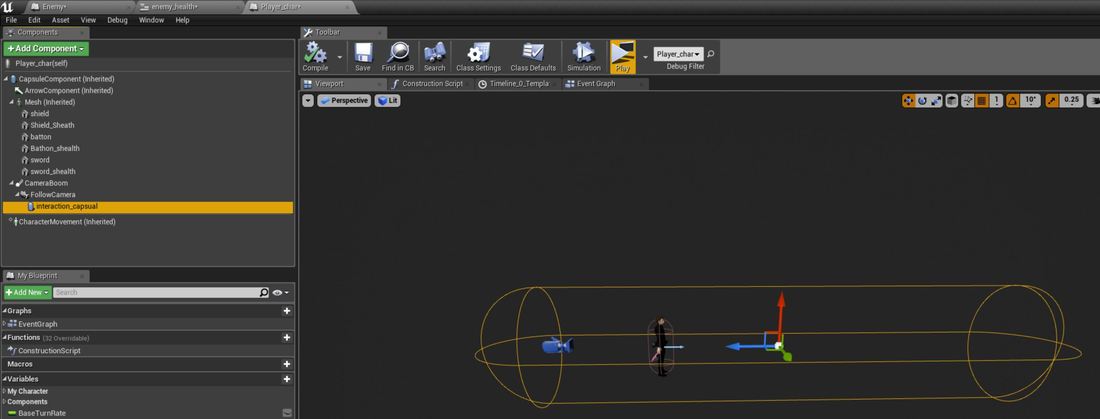 In the enemy blueprints I used the new interaction functions and called these and then set the visibly to show and disappear on the widget. In the character blueprint I used on enter and leave nodes and made sure it equals to the interaction blueprint and then call the function with would trigger the enemy blueprints to display the widget
Below is a video of the widget displaying the health NPC: Adding to the attacksAfter setting up all the basic mechanics for my NPC I wanted to add to the attacks so that when the NPC fires an attack it will damage the player and reduce the player’s health per attack. I started off by going thought all the NPC animation montages and added a new notify for each hand / foot to enable and disable. I added the disable notify to make sure when it is fired that it starts off and then turns on.   Once I had all the notifies set up, I then created custom events in the enemy blueprint and then I attached these custom events to the notifies in the animation blueprint. After this I then went to the enemy blueprint and added four capsule collisions around the players foot and hands and then attached these to the sockets of the respectable positions and then zeroed out / placed them. In the NPC blueprint I for each custom event I then reference each capsule and on enable I set the collision and then on disable I disable the collision. I then set up for each collision on overlap to check to see if it the player character and then print a string to show it has been hit. I wanted to add a visual reference for when the NPC hits the player, looked into a few ideas of having like numbers floating on the screen, or comic book style words like pow, pop etc. I then looked into creating a hud that flashes on damage. I then decided to create a sprite that shows when the character is hit. I started off by duplicating the fire particle effect and removing certain parts of the particle so only the shockwave part of the particle effect is showing. I then went back to the players’ blueprint and created a new custom event and added a sphere trace for objects that will spawn to check to see if the player is in range. I then got the collision box and used the location to spawn this trace for object. I then break hit result to check to see if the player in the collision box if true I then spawn the emitter at the location. dodge After getting all the basic movements working on my NPC, I wanted to little features to make the enemy more realistic. On my distance check I added extra pins to the close range so that it would choose 4 different dodges, then changed the random probability so that It would randomly choose between attack or dodge. This will give the player a bit of breathing space and also give the option for the enemy to go back to its chase / long distance attacks. projectile I wanted to create a projectile that can be thrown at the player, I created a new blueprint actor and added a sphere mesh and collision box. I then added a rotation movement and projectile movement this will make the sphere rotate and move to words the location. I then went to event graph and used the player location as the fire location and then used a collision overlap to check if it is the player hit, if it did it would cast a blue particle effect and if not it would spawn a red particle effect. Future I plan to make this better in the future as I want the projectile to look like a grenade than rather the a straight line fire and gives the player better change to dodge the attack than instantly getting hit by it. Debuffs I then wanted to add debuff on the character when the NPC uses some attacks. I started off with a simple one where the enemy changes the speed of the player. This give the impression that the character is dazed after a heavy punch. I used a custom event and used the character movement to a lower effect and then after a delay I resort it to its normal speed. Future To improve this, I could look into adding like a post processing effect to add like a dazed or spinning effect. I could do this by adding a post processing effect in the character blueprint and just set the visibly when the debuff is active. The second debuff I added was a burn effect. I wanted to add this when the plasma bomb hits the player, I added a new collision box into the character blueprint. I then added a custom event and then I set the visibly of the collision box and added an spawn emitter which I attached to the collision box, I then added a delay for how long I wanted this to be visible for and then change the visibly of the collision box. I then created a new blueprint actor for the fire debuff. I added a collision box and fire particle effect in this, I used simple code to display the fire if the collision box was overlapped, this will spawn the fire if it hits any object or the player. If this hit the player it will spawn the fire on the back of the player. I then went to the projectile and added a custom event to spawn the fire debuff blueprint this will spawn the fire debuff at the location of impact. Below is a video of the above added to the enemy ,For the minion I started off by creating a new character blueprint and added a character created and animated in an earlier unit, I then added a sense node so when the player is in this radius it will trigger the behaviour tree. the behaviour tree it uses a selector branch node that choice between the two if it doesn’t see an enemy it will find a random point and move to it and wait. The other node is an selector node that checks the distance if it meets a distance it will move back to it start position, the child branch underneath run the distance check and if it see the player it launches the attack and follow the player. I then created a blackboard and added various variables that will be used in the character blueprint, to set the variables that will trigger the behaviour tree, the other variables will be ran in service, task and decorator blueprints that will be part of the tree branches that will check conditions. The main conditions for the behaviour tree is that it will attack the player on sight or if hit, the NPC will set once a certain distance is met between the player and NPC and it will return it starting position, using location variables to wonder from it start location and finally triggering the death animations. Task 2 - Damage and DeathIn this task I want to create how the player will damage the boss and how the player will receive attacks from the NPC. I started off by going to the player blueprint animation and creating a new state, in this state I want to have multiple death animations. I added all the death animations to the state and then I added a blend poses by int and then promoted the variable to an integer. I then went to the event graph and called the variable and added it to a random integer in range to randomly select an animation. I then created a Boolean variable in character blueprint and called it death and repeated the same in the character animation blueprint and set it up to when the player dies it sets the animation blueprint variable. I then set this variable as a condition on the state so when it is triggered it plays the animation. 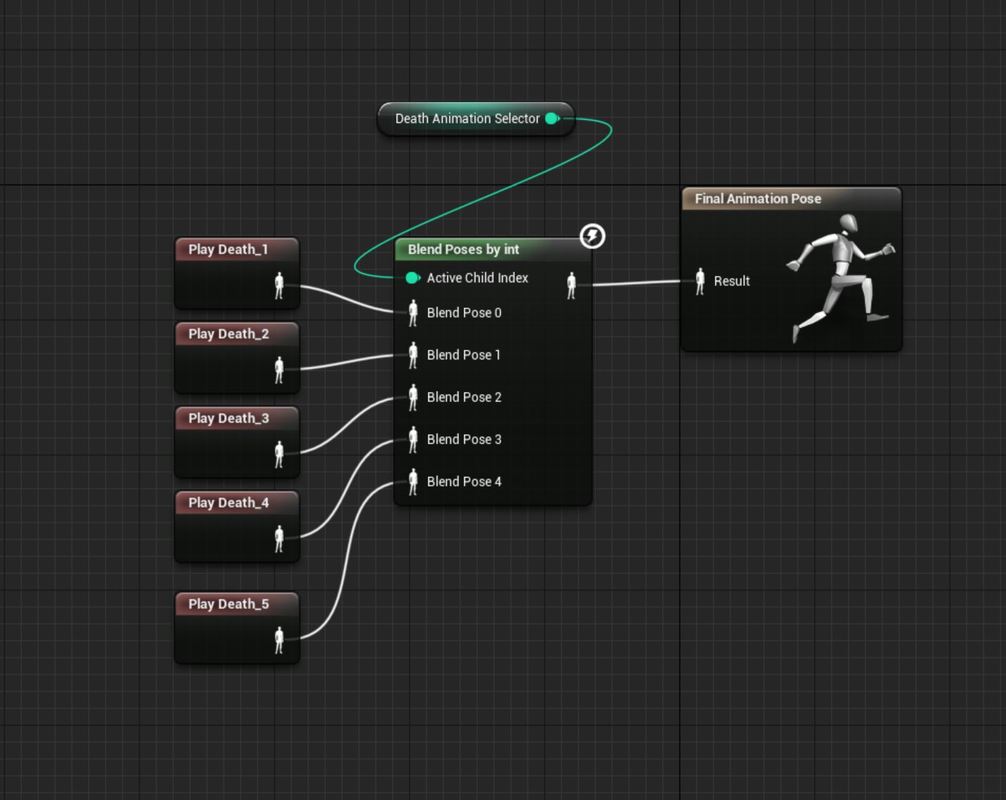 To trigger damage by the players weapons I set up the same process of what I did with the NPC and added a collision box to the weapon and then added notifies on the animation montage to enable and disable the collision box.  I then a min and max damage to each of the attacks and put in numbers to suit each attack. I then added a begin overlap for each collision box I added on the weapons that then gets the apply damage and uses a random float in range and uses the min and max damage that is set. I then added an event any damage, this is used to take health of the player when damage has been applied to the character. I then ran a condition to check if it is the character and then I use armour that takes away from the current value. When it equals 0 it starts to take from the health. When this reaches 0 it triggers the death variable. For the shield damage I don’t want to make the shield give damage but to absorb the damage, to implement this I added a condition in then damage taken nodes before the character health / armour is taken it will check to see if the player is blocking and then check to see if the player stamina is above 0 if not it will take the damage from the player’s health and armour. I then player a custom event that plays an animation montage of the player been hit / knocked back and then spawns a hit sprite for visual references. Each hit then subtracts the damage given from the stamina till it reaches 0 where I will then start taking it from the player’s health or armour. Below is a video of the shield taking damage. Ultimate AttacksTo add onto my damage, I want to create 3 ultimate attacks one for each mode that the player will be in, I will look at making a whirlwind effect for the shield, a high damaging sword attack for the two-handed sword and a healing mode. I started off by creating a new actor blueprint and adding two baton meshes into the blueprint and used the character as reference, I then increased the size and added a collision boxes to the batons. I then added a rotating component to make these spins. After this I removed the character reference. 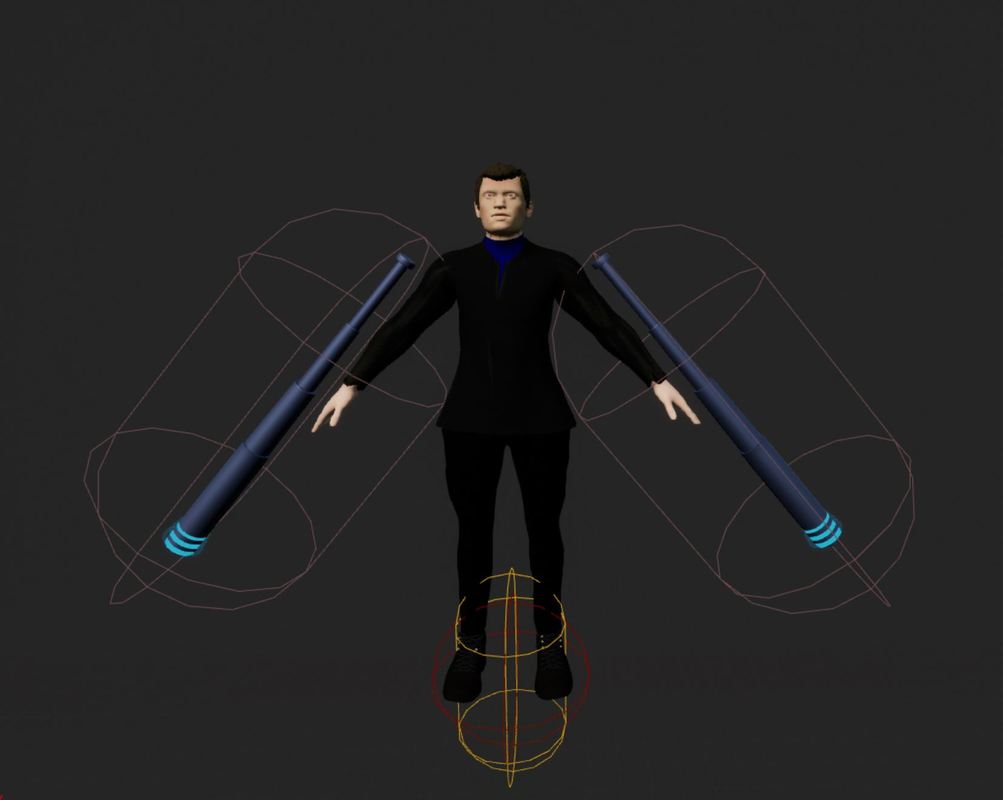 I then made a weapon trail using a particle effect and changing the colours and making sure no velocity was added to the particle. Then tested it out. I then added a particle effect on the animation montage to show it been active and when to hide and show the battons. Two Handed Sword I then repeated the same process for the two-handed sword attack. I used the player character as a reference and scaled up the sword, I then removed the physics so when it spawns it will drop to the floor. I added a collision box around the sword. Special Attack For the last unlimited power, up I wanted to create an health buff, what I want this to do is drain the NPC health and then replenish the players health. I started off by duplicating the fire particle effect, I removed everything except for the embers, I then changed the colour to more of a healing colour, then I created a new animation unlimited to look like it is casting a healing spell. I then added particle effects to the animation notify, this is to play the animations for the healing effect. I then created a custom event in the character blueprint and I used the min and max damage to add health on my player when taken. I then used Booleans to active this custom event and to check to see if any other skill is active and to check if the player has more than 30 stamina and if it does remove 30 stamina and enable the healing spell. 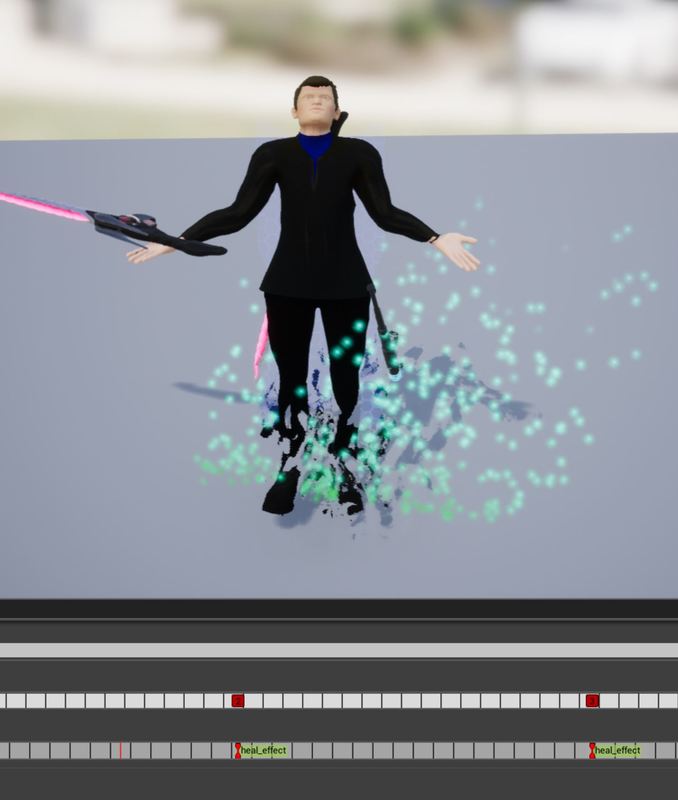 Evaluation Overall, I enjoyed unit 52, making a character come alive in the game engine. The complete process was interesting, learning about how to take my character add animation to it and then call actions on these animations to perform certain actions. I also learned how to do this by using the state machine using conditions and using a montage that where called from the character blueprint.
Overall I felt the first part of the project went quite well, for this task I created a mind map, mood board and looked into creating a flow chart for my states on my character animation blueprint. I also look into a bit of research to understand how this worked. For this task I have no negative points that didn’t go well. I made a few changes to what I created in my state flowchart, it was simple changes that I didn’t know about or could have done more research into. I also add more to the states in the animation blueprint than I had originally planned but this was down to adding extra features to the character. Overall I felt setting up the character implementation was the big task to this project, I had to create both the character and NPC blueprints and then add damage to both so that I could interact with and battle the NPC and he could battle with me two. For the charter I feel the whole implementation went well, I was able to add the UE4 skeleton to my own character and then import that into the engine and add marketplace animation to this skeleton, I feel this went well, I had to go between ue4 and Maya a few times to get the painted weights working. I had no issues creating the states for my character I feel the flow of the character changing from the run blend space to the sword and shield and long sword blend spaces worked well, I had a few issues with the equipping of the weapon and switching which I had to fixed by adding extra conditions and checking which was been used, after some time I fixed this issue. I also add a combo system this was straight forward once I had figured out how to use the notify system in the animation montage I was able to call events to trigger these animations from the character blueprint. I had a few issues with overlapping animations, but this was an easy fix by putting in a delay to let the animations finish before starting the next combo. I also had issues with the player going back to equipping the weapon state which took some time to figure out as at the end of every combo it would play this animation. I ended up fixing this problem by adding an extra condition in the state. I have problems blending the animations with a walking animation. I wanted the upper body to attack and the lower body to walk, I was unable to do this, but I used a different system that launches the player forwards when attacking giving the impression. This is something I will look into in the future to improve on as I feel it is a standard in most games now. The next thing I feel that didn’t go to well was the blocking, I had a lot of issues trying to get the player to enter the blocking and exiting encountering a lot of gliding, this was down to the animation states. I also feel this could be done better and I don’t like how the whole system works. I was able to implement a basic damage system using collision boxes that turn on when a animation notify is trigger from the character blueprint. I feel this is an old way to doing damage but is a quick and simple way to do it. I am going to look into new methods of adding damage via the animation montage and create a custom notify. Overall, I think the NPC turned out well, I was able to create a custom boss using blueprint, that used a range checker and from this range checker it decided which attack to use. I felt this worked really well in the game. I am also pleased with how the minions came out as these uses a different system to the boss by using behaviour trees, it needs a little work on it when the player attacks it but this is minor work on changing variables. I had a few issues with setting up the collision boxes for damage as this was a punching enemy it would damage the player multiple times, I fixed this by using a do once, but I will look into the above method for damage on this. I also feel like the grenade doesn’t work how I want it to and is more like a homing missile and gives the player a better change of dodging. I really like how the NPC looks after upgrading it to 4.19 and using the paragon addons to create an AAA game boss that taunts the player and uses partial effects on attacks. Conclusion Overall, I feel like 52 went extremely well, I have learned a lot from this unit about how to implement a character and it has taught me a lot about the engine and how to use new features in the engine. I feel after doing this unit and learning how to create a custom character and implement all the animation and attacks as well as the boss I feel like it is something I could be interested in doing for a job in the industry. I also has taught me how to problem solve and I feel this has improve a lot for me, when I was stuck I would try different methods to get past the problem and if this did not work I would research the problem to see if I could find a fix. Future improvements Two blends spaces – legs walking with upper body attacking Notify damage in the animation montage New blocking system Improve the grenade – less homing missile like
0 Comments
Leave a Reply. |
Archives
June 2018
Categories |
 RSS Feed
