|
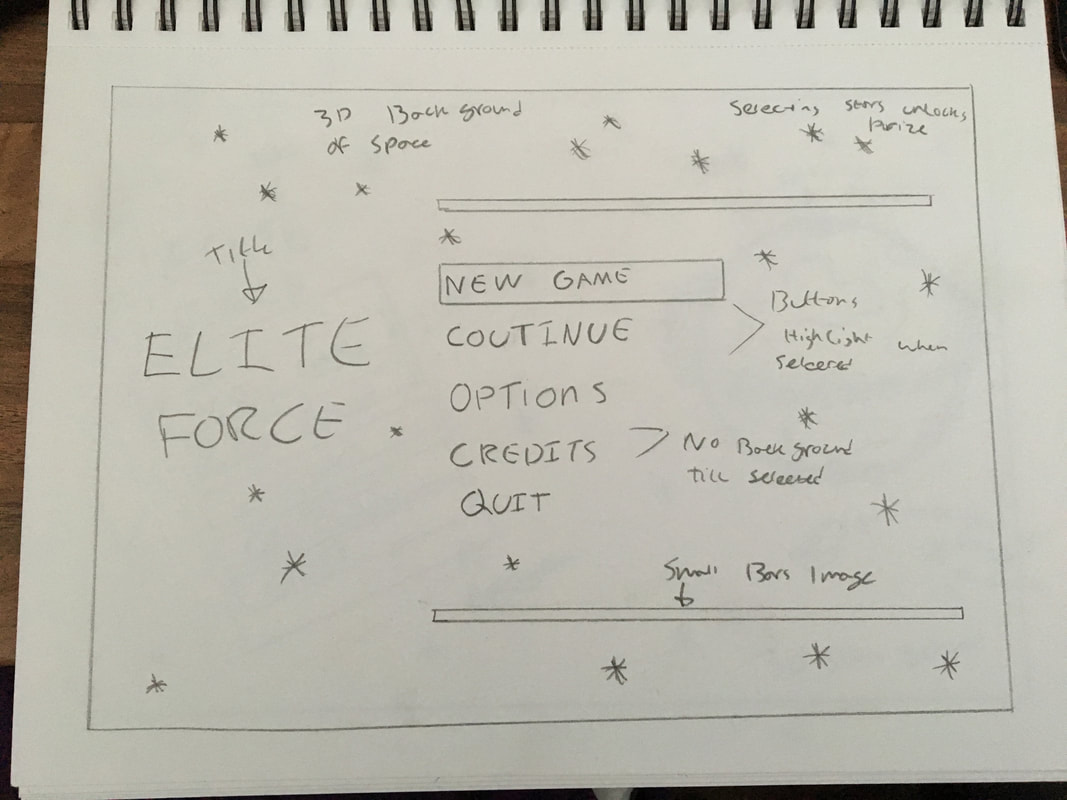
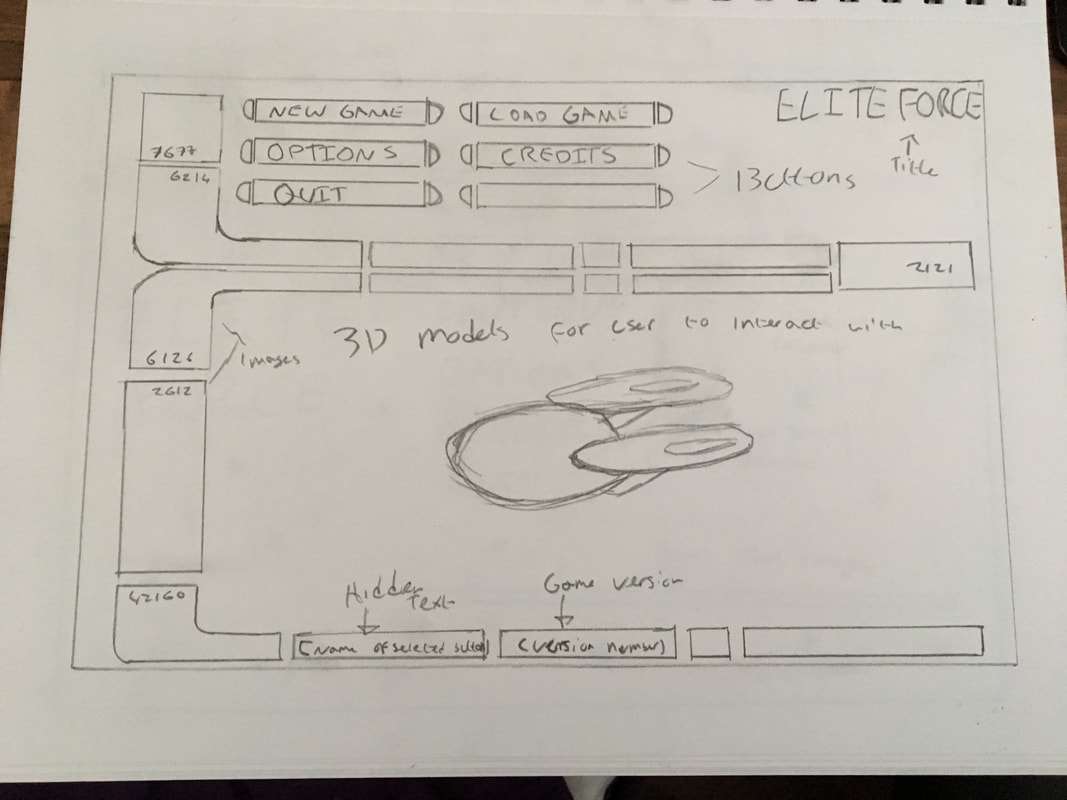
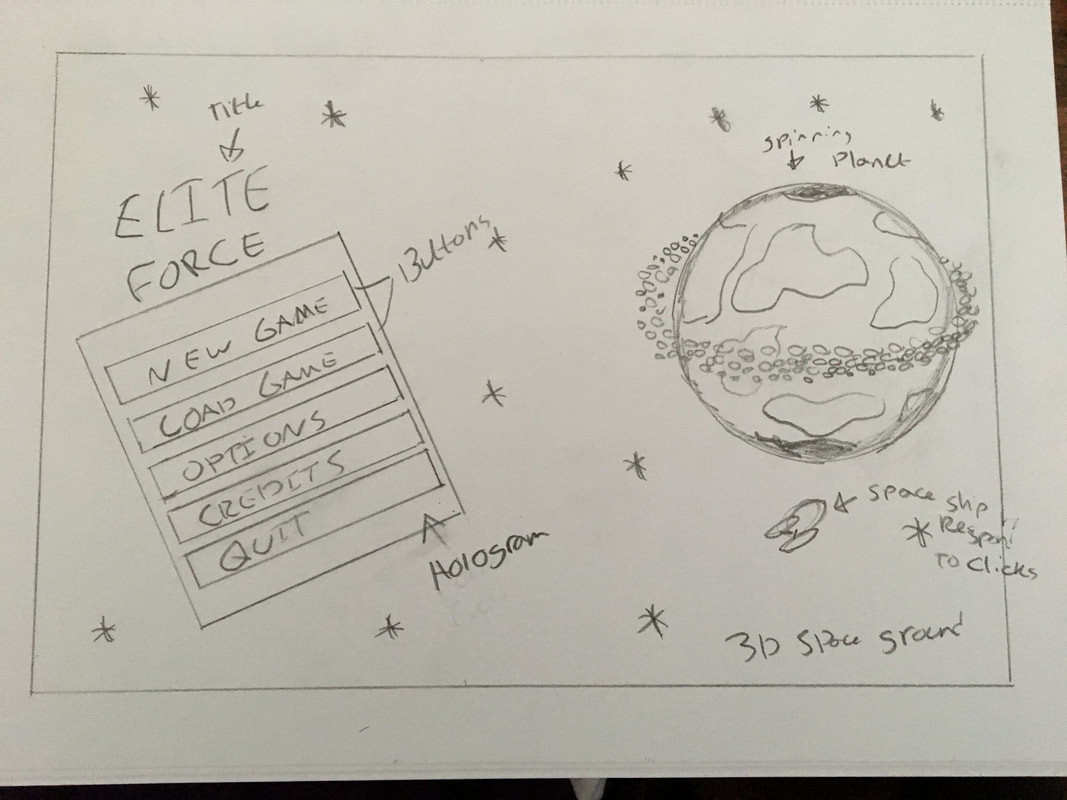
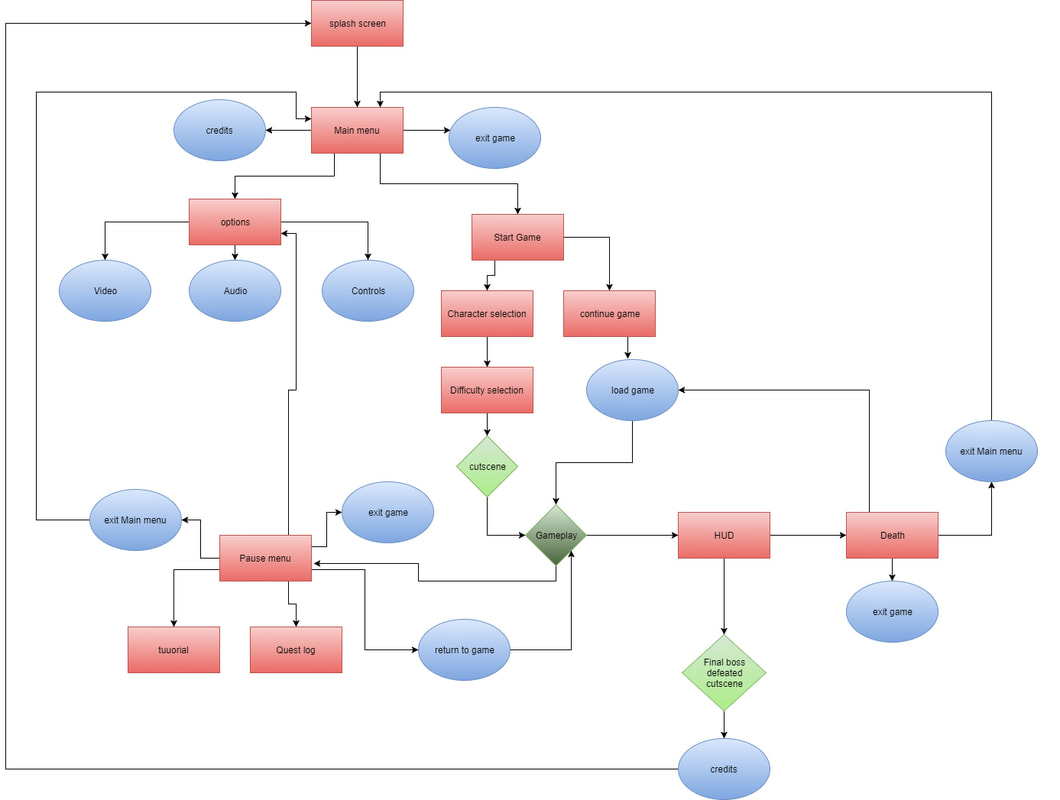
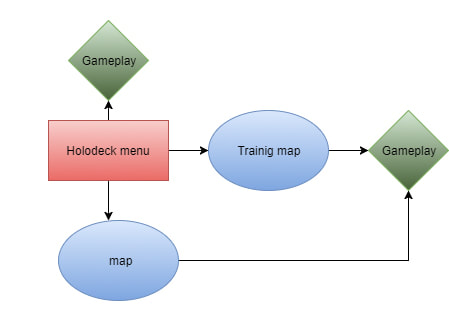
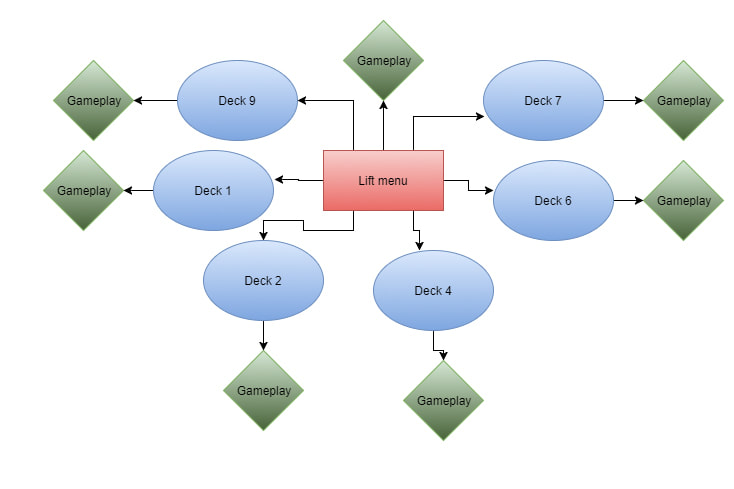
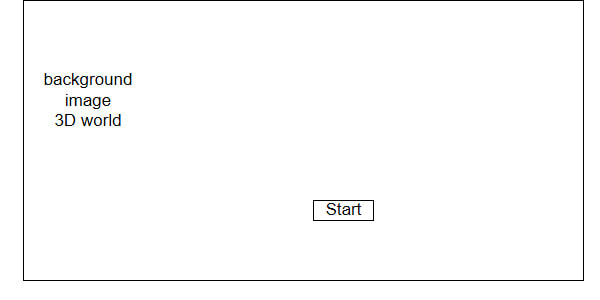
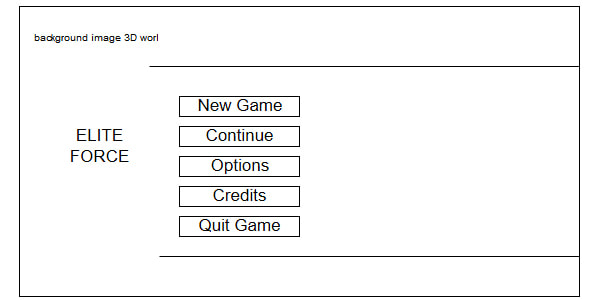
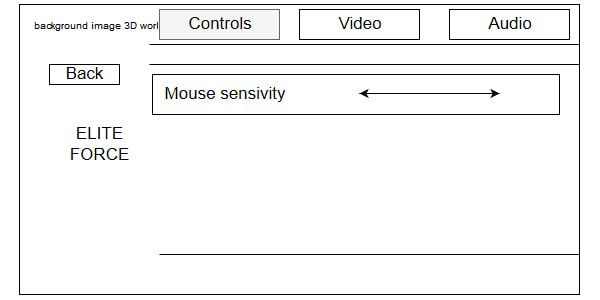
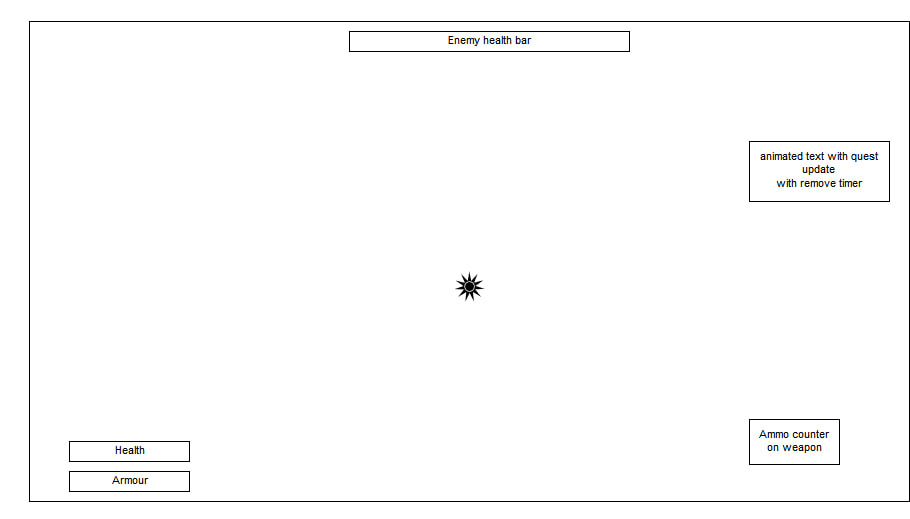
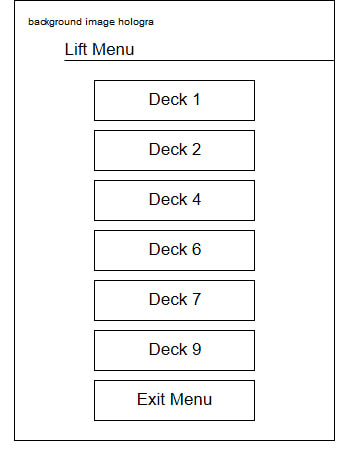
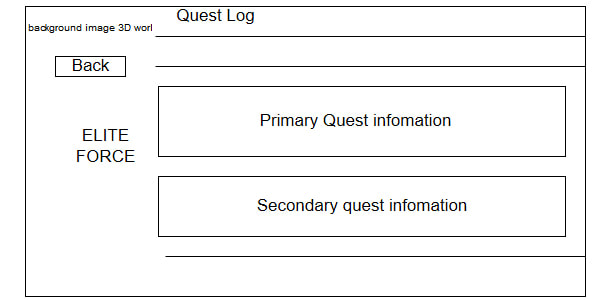
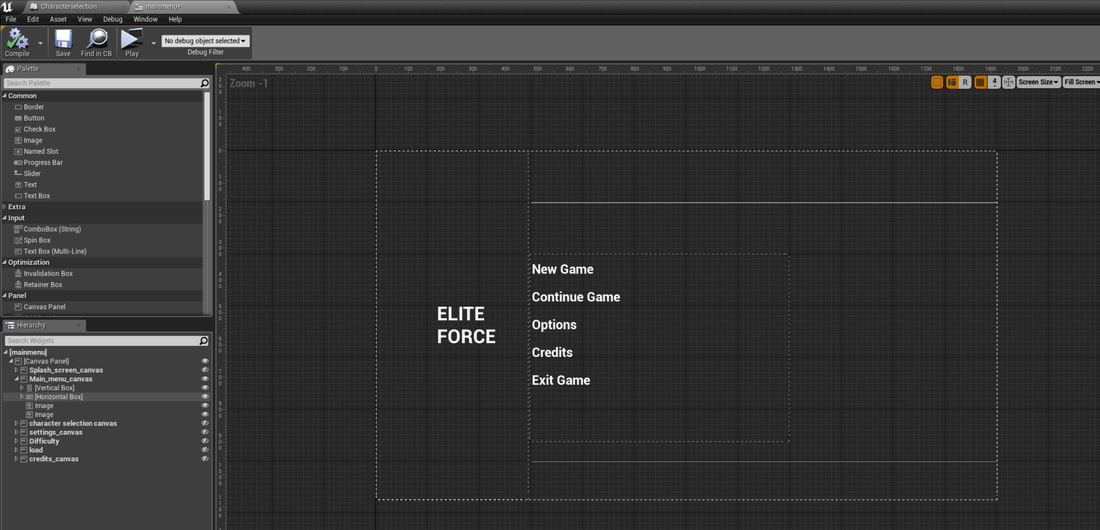
Overview The purpose of this unit is to understand how the interfaces work in the game and why they are so important. also looking at different elements of technology, styles of interfaces, human factors, design principles and feedback of the interface. for my first task I have to research these types of elements and write an essay on how they will relate to my interface for my game. After this I have to look into pre-production ideas such as mood boards, mind maps, flow charts and wire-frames of how my menu will work and look. Then I will create this menu from my wire-frame and add functionality and then test my interface and get peer review. Time scale Task 1: Research Start date 18/9/17 Finish 30/9/17 I have given myself just under two weeks to complete the research into interfaces looking into forms of feedback, technical, types of interfaces, human factors and user interface design principles. Task 2: Pre-production Start date 1/10/17 Finish 10/10/17 I have given myself the time scale of 10 days to create pre-production of mind maps, mood boards, wire frames, flow charts and a basic block out. Task 3: adding functionality to my interface. Start date 10/10/17 Finish 5/11/17 I have given myself just under 4 weeks to add functionality to my interface the major developments I plan on creating in this month are: Character selection Character customisation Checkpoint saving Game difficulty Game settings Interactions Level streaming in game menus; pause, HUD and lift menu 3D environment and graphic, post processing (in each of the sections above) Task 4: Testing and reviewing Start date 6/12/17 Finish 13/11/17 For this unit I have given myself a week to gather peer review and to test my menu system with white and black box testing methods. Task 1 For task one I had to research and write and essay on about interfaces looking at 4 keys areas, technology, interfaces, human factor, user interface design principles and forms of feedback. For each key area I had to look at several aspects and write and understand how this could influence and have an impact on my interface system. For technology I considered keyboards and mouse as I plan on my game been produced to be used on a computer I looked at how interfaces used keyboards before moving to a point and click system. From here I considered screen resolution as ever user could have a different monitor size to what the game is developed on, I found out from my research the most used was 1280 by 1024 or higher. For interfaces I considered sense oriented and how interfaces don’t have to be a 2d graphical image but could be more diegetic and immerse the player into the game more. For example, having the health bar on the player. I then considered voice recognition but didn’t pursue this as unreal doesn’t support this feature. I also looked into command line inputs for cheats and Easter eggs to add a uniqueness to my game. For human factors I researched about user experience and how much a user plays games leading into adding difficulty settings to add challenges. After this I looked into accessibility and how my menu could be use with people who have mobility, hearing and vision impairments. For user interface design principles, I looked at the architecture of interface systems and what makes a good interface system looking at complexity, easy to understand, sub-categories and how the interface looks and typology that makes an interface system. Finally, I considered forms of feedbacks I used three industry standard games interfaces (Dead space, Fallout and Prey) and looked at the physical, perception, visual and control methods. this gave me a great understanding how interfaces work and the types of feedbacks that each interface gives and what would be expected of mine Time scale I was able to produce my research essay within the deadline I set for myself most of this was spent finding articles to refence and finding realisable sources of information. After creating my draft, I only had to make minor changes to the essay before finally submitting it, all within my time scale. Task 2 For task 2 it was about pre-production, I had to research several types of interfaces to get an idea of how I would want mine to work and look like. I broke this pre-production down into, research, mind maps, mood boards, flowcharts, wireframes and a block out of my interface. I started off by doing added research I wanted to consider colour psychology and shape psychology as I felt this had a massive impact on the type of feedback my interface would create depending on the shapes and colours I chose. I considered what each colour and found out how it could influence people and then I did the same with shapes. After my research I wanted to get my ideas I had for my interface down onto paper, so I decided to create a mind map, in this mind map I broke it down into three areas: types of feedback, architecture and interfaces. For feedback branch I considered different types of feed backs I wanted to give my menu such as the physical feedback for example; colours, shapes, sounds and typology. I also considered visual feedbacks such as; button styles and graphics type. For my architecture branch I broke this up into three subcategories the first one been interfaces where I looked at the type of interfaces I would have, how I would be able to navigate in my interface and what I could have in my interface. The next branch I considered peripherals and looked at different types that I could use to control and navigate my interface and continue using this into the game. for the final branch of architecture, I looked at different human factors such as: age, localizations, the user requirements, and experience levels. For the final major branch, I looked into interfaces, for this branch I wanted to come up with as many ideas as I could that I could use in my interface and what my game would require, I also looked into other options that I could use in the future if I ever wanted to expand my game. Below is my mind map 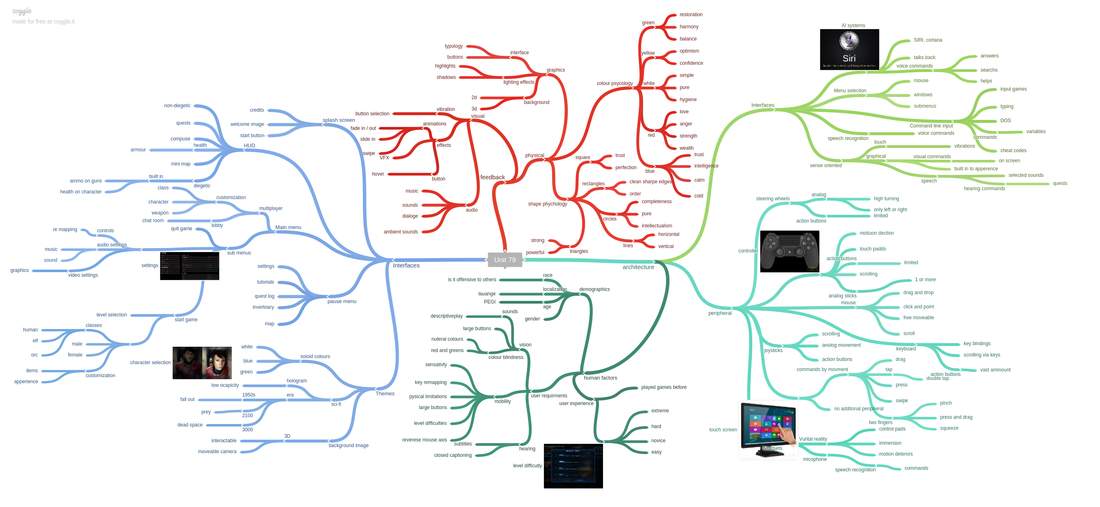 Once I created my mind map I wanted to get my ideas on a visual representative, so I decided to create a mood board to find my ideas so that I could visualise the feedback and style that I wanted to create. In my mood board I looked at different menu styles, the several types of interfaces such as options, character selection, customisation and how I want my menu to look like. I also looked at other ideas I wrote down such as HUD elements like health and ammo and in game menus that I could use to help improve my game. Below is an image of my mood board: 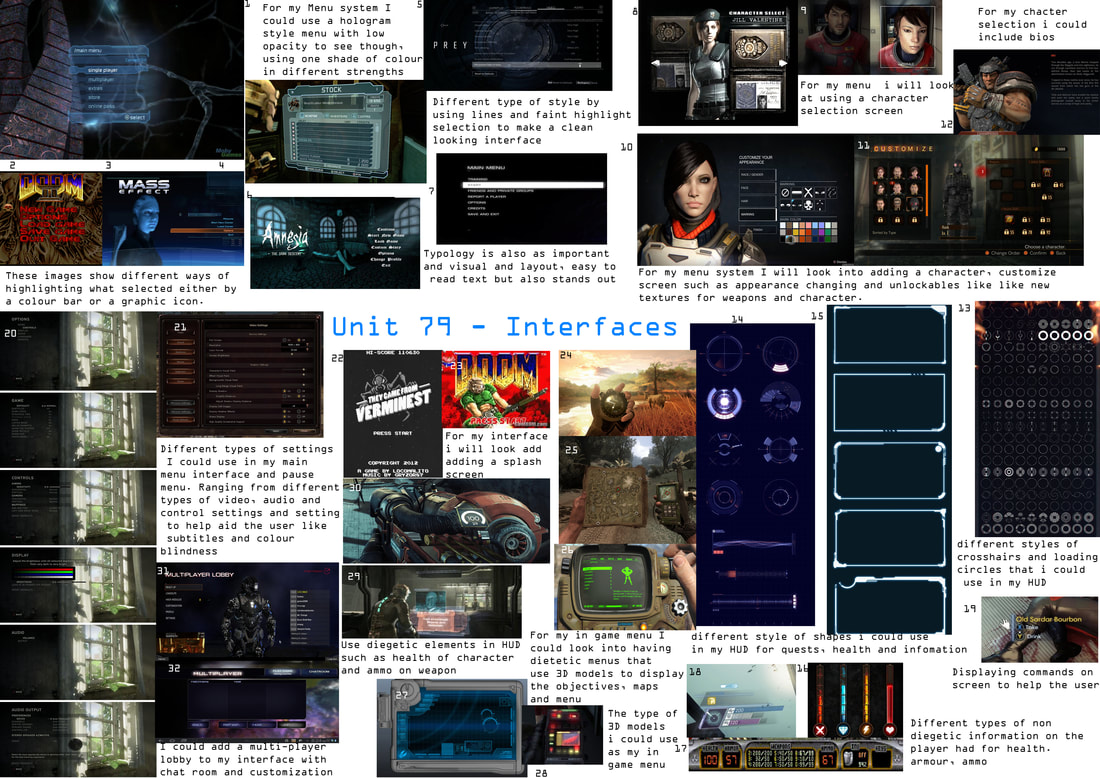 After creating my mood board, I had a few ideas how I wanted my main menu to look like so I decided to sketch these ideas down onto paper so that I could have a visual idea of what I wanted to achieve. I drew three sketches all having a space theme, my first which was a simple menu based in the solar system for a background using horizontal lines to keep the buttons and text into a section. I then had a console looking sketch idea where it looks like the user is controlling a console station it would have had a 3D model of a space ship rotating and all the buttons would have been at the top. Then my third example was a large open environment with a small simple menu system in the left-hand side with the buttons. On the right-hand side would have been a large planet rotating. After getting my sketch ideas down onto paper I then decided to create a flowchart of the main interface, pause menu and other in game menus. These flowcharts show the main interface is connected to the in-game interfaces and what happens on completion and death. in red squares is the main interfaces that people will use and interact with. The blue circles represent the sub-categories of the main interfaces and command buttons that direct them to another interface. Green diamonds represent gameplay and cutscene that are triggered by the interface. I then created flowchart diagram using the same methods as above for the in-game menus that do not connect to the main interface system for example the lift and holodeck menu. From the flowcharts that I created, I wanted to create wireframes of each main interface and sub-interface, on these wireframes I want to show the position of the buttons and type of button, text, canvas, background images and the information each interface has. I created this by drawing basic shapes to outline the boundaries of the canvas, the location of buttons, text and miscellaneous items. I created an HUD wireframe as well, so I could get the positioning for the health, armour, enemy health and ammo. I also created wireframes for the in-game menus such as the lift and holodeck menus to get an idea of how these would look like too. These wireframes can be seen below After creating my wireframes, I decided I want to turn those wire frames into the interface. For this I just wanted to create a basic block out, to get the positioning correct before I add functionality and graphics. I started off by creating canvas for each of the sub categories, once I got the position for the title and horizontal bars I duplicated these to all the other canvas that had these. I also create the basic layout for my settings and character selection so that they would be ready for any functionality to be added to them. Below you can see a few screenshots of the interface. Changes I made a few changes from my flowchart/wireframe and when creating my block out, I planned on having the difficulty setting after the character selection but the camera transitions going back and forth didn’t feel right so I decided to move the difficulty settings in front of the character selection. Time scale For my pre-production I gave myself 10 days to complete any pre-production. I was able to get the bulk of it done in a few days, the wireframes and turning them into block outs took the longest but this was expected as creating the widgets in unreal engine can be a time-consuming process to get every element in the correct location. I didn’t run over my time scale to complete my pre-production, I started to blend task 3 into my time scale once I was towards the end of creating the block out for example adding ability to swap canvas to show the sub-categories when a button is clicked. Task 3 For this task it is all about the core functionality that will be include in my interface system, I broke down the core developments for each task and setting individual deadlines for each task. This will help me project manager my core development and help me stay on top of the easier developments that I might forget to do. The core functionality and mechanics that I will aim to focus on are:
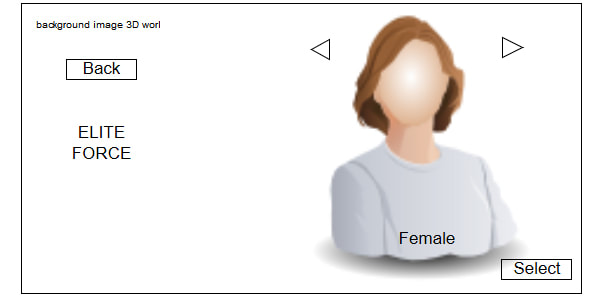
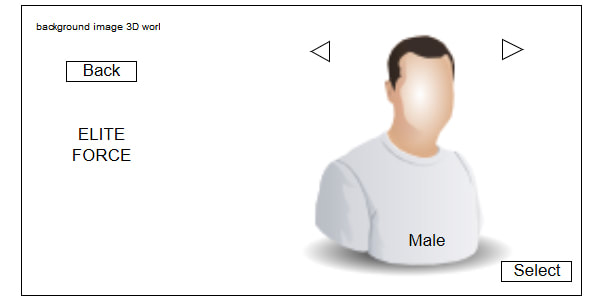
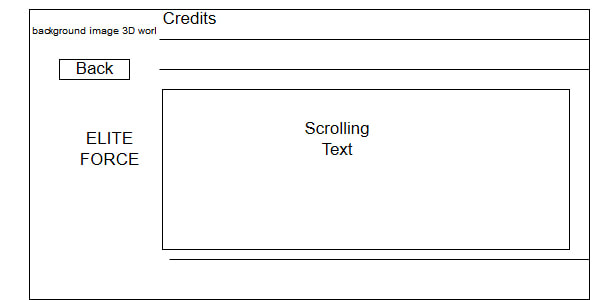
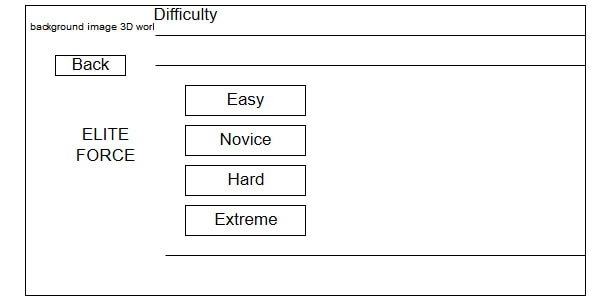
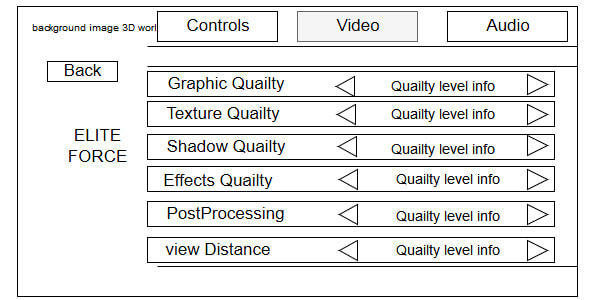
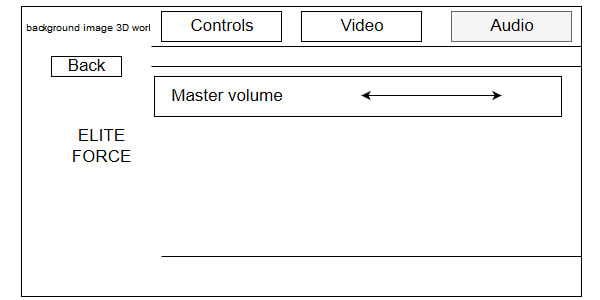
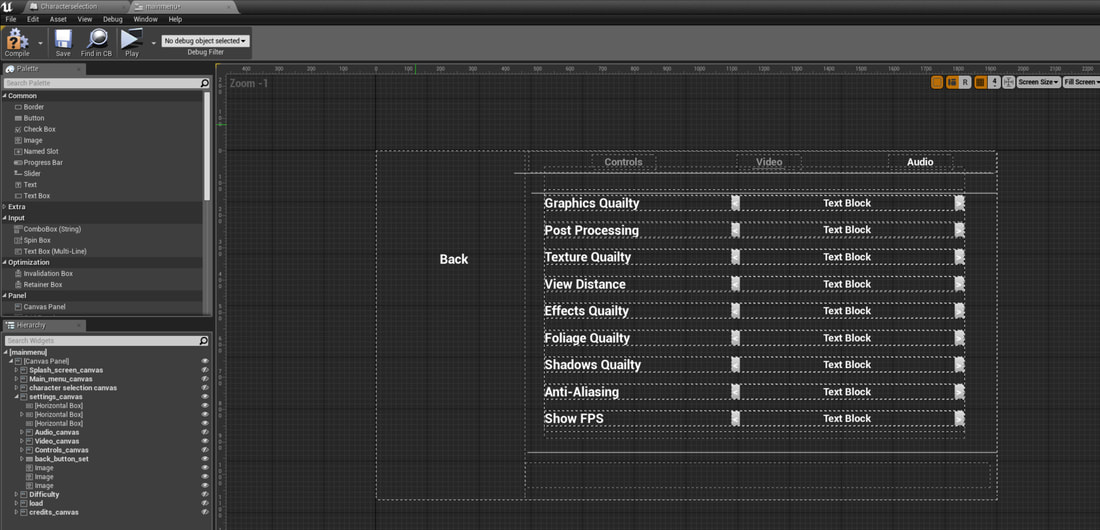
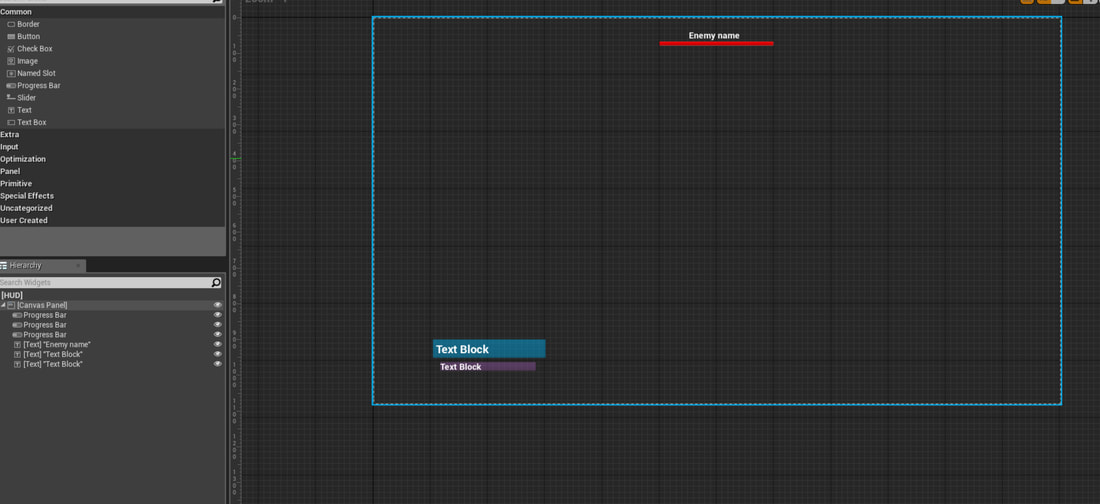
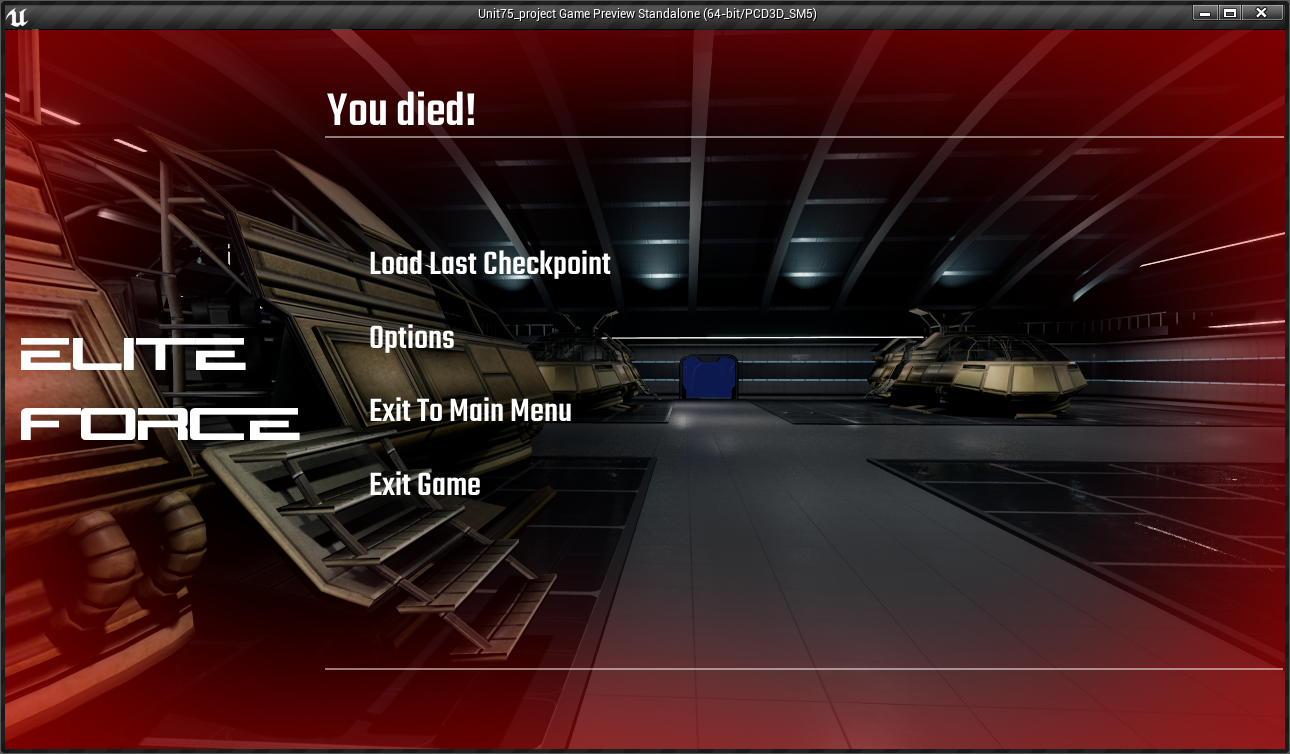
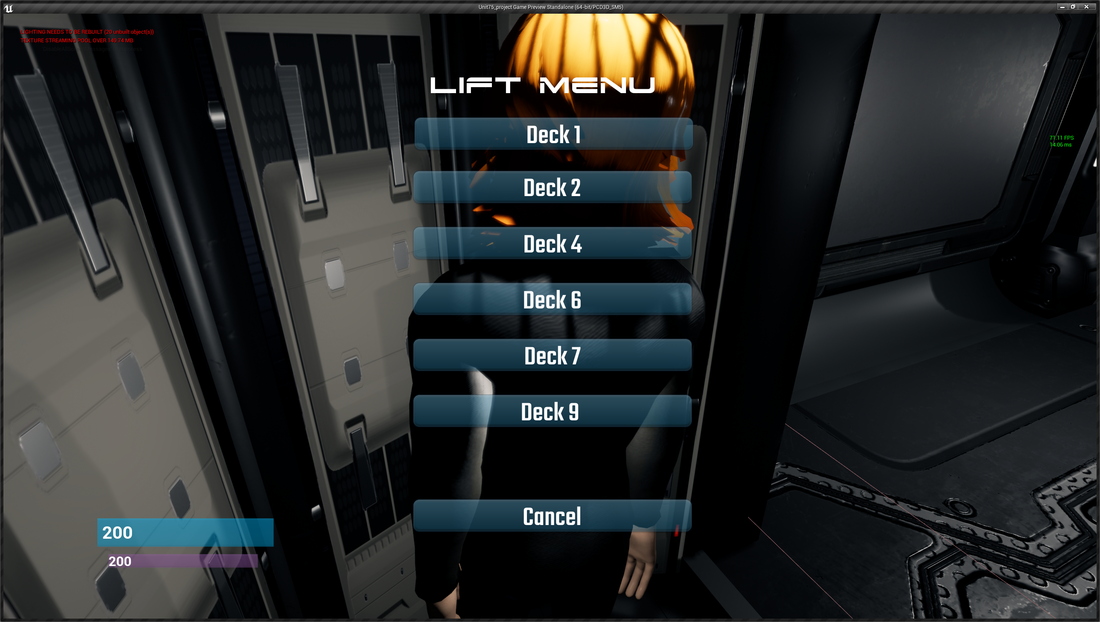
Character selection For my character selection, I started of using a template that when I click on a static mesh I would load the character details, I decided not to use this after testing it. I was able to work but for my game menu system it would not work as I planned on creating my interface its own level and I had to spawn the correct character selection over to a new level. This involves saving those variables selected. This method I started using if the game wasn’t too large and I had planned on using persistent levels with sub levels below. After researching on creating a custom character selection that would work for my system of having the menu system in its own level before the user is teleported to the starting level. I started off by creating blue and pink character meshes for my character selection screen, for the time being these meshes is what the user will take control of to play as either my male or female character. I then created a save game instance and set up my menu level to be the default map. After creating the meshes I added three variables into the save game, an integer for the user index, a string for the save slot and a Boolean to check if the male is selected. Then I went into the blank character blueprint and added a spawn actor that would spawn the newly created meshes in my main menu widget. When the male is selected the female mesh is depsawn and spawns the male mesh in front of the camera and vice versa. In the event graph I used the Boolean to determine if the male character is selected or not, I then created functions that would use the save game instance to save this Boolean and the other variables. I then went to my character blueprint and added the same functions so when the player starts the game the character mesh is spawned and selected from the set variables in the save game file. Every time the player changes level these variables will be loaded, and it will be the same mesh. A demo of the character selection can be seen below in its block out state. Character selection update 17.10.17 After implementing my character customisation, I was able to import and create my character. As I had to edit my selection screen to accommodate my customisation screen I felt it was necessary to update my character selection. Instead of spawning one mesh now when male or female is selected the blueprints that I edited now spawns 6 skeletal meshes that share the same animation blueprint that makes the mesh move simultaneously. This is what allows my character customisation screen to work as it is changing one of those body parts. Also since creating the character selection the environment has been improved and now features the character in its own quarters when the user is selecting which character. Below you can see a video of the character screen after it been updated. Character customisation screen For my character customisation screen, I wanted to let the user be able to customise the character that they have selected regardless of if it is male or female. I came up with the idea of keeping the change unisex so looked at changing the hair colour, uniform colour, hair style and adding a PDA on the character arm. I started off by uploading my character to mixamo so that I could get a quick skeleton and animations so that I could add my custom character in to the game. Once the character was rigged I then took it into Maya and I started to separate my mesh into 6 parts; hair, head, uniform top, uniform shirt, legs and pants. I then exported each of these meshes with the skeleton and imported them into unreal engine. Error When I tried to create blend space and animations for my character so that it could go from idle to running it was not working. I decided to have a look at the skeleton in unreal engine and it had only imported two bones from the skeleton. I then opened the exported file in Maya to notice during the export the mesh had unskinned from the skeleton. This was a simple and quick fix by reskinning the mesh to the skeleton and reimporting. After doing this I was able to add a blend space and animation to my uniform shirt, I used this as the base so that I could get a visual representation that the animation was working. I then selected each skeletal mesh and assigned the skeleton to the skeleton that has the animation. Each body part now uses the same animation blueprint. I then went to the character blueprint and added skeletal meshes under the mesh for each of the body parts. I left them blank, so I could assign me meshes to it. I then went and edited the character selection changing this from spawning just the one mesh but to spawning each of the body parts in the skeletal meshes that I assigned in the character blueprint. After I had sept up the mechanics for the custom character I started creating my widget for the character selection, I started off by changing the material by casting to the character blueprint and getting the reference to the hair/uniform body part and then setting the material for these body parts. I set up buttons with different colours. After this I imported hair meshes that I created for my character and used the same method of getting the body part reference and setting the mesh to the new body part. For the PDA this was a mesh that I connected to a socket on the characters body and I turned the visibility to off. In the widget I added an event dispatcher that I could call on a flip flop to turn the visibility on and off. After I got the widget set up I added the code to display the widget on a console and added a camera for it to transition too and a spot light to light up that character. Below is a video of the final character customisation screen: Game Difficulty After my research into game interfaces I wanted to add a level of difficulty to my game, for user who have never played games to users who game regular can both enjoy my game, for the difficulty setting I have decided it will affect the player's health, armour, ammo and enemy difficulty. I decided only to implement the health and armour for the time being and will add more to this in the future. I started off by creating a game instance that can communicate to blueprints and levels. In this instance I added health and armour variables as an integer. I then went to the main menu widget and for each button I cast to the game instance and set my health an armour. To see these variables, I then used variables inside of the widget with values of 200,150,100 and 75 depending on the level and connected these to the set values. When the player selects the difficult these variables are set in the widget and transferred to the game instance. I then went to my character blueprint where I wanted to set the characters max health and armour by using the variables that were selected in the difficulty settings. I did this by casting to the game instance and referenced these variables. I then created a health and armour integer variable in the character blueprint as these will be the live variables and set these and connected the game instance reference variables to these new set variables to set the values. After this I needed to set up a HUD system to show my health and armour, I created a new widget and placed to progress bars at the bottom with text. I created a bind function to these and cast to the game instance to get the max health and armour and to the character selection to get the current values. I then used simple maths to work out the percentage as a progress bar works form 1- 100 percent. I then created a simple function to remove health to test my health and armour. A video can be seen below Update 28/10/17 Since creating my game difficulty and HUD I decided that I need more of a visual representative when the player gets low health, so I decided to add an animation to play flashing the screen red around the boarders to simulate this. I did this by creating a simple image in photoshop and then created an animation in a new widget to remove the visibility of the image and show it again. The results can be seen below Checkpoint saving and loading The main aim for my save and load function of my game is that all the information of the player gets saved at the end of a level (health, armour) and loaded into the next level the player selects. When the user exits the game, player will be spawned at the beginning of the level selected with the current health and armour. I started off by creating an enumerator, in this enumerator I added all the level name that I wanted to have for my checkpoint save. I added this enumerator to a new blueprint called checkpoint and made it editable so that I could select the level in the details options. In the checkpoint blueprint and the save game instance I created new variables, a vector for location, text for current level and four integers for my max and current health and armour. I then added an collision box with an overlap and then from the player begin I created an branch to check for a save file so that it know to create or load one. From here I cast to my save game file and I set all the variables I then cast to my character blueprint and got a reference for the current health and then I cast to the instance to get max health and connected these to the set variables from the save game file. I then wanted to save the location so form the collision box I got the current location of the actor and set it in the vector variable in the checkpoint blueprint I then cast to the save game and set this variable using the checkpoint variable to reference where the player was. I then also used the text variable and enumerator to select and set what level the checkpoint was on, so those coordinates were set on the right level. Error As you can see in my video it saves the information on what level the player is on, but it isn't saving the coordinates of the location, I spent many hours and solutions trying to get the player to spawn at the checkpoint and decided to leave it as the player is spawning at the start point of the levels and saving what level the player is on. this is something I will come back revisit and figure out how to spawn the player to that location, but first I need to carry on with the rest of the save and load function as I didn’t want to run over on my project schedule. I then went to the character blueprint and added two functions to save all the current health and armour to the save game file and another function to load these back into the character when the game is loaded. To load the save game file I added a simple line of code in the main menu widget that loads the save game file and loads all the variables teleporting the player to start of the level with the current health and armour that the user had. The can be see below been tested: Changes that I made In my flow chart and wireframe I planned on having a canvas with four loading saved games I concluded as I didn't need this as I could just load the last game by clicking the caption button instead of selecting previous saved games. It will also be easier for the user to navigate though. Game settings Video settings For the graphics settings I used arrays to store text values and console commands, I decided on using this method as it keeps the interface looking tidy without having multiple buttons all over the interface for each setting value. I started off by making a text variable I turned this into an array, named its main settings and added 4 elements to this array, this is where the text will get the level of settings from so I added low, medium, high and ultra. After this I created 8 more text arrays with 4 elements inside, each of these arrays would be the console commands so for graphic array this would change the resolution of the screen so I put in r. screen percentage 25,50,75,100 for the levels. After creating the arrays, I made 8 integers, and gave them all a basic value of 3, this value will represent which element is selected in the arrays. After creating the variables, I took the main setting variable and got its length and sub stroked 1 from it and added a clamp to stop it going below 0, I did the same with the internet variable when the user clicks the left arrow but for the right button I added 1 instead. These connect to a site, which set the integer variable. The set variables connect to an execute console command which would change the setting on the arrow press. When the user press the arrow now the setting will go up or down and display what level it is at. Using console command changes, the settings in the engine so I don't have to save them like I did with the character, I could save them to a config so every time it the game loads up it remembers the last settings instead of going to the default value. Below is a video of the graphics settings: Audio settings For the audio settings I have master volume that is also a slider. This slider controls the master volume for the whole game, to cast this though the whole game I used the game instance that I made for the difficulty level. I started off by creating a float variable and called it master volume. I, then we to the blueprint of the game instance and created an 'event into' and connect this to a set base sound mix and created a new sound mix file. I then created a custom event and set the master volume and connected the float to this custom event. I connected the set variable to a node called the 'set sound mix class override' set my sound fixer in this and selected the pre-made file of master in sound classes. Then I got my variable and connected it to the volume. From this I went to my menu interface and selected the slider and clicked the change on value button and from this I cast to the game instance and pulled out a pin to my custom node and connected the audio volume to the slider value, this will set the volume when the user uses the slider. I placed some music into my level and gave it a test, the slider reduced the volume. Changes After getting my master volume working I decided I wanted to add more control to the audio settings, after research I found out I could assign audio its own sound class which means I could control these sounds classes by its own slider and connect it to the master control. To implement these changes, I duplicated the code in the game instance and added new variables and custom event and set it up in the same as the master. Below is a video of the audio level been tested. Interaction 1 For my first interaction I have set up a system for user to select a combination of buttons that will set the bridge into a red alert senior as the user has turned on the gravity, the NPC will float and this is where the player can use radial impulse to move the character in the gravity. As I started off by duplicating my character blueprint and deleting the none essential code and left the movement feature. I then move the collision box away from the character to stop strange physics. I then placed this into the game work and made the character look like it is in the chair. I then changed the global gravity to 0.5, and placed a physical volume around the level. I then cast on a key combined for the player to jump and on a delay to ragdoll and this is what makes the player look like it floating in the low gravity. Once the character is floating then enabled radial force with a line trace then I attached this to a tick with a gate so when the player clicks open the gate it fires the radial force and pushes the player around. I then used event dispatchers on the buttons clicked on the console and used Booleans to check if the buttons are selected and when all the buttons are selected this will enable the interaction and radial force. I then wanted to add visual effects in the environment to create a red alert, I started off by getting references for all my emissive lighting in the environment and adding a set material to all these changing the white emissive material to a red material. I then changed the point lights by referencing then and changing the intensity and colour and to add more effect I enabled a sound to play. Below is a video of me testing the red alert interaction Changes / updating the visual effect For the red alert I wanted to a give the impression that the lack of atmosphere is affecting the camera system, so I decided to do for a glitch type of post processing effect. For this I used a third-party plugin in for this as creating a glitch material is very time consuming. I started off by creating another post processing volume and placed it over the first camera that user interacts with, I then created an array and added the material instance to the post processing material. In the event graph I added another pin to the sequence pin and then got a reference to the new post processing volume, from this I got the enable the volume. I added a delay connect to a random float to randomize how long to wait before enabling and then added another delay with an random float to randomize how long the effect will be on for. To add more effect, I created an camera shake blueprint and added a node called the client play camera shake to the blueprint that will add a subtle camera shake when the post processing volume is enabled. Interaction 2 I wanted to create a field of asteroids that spawn in front of the spaceship that the user can fire and blow them out of the way, I started off by looking at mechanics of how I could trigger an event to destroy the asteroids. I created a new blueprint actor and place a cube inside of this, I then went and added a button to the main menu that I could fire and destroy the cube. I came across a few errors for this system and I had problems respawning the asteroids so I decided to create a dispatching system with a life spam to destroy the mesh if it’s not had any interaction for more than 30 seconds. Once I had the dispatching system working and had random asteroids spawning over a large area I decided to turn these meshes into destructible meshes and I then added a radial damage node with a particle effect on impact. This will destroy the destructible meshes and look like the explosion has destroyed them. After this I wanted to add random effects to the interaction so I added a dynamic material instance function connected to random floats so that would change the colours randomly on spawn. After this I wanted to add a post processing effect to give the impression when this random effect is selected the user is under a drug influence. I used a simple post processing volume and enabled the chromatic effect to add a light blur and also changed the depth of field to add a slight blur. This can be seen tested in the overview of the menu video around 6.30 seconds Level streaming I wanted to use the level streaming features to make my game run more smoothly, I started off by selecting the part of the level I wanted in a new sub-level and then I went to the levels tab and created a new level with the selected actors. I then went to the level blueprint and added a node to the door button to load the new stream level, from here I wanted to the steamed level to deactivate when the player goes back though the door, the way I did this was by adding a trigger box inside the door frame and using a Boolean that the player sets every time they walk through the trigger box. It will then use this condition to see if the player has walked through the door after the button is pressed if they have the level will deactivate. In game menus; pause, death menu and lift menu For the pause menu all I did was duplicate the main menu widget so that I had the same layout and deleted the canvas that I did not and any code that was not needed I then changed the buttons to match my wireframe and then I set up the mechanics in the character blueprint to display the widget and pause the game. I then repeated this process for the death menu and for the lift menu I just added buttons with graphics that I created and just added code to load up the level selected.
Conclusion
I really enjoyed this part of the development, I feel like I have learned a lot about interface systems and it has broaden my knowledge of what is required to create a good interface system that is easy to use but also gives the right forms of feedback to the user. I found that certain areas gave me a challenge and made me work hard to figure out the problems I encountered but this overall improved my knowledge of how blueprinting works within unreal engine. It has also shown me areas where I could improve on such as improving on my researching techniques to find more reliable information. I could also improve on my pre-production creating more and covering more areas as I felt missing out the character customization was something to overlook. Overall, I think the development went well, I was able to produce everything I had planned, most of these were on schedule or before the scheduled date. I had two development tasks that took longer that the deadline that I had set myself. The character selection took longer than anticipated as I didn’t realise that I had to implement save and load functions of what character was selected as I was using my own menu map and not streaming from a level in the game. This added time onto the development task to get this feature working. The next development task that took longer than I anticipated was the checkpoint saving this was mainly down to how complex it was and getting all the variables to save and load up the correct ones was time consuming but a good process to learn. Even with these two development delays I was still able to produce everything planned for and was able to produce the menu that I was looking to create.
0 Comments
Leave a Reply. |
Archives
June 2018
Categories |


 RSS Feed
