|
After I created my level I wanted to make a small obstacle course that combined the two together. I used a fixed camera for the player to view from while using the jump and crouch, then I turned the camera back to the player so they can fire the weapon and use the quick time events before going though the portal.
0 Comments
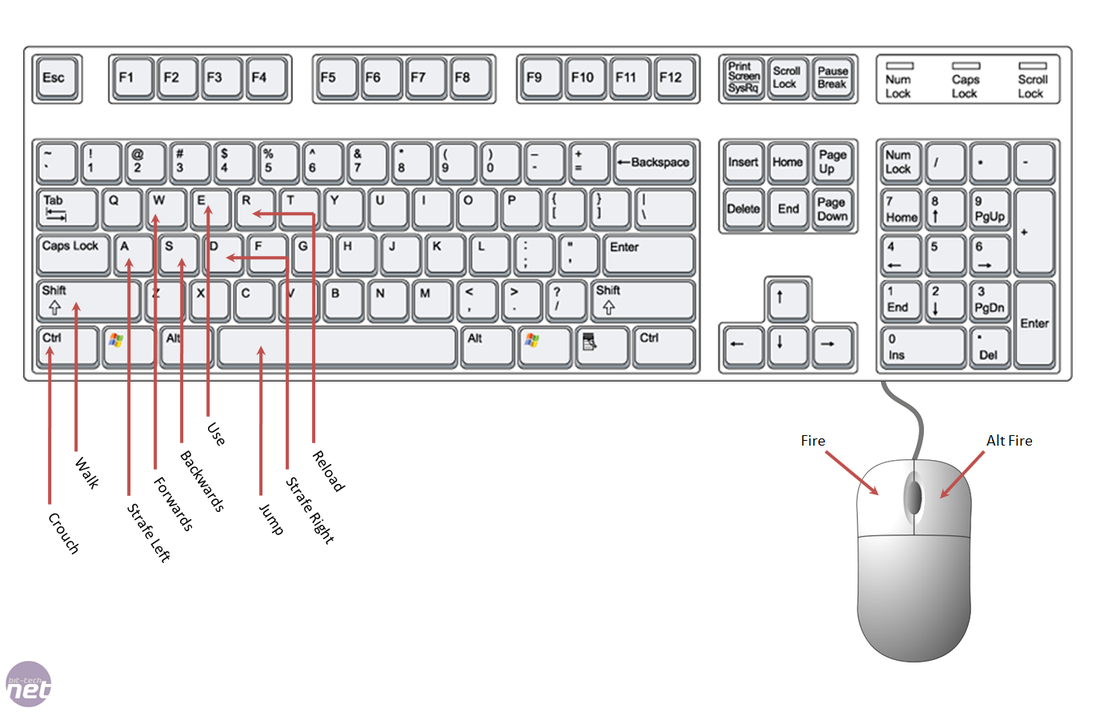
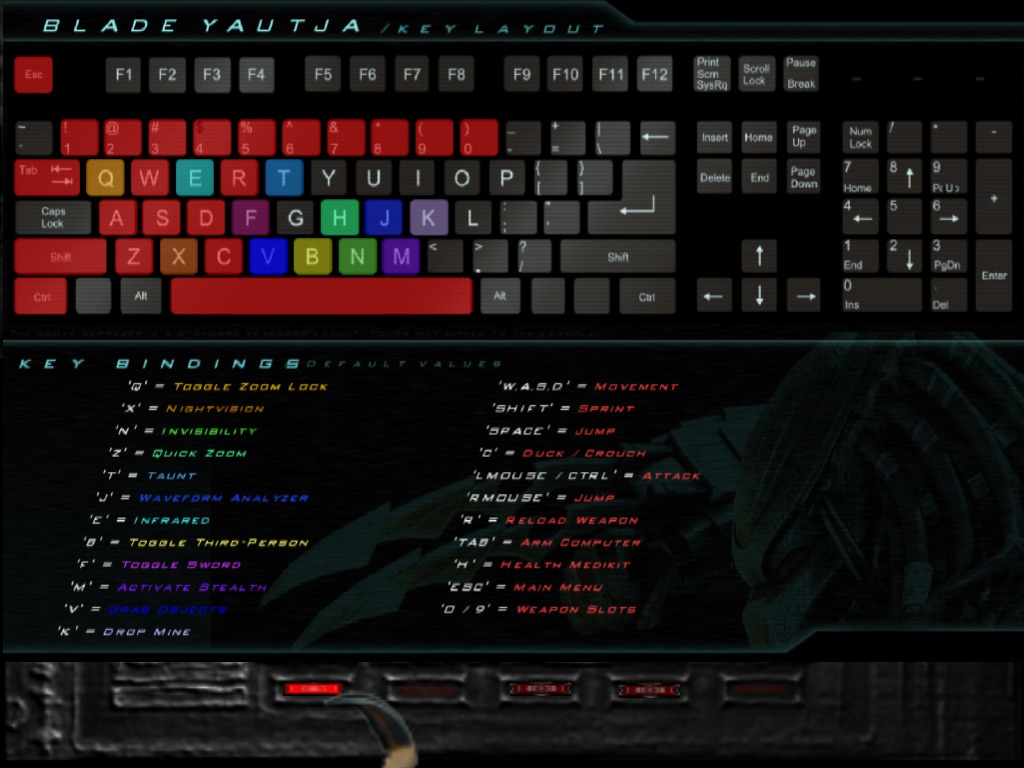
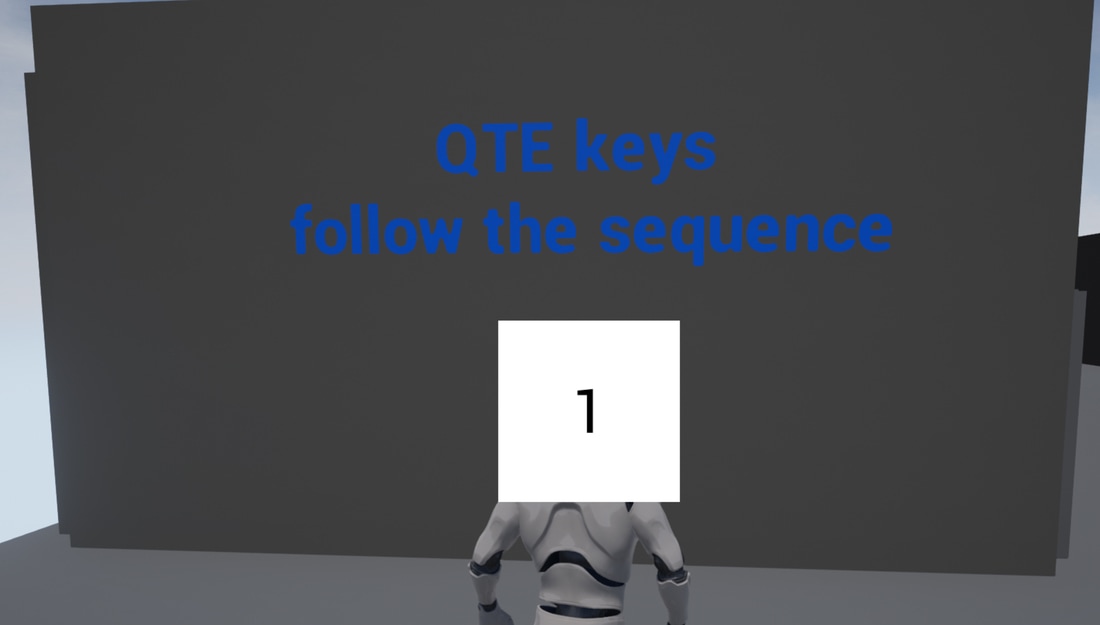
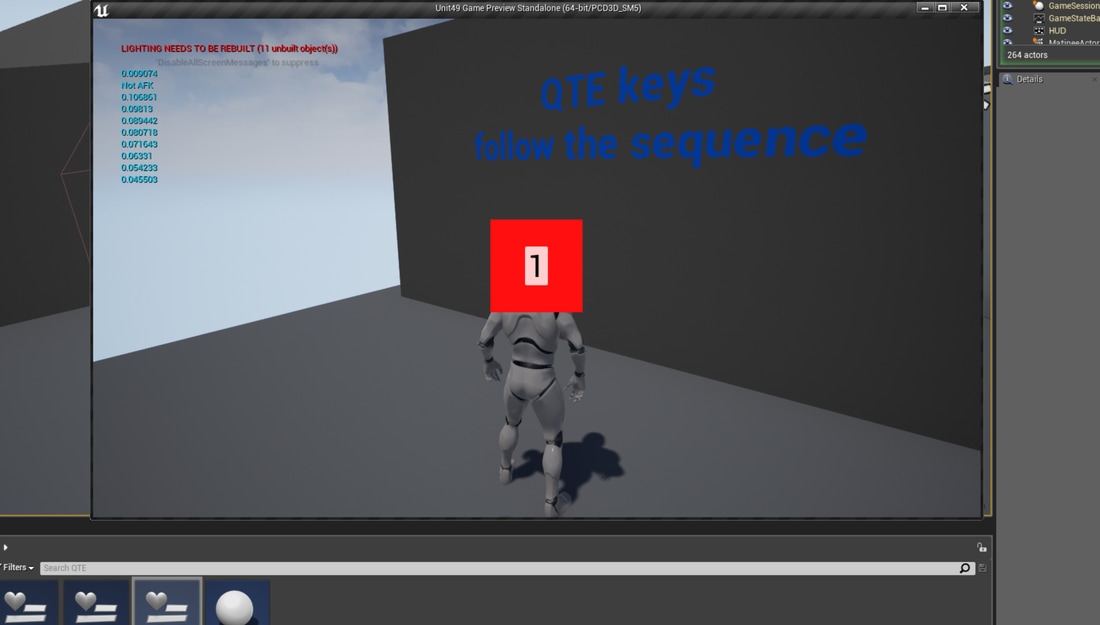
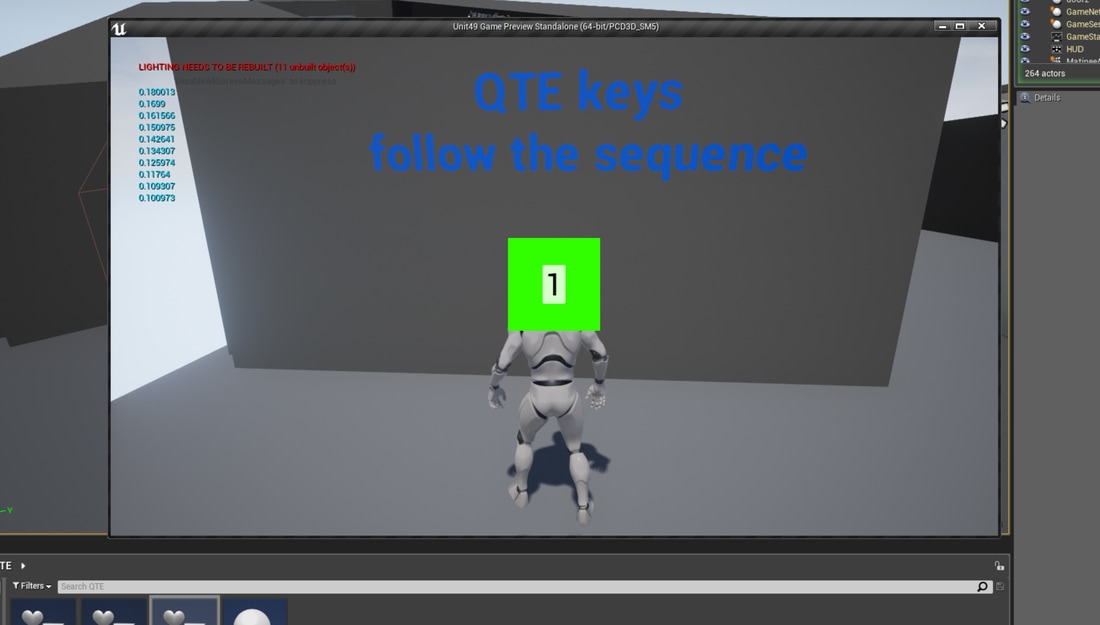
For the game I am planning for unit 75 I need to decide how my character will move, look and interact with the game. I have to come up with a system than having a limited number of controls so it is easy to config for other controllers other than the mouse and keyboard. I have decided I need controls for the following categories, Movement, actions, Weapon, camera and GUI Movement: Forward Backwards Right Left Actions: Jump Crouch Interactions Weapons: Weapon - Primary fire Weapon - Secondary fire Weapon Draw / sheath Weapon Change Reload Camera: Camera toggle for first person perspective and third person perspective Camera toggle to change shoulder view Look turn GUI: pause menu I did research on popular first person shoots and third person shooters at how the game uses the keys and what keys are popular for the keyboard. I looked at Doom 2016 and Counterstrike, both of them popular first person style shooters. I noticed straight away when doing the research that they use similar keys for some of the actions such as, movement used the W, A, S and D key to move forwards, backwards and left and right. E was used as an interaction/use, R was reloaded, Jump was space-bar, C was crouched and the mouse buttons where primary and secondary attack From doing the research I have decided to keep these buttons identical as it will be easier for users to adapt to the game and get used to game play quicker. In the image below is the keyboard and mouse controls I have decided to give to my game, I have highlighted the keys to the corresponding control action. I did not include the look and turn control in this diagram as it will be bound to the mouse axis 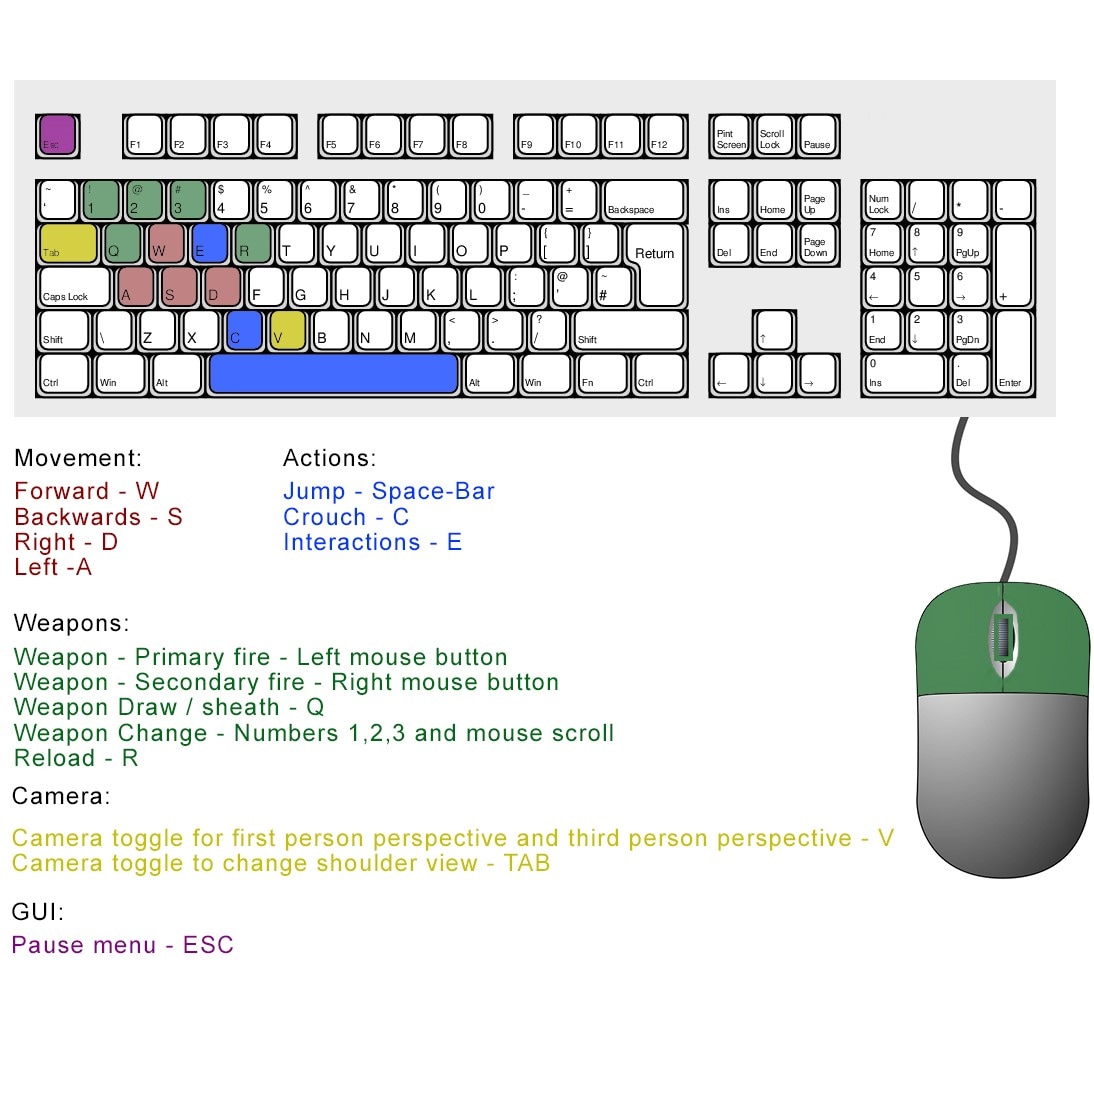 After I figured out what keys I wanted to use for the game in unit 75, I added the names in the action mapping section by pressing the + button. Unreal engine came with some action and axis maps already mapped so I did not need to set up any keys for movement, jump and the camera movement for everything else I added an action map. 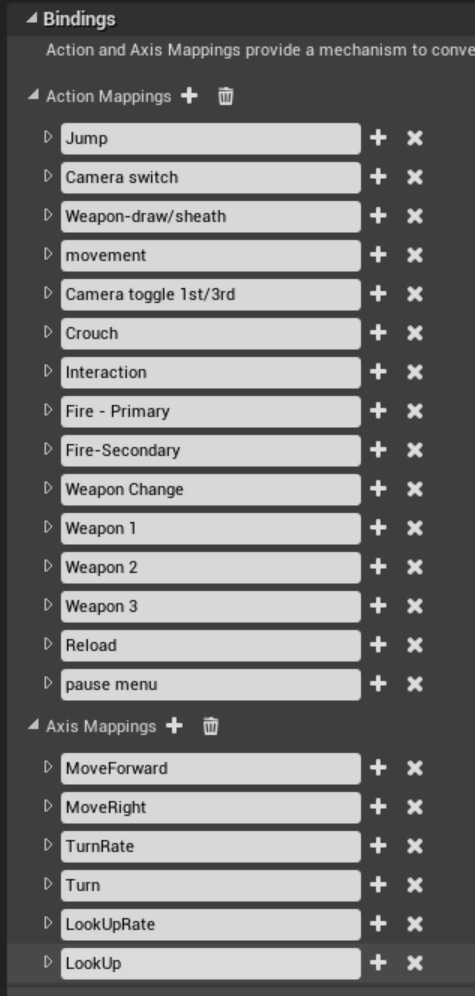 I added the keys to the maps that were empty as shown in the picture below 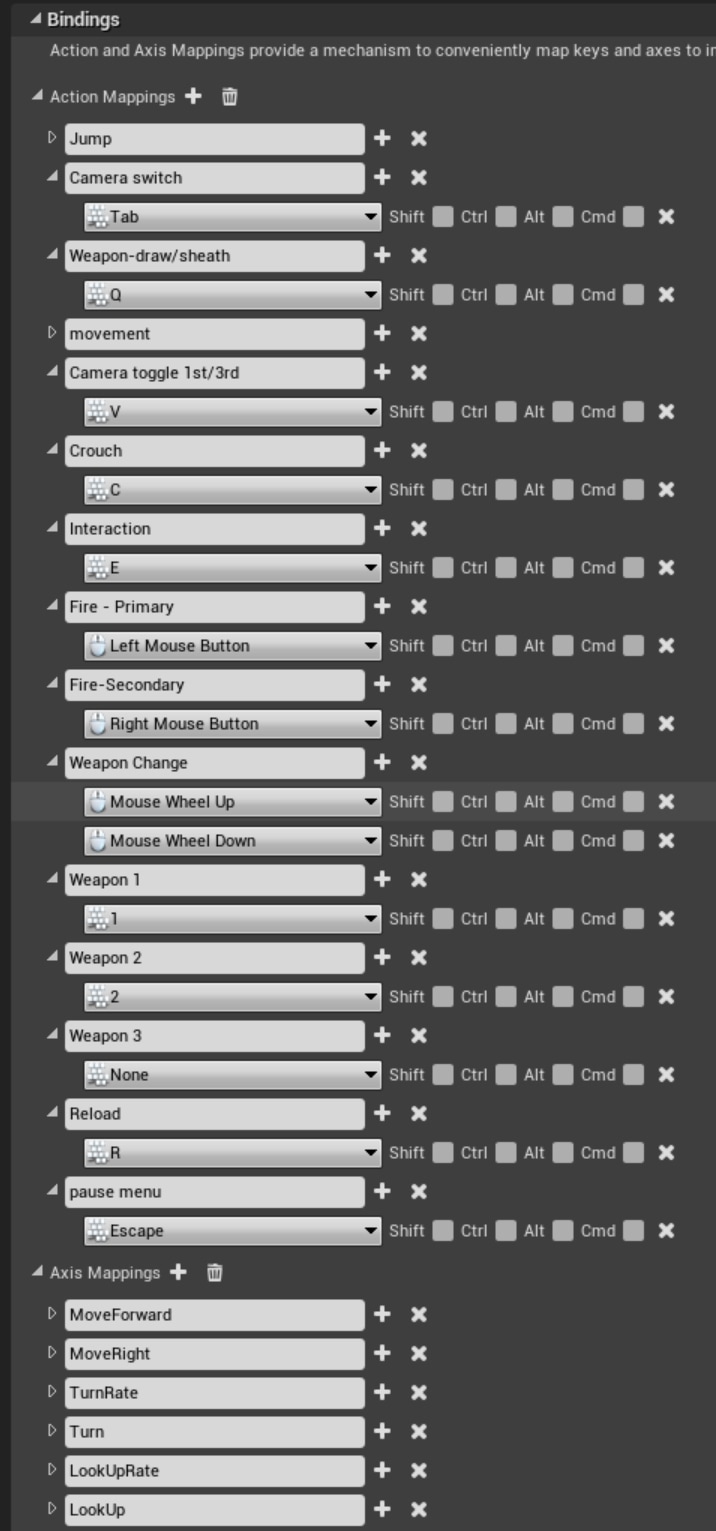 I can now use the actions in the blueprints. I can search for the node in the blueprints and add it to that blueprint 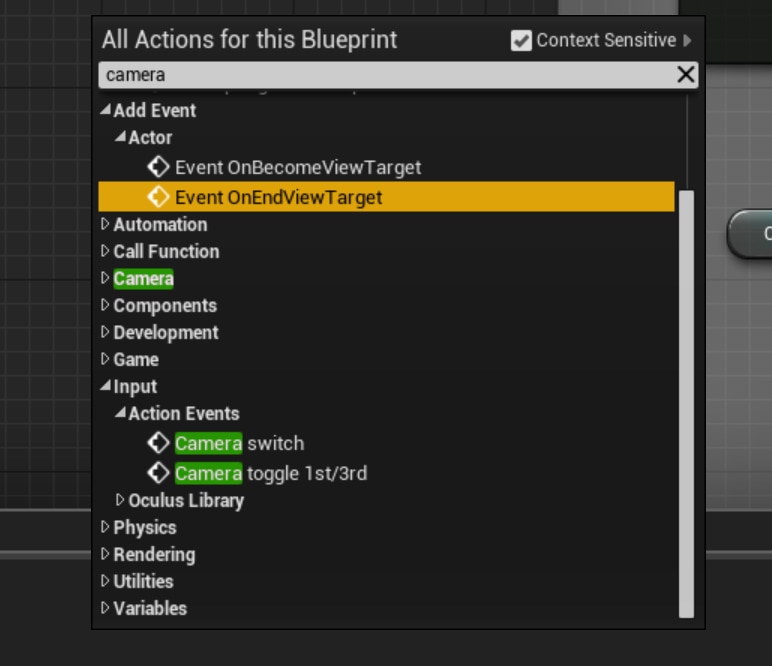 Then I select which action event, I want and I can tell what the button to do like with my camera system changing between first and third person camera 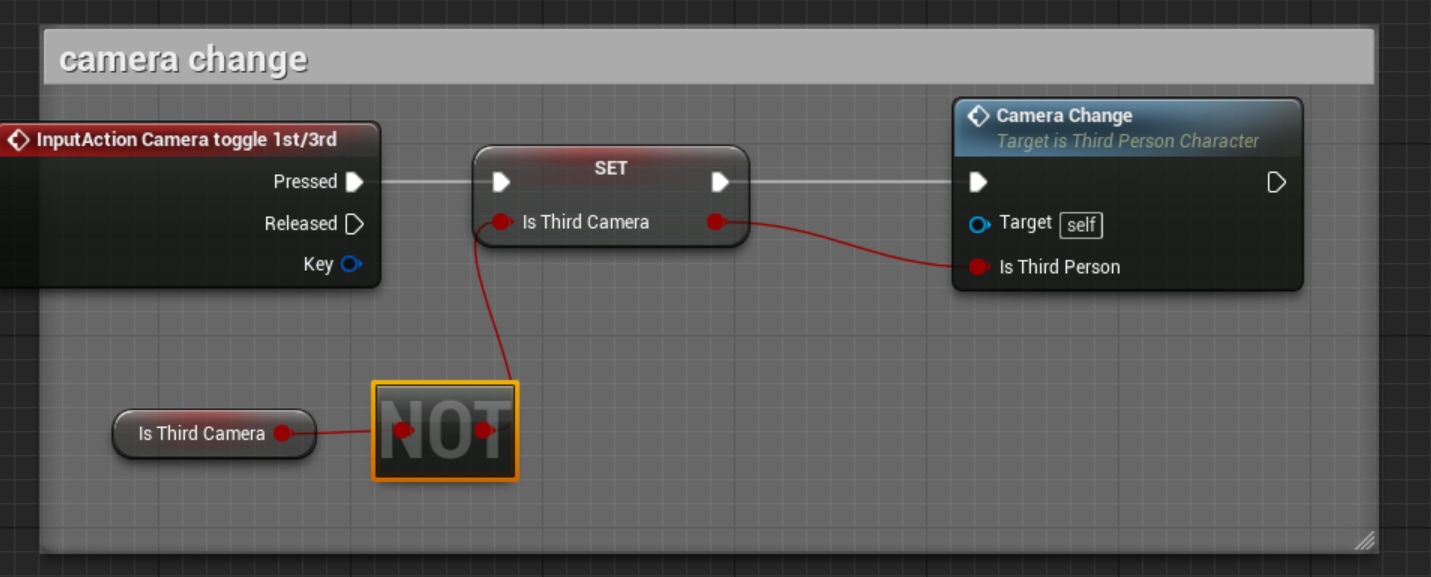 Conclusion Using the action inputs is very handy for creating my game as if I decided to change a key mapping later on in the game development I don't have to go though all my code changing the button, all I would have to do is go to the input settings and changing the key for that input and it will change all the blueprints bound to that input action to use that key. It is also handy for adding other controllers to the actions for when want to convert my game to work on other platforms such as Playstion 4 or Xbox one, possibly going into VR controllers and the new switch controllers. I can simpler, just added these to each input and it will use those buttons on those controllers to do the function its told to do. Adding function to the keys some of their keys in unreal engine are already set up by default and I have added the camera function to some keys from the previous task. I wanted to add a couple more of the key actions to the game, although I don't have any animations or weapon systems set up I get get the basic input set up. Crouch I started to crouch, I went to the character blueprints and selected character movement in the component window. Once the details were loaded up on the right hand side, I scrolled down to Nov movement and check the can crouch button. 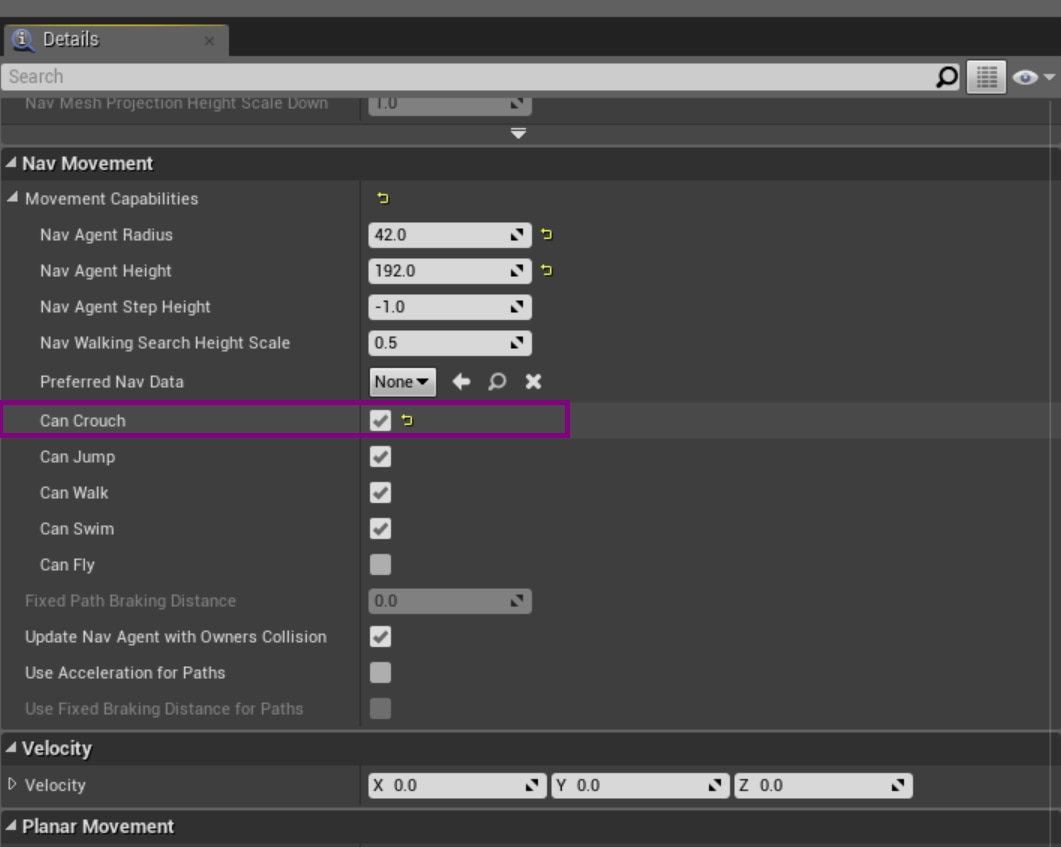 Then in the event graph i added a flipflop to the input crouch key so the player will crouch. As you can see in the video the camera moves down when the button is pressed and up when unpressed. There is no animation for visual the character is crouching as of yet and will be added at a later date. The Collison box for the character compressed and has the ability to move through smaller gaps in the wall Weapon fire After I set up the crouch I wanted to make a basic aim and fire function for the weapon that will use the mouse. I created a blueprint and added a collision box within and enabled player controller when entered. After this I added the mouse buttons and coasted to the third person that uses the arrow component to to spawn the line trace from with an offset. I connected the line trace to a meter and sound and when the line traces hits a cube it destroys the cube. This gives the basic weapon firing system. Interactions I want to add different types of interactions in my level. I have made them in the previous unit 18, and I used something similar to that by using a button with a trigger box to open a door via a matinee. I class the tutor gave us a small task to figure out how to slow down time when using movement keys and then speed back up when the key is reused. I went in a slightly different route by using a trigger box and when the player presses E it slows down time around then. I added a sphere to all show it isn't the player slowing down, but time itself and if the sphere is moving when activated it slows down as well. I could implement this into my game next year. I was thinking about adding it to the teleportion system so it seems like it slows down a little and on exit it speeds back up again. Also, I could add it as an effect if the player gets disseminated by e.g a grenade I could use this effect to change the gameplay style for a small duration. AFK Camera In lesson today we were shown how making a camera change to a rotating camera when there has been no key input for more than 3 seconds. The camera is based on register input from the keyboard and mouse, if there is no input a timer will start and once the timer hits the limit it changes to a new camera till the player's inputs in the game again. We started off by adding movement keys to the input key actions, these keys are the ones the player would use the most during game play. Then in the character blueprints we made an alternative tick using event timers and then used balloons and floats to determine if there is any key inputs. then we added a new camera and sprint arm and connected it to a cube, but removed the static mesh and then added a timeline with a ratator to make the camera spin and active and detective camera when there is an input or no input. Basic quick time events In todays lesson we were given the task of creating quick time events. These are events that display on the screen and the play has to copy the message on the screen. popularly used in music games such as guitar hero, also popular with dance arcade games as well. We started off by adding event dispatchers with the balance in the character blueprints and then created a new widget. in the widget I used a size box, background colour and text. I made the background and text an variable so they could be changed. Running off and event tick I used to player controller to see if a key had been pressed then another one to see what key had been pressed. from there I cast for the third person and called the event dispatchers. after this I set the background colour and copied the code to do the same if the player pressed the wrong key. After this i created another blueprint actor and placed a trigger box in it, when the player walks over it brings up the widget which looks for key input. then tested it out After getting it to work I looked how I could improve it, the task we followed used a custom event to change the colours, time and keys I looked at casting from the widget to see if I could get more control over the customization of the quick time events. I cast from the widget and set all variables and nodes I wanted to customise. 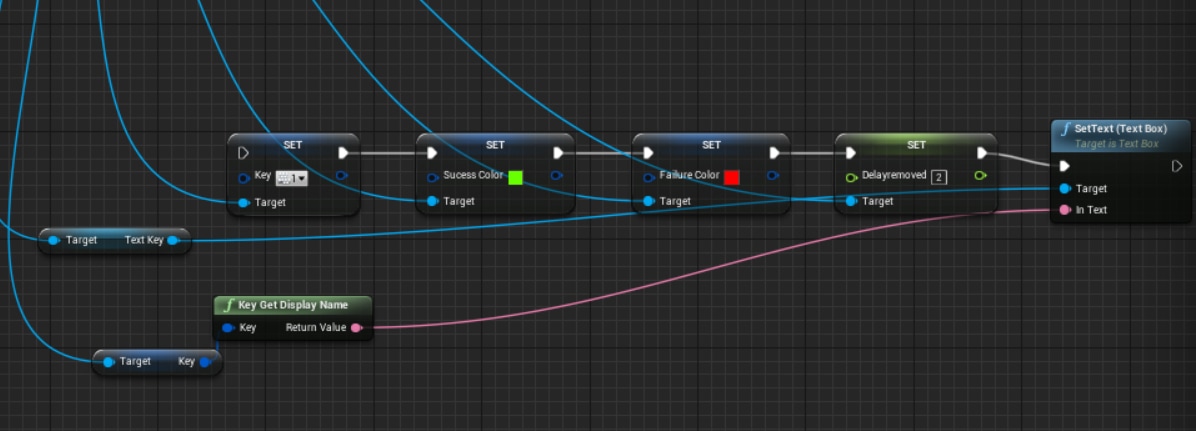 I could of added more to the set list like, font, size of the text. I could also look at adding sound particle emitter and being able to change the what is played to completion. But i decided it looked messy compared to the one we made in class and it was easier to use. After that I looked at how I could improve the quick time events them selves so I made a chain of three numbers for the player to press, freezing movement so it doesn't effect the game and adding sound and particles on completion. I got the sequence of quick time events to work, but it is still very buggy. I could improve this sequence by using plans to check if all 3 numbers were correct as at the moment it will just play keep playing the sequence if the wrong number is pressed. Adding a controller After creating my level I wanted to adapt my game to be used with other controllers I mapped out the layout of the controls I wanted to use like I did with the pc 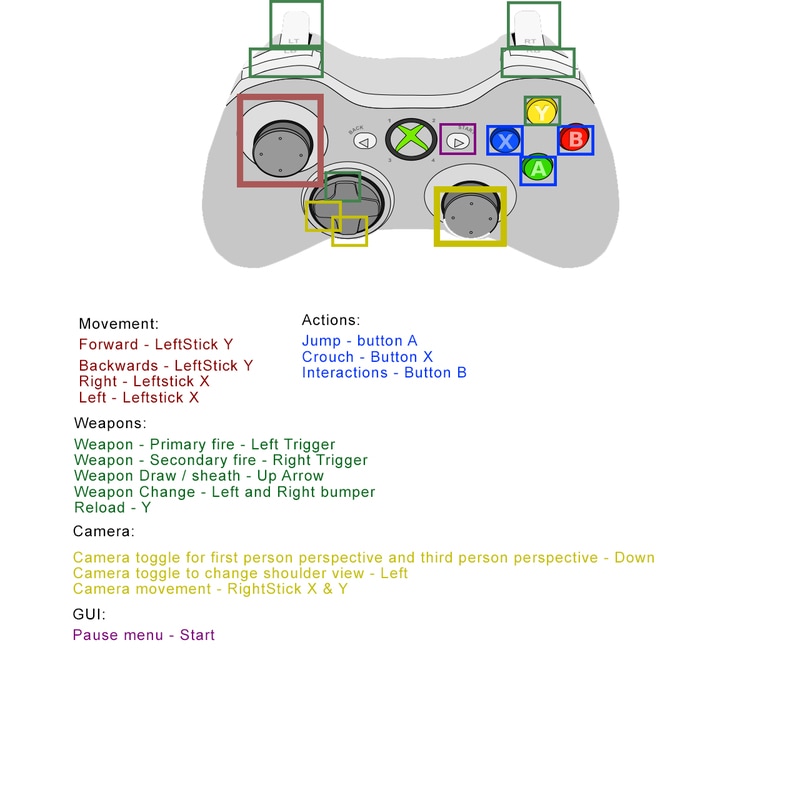 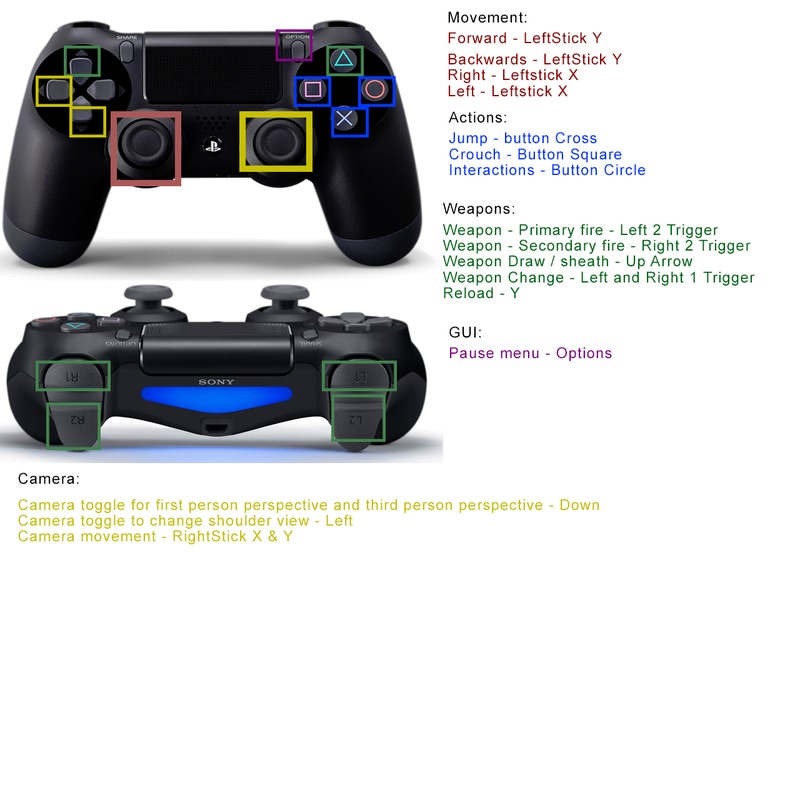 Then like with the keyboard i added the buttons to the input actions in the project settings 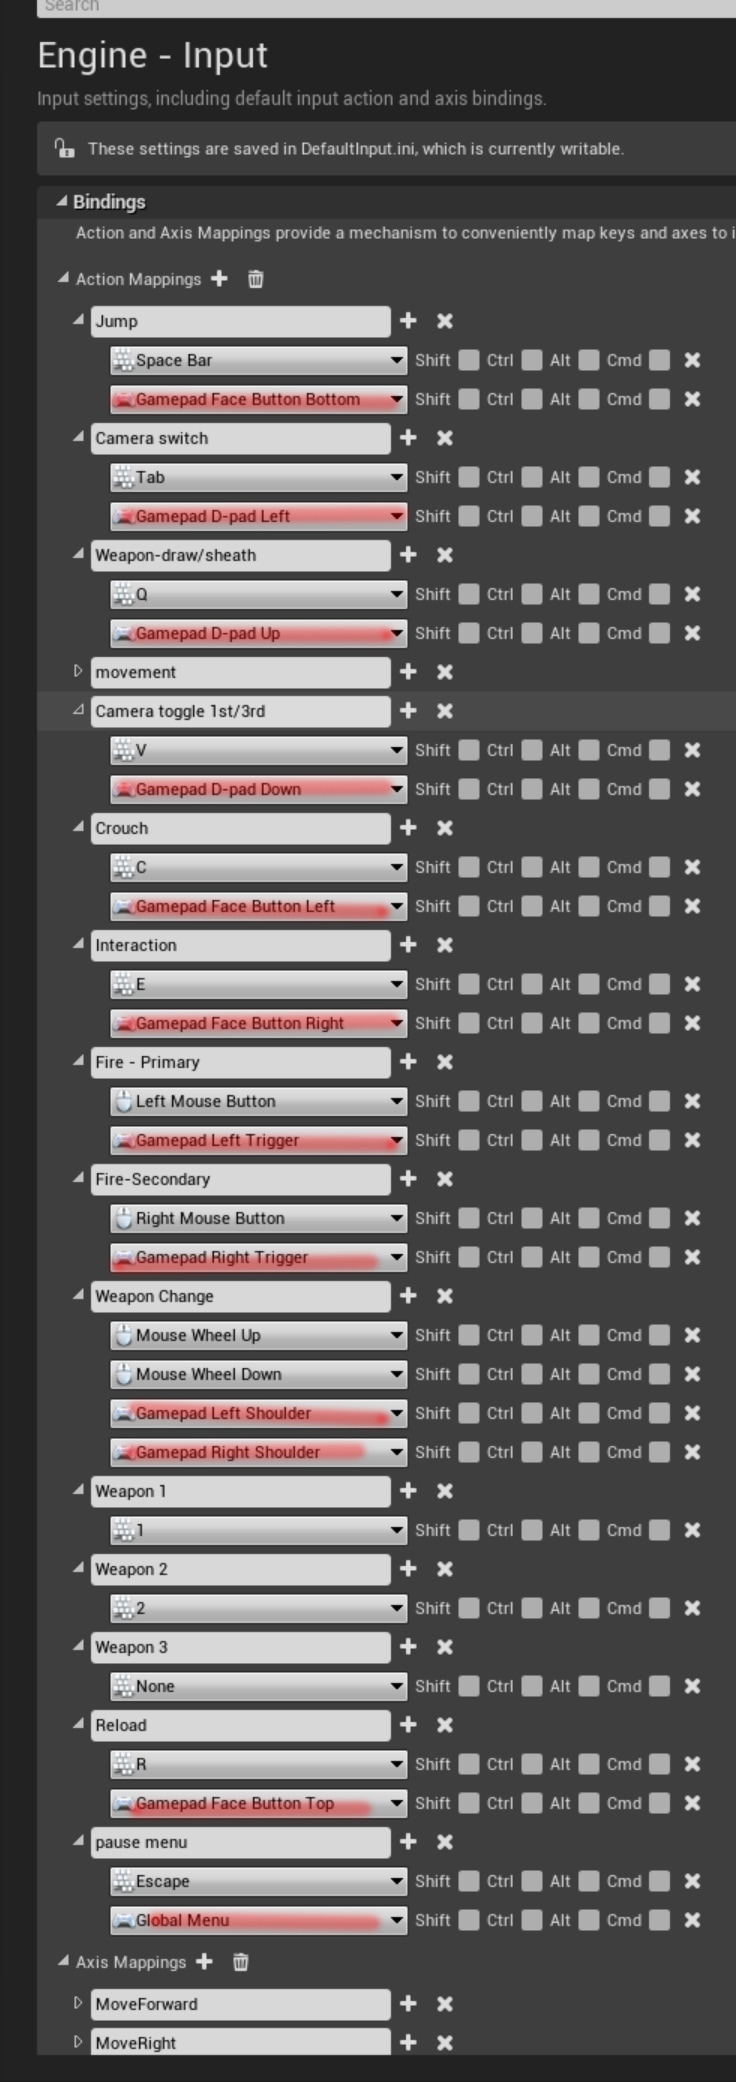 I decided to test if the keys worked by plugging in an xbox controller After this I added vibrations to the controller when the player shoots or goes thought the portal 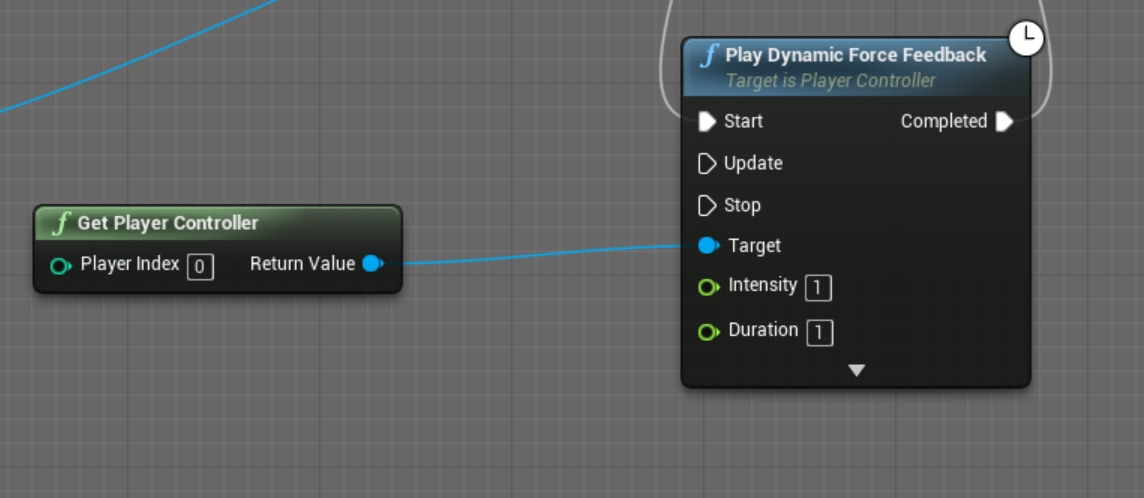 |
AuthorWrite something about yourself. No need to be fancy, just an overview. Archives
May 2017
Categories
All
|
 RSS Feed
